
The error code 0x8007041D can happen in varied situations, for example, it can be a Windows update error or a Windows Defender error and you need to check which one you are facing. This post on MiniTool Website will deliver a series of methods to fix the Windows update error 0x8007041D; please keep reading.
Windows Update Error 0x8007041D
This error code 0x8007041D can happen when you install a Windows update. It can stop you from further steps and may lead to some other severe issues. So, why does the 0x8007041D error happen?
Before we start the troubleshooting, we need to figure out the hidden reasons causing the 0x8007041D error.
- Incorrectly configured system settings.
- System file corruptions.
- Background app interference
- Virus or malware infiltration
Related articles:
- How to Fix Windows Update Error Encountered on Windows 11/10?
- How to Fix Windows 11/10 Updates Failed Error in Windows Update?
Troubleshooting Windows Update Error 0x8007041D
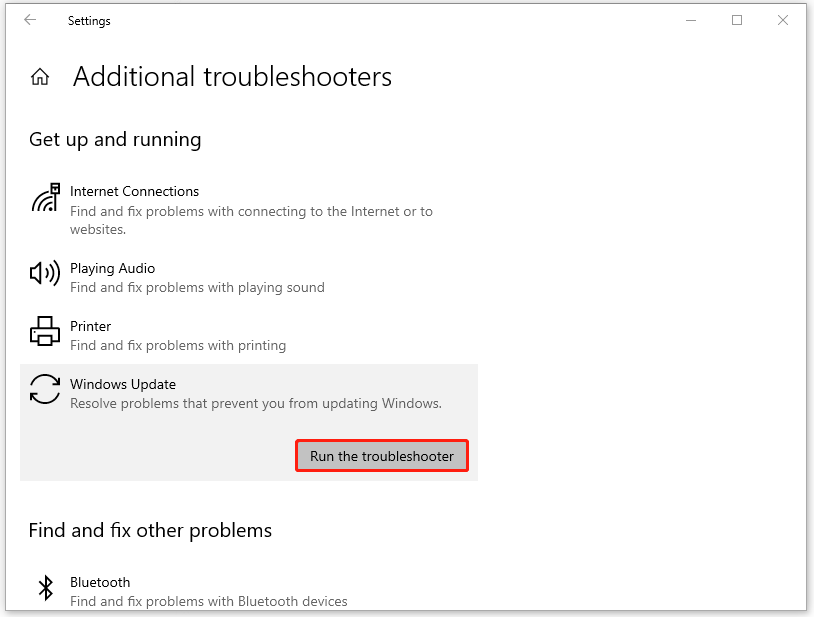
Method 1: Run the Windows Update Troubleshooter
Windows Update troubleshooter is useful to identify and repair the bugs that prevent the Windows update. You can follow the next steps to run the troubleshooter to fix 0x8007041D.
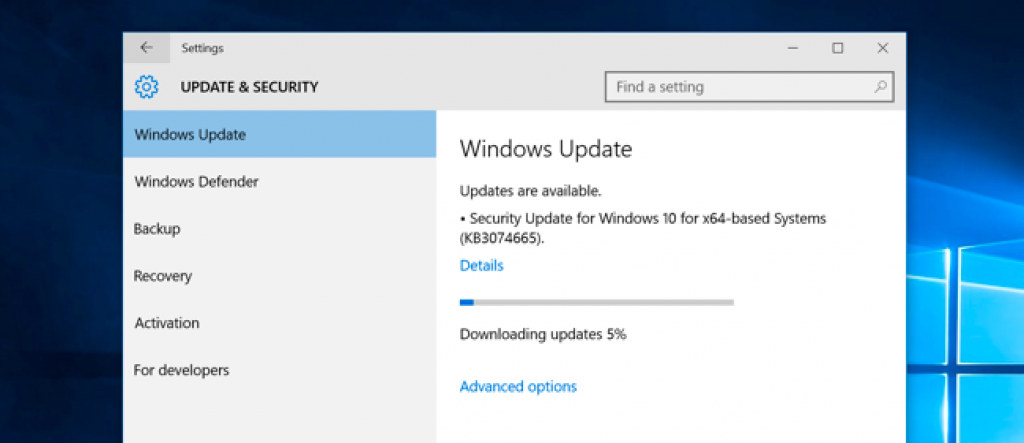
Step 1: Right-click on the Start icon to choose Settings and go to Update & Security > Troubleshoot.
Step 2: Click Additional troubleshooters from the right panel and click Windows Update under Get up and running to choose Run the troubleshooter.
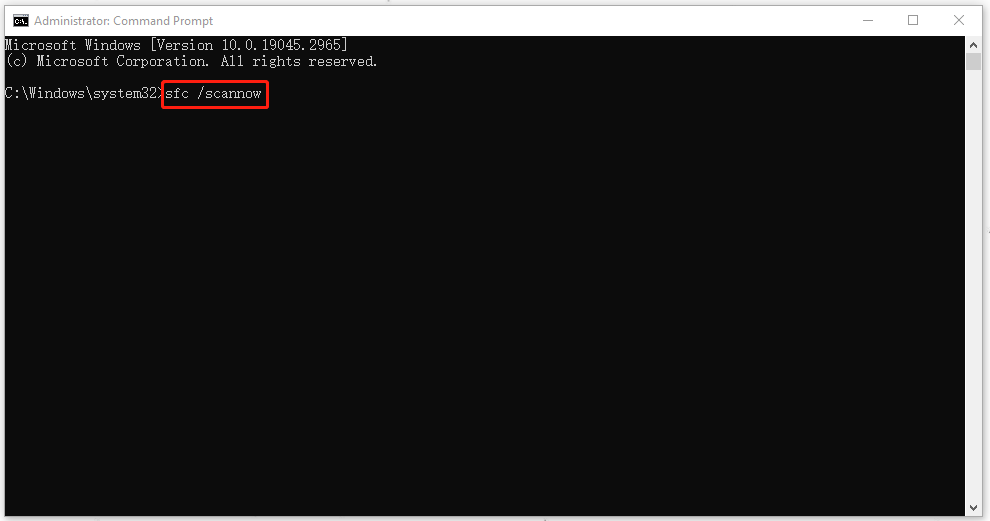
Method 2: Run a SFC Scan
To fix system file corruptions, you can try a System File Checker (SFC) scan that can scan and check for possible corruptions and repair those damaged files. After the scan, you can also apply a DISM scan to perform a further check.
Step 1: Open Search by pressing the Win + S keys and input Command Prompt to run it as an administrator.
Step 2: When the window comes up, please type this command – sfc /scannow and press Enter to execute it.
When the verification finishes, you can close the window and restart the computer. If you find the error persists, you can go on with the DISM scans. Here is the way.
Still, run Command Prompt as an administrator and input the following command and press Enter to execute it.
DISM.exe /Online /Cleanup-Image /Restorehealth
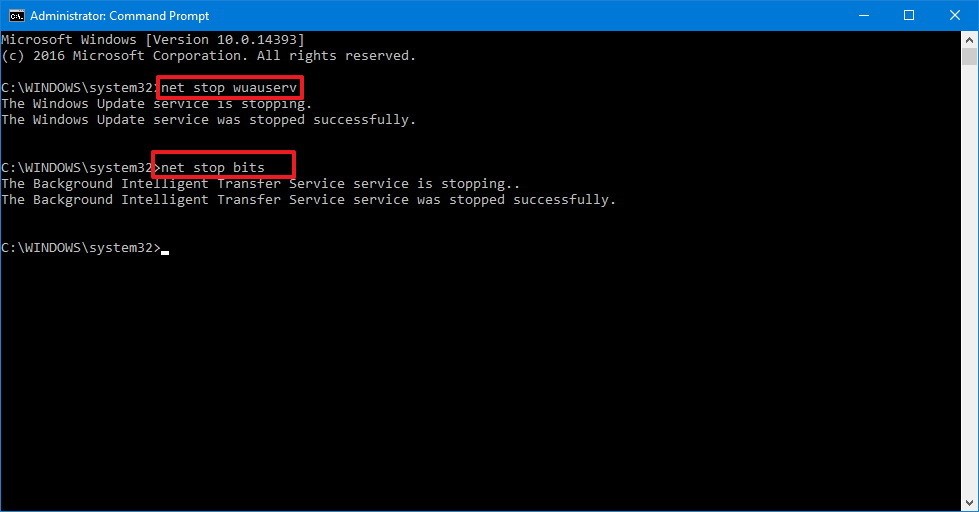
Method 3: Delete the Software Distribution Folder
The software distribution folder, designed for Windows Update, is used to temporarily store files needed to install new updates. You can delete the folder and then try to install the updates again to check if the error 0x8007041D will occur.
Step 1: Run command Prompt as an administrator and execute the following commands one by one.
net stop wuauserv
net stop bits
Step 2: Open File Explorer and go to the C:\Windows\SoftwareDistribution folder. Then delete all the files and folders in it.

Step 3: After emptying that, you can restart your computer and run Command Prompt as an administrator to execute the following commands.
net start wuauserv
net start bits
Now, you can perform a Windows update again.
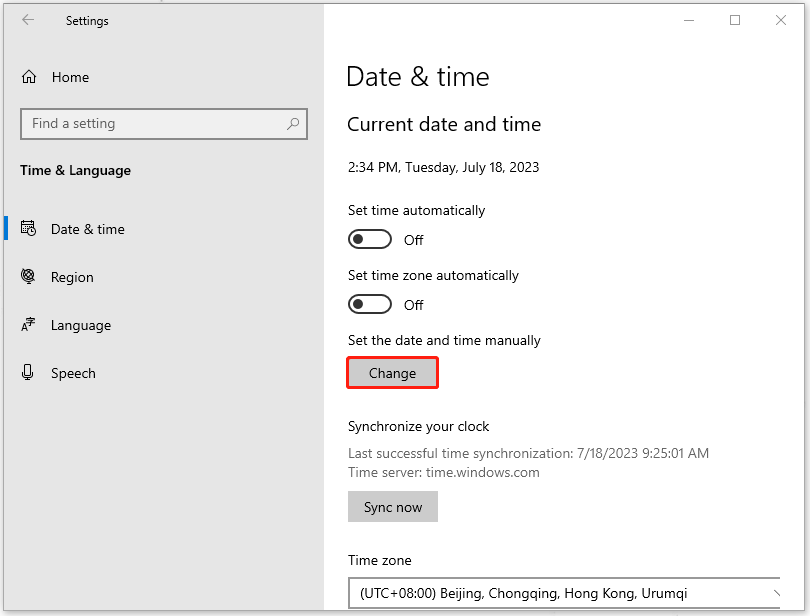
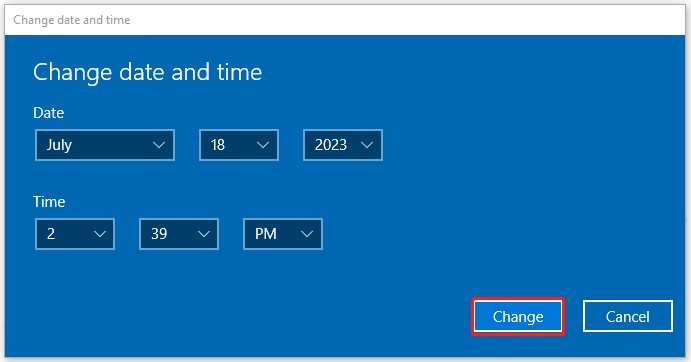
Method 4: Reset the Time and Date
You can try to fix 0x8007041D by resetting the time and date on your computer. Here are the specific steps.
Step 1: Open Settings by pressing Win + I and click Time & Language.
Step 2: In the Date & Time tab, choose Change under Set the date and time manually.
Step 3: Then please input the correct date and time, and click Change to save and initiate the changes.
Apart from the above methods, there are some other troubleshooting methods that have been proven useful for some inflicted users:
- Disable background apps running in the background.
- Perform a virus scan for your system.
- Run your system into Safe Mode to check if the error happens.
Recommendation: Back Up Your Data Regularly
During the Windows update, all of your data will be transferred and a sudden malfunction may make that data loss. This occasion happens to many Windows users and they also complained about this condition in the Microsoft forum.
So, how to avoid this condition? After you have successfully removed the error, we would like to recommend MiniTool ShadowMaker for your regular backup.
It is a free backup software that you can back up your systems, files, folders, partitions, and disks. You can use it to perform scheduled backup and backup schemes.
This backup program can help you avoid losing your data when the error 0x8007041D occurs. To download and install the program, you can click this button and you are allowed to enjoy it for 30 days for free.
MiniTool ShadowMaker TrialClick to Download100%Clean & Safe
Step 1: Launch the program and click Keep Trial to get into the interface.
Step 2: In the Backup tab, choose your backup source and destination. In it, you have multiple choices and choose what you need.
Step 3: After everything has been settled, you can click Back Up Now or Back Up Later to perform the task. The delayed task will be displayed on the Manage tab.
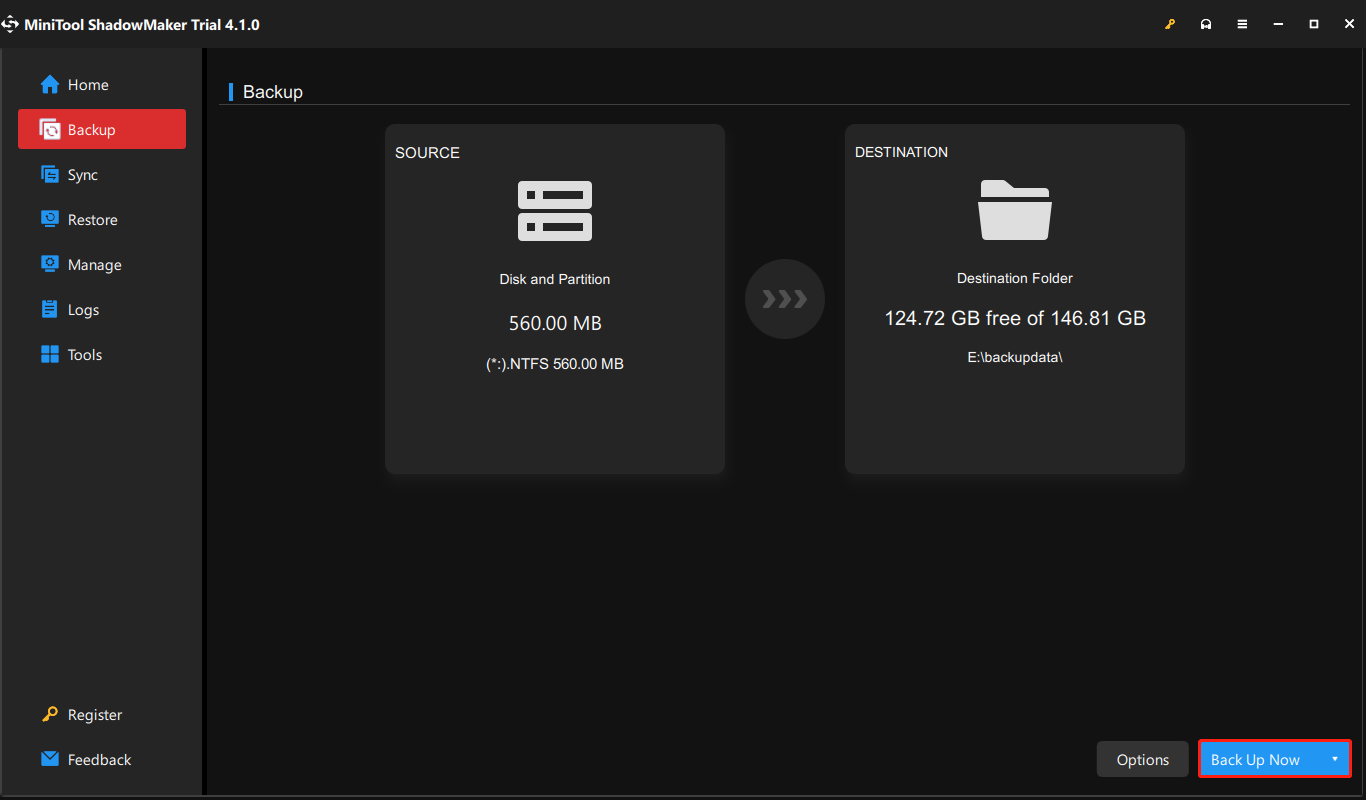
Then, if you want to configure some backup settings, you can click the Options feature. You can configure your image creation mode, file size, etc., and apply password protection.
This article has introduced some methods to get rid of the error code 0x8007041D. If you like it or think it is useful, welcome to share it on Twitter.Click to Tweet
Bottom Line:
How to fix the error code 0x8007041D? Now, this article has told you the answer. Besides, to better protect your data during the process, we highly recommend you should back up your data regularly.
If you have encountered any issues when using MiniTool software, you can leave a message in the following comment zone and we will reply as soon as possible. If you need any help when using MiniTool software, you may contact us via [email protected].
Уведомление с кодом ошибки 0x8007041d возникает при обновлении ОС. Причина — в Windows Update некорректны настройки либо скачанные апдейты повреждены.
Способы решения ошибки 0x8007041d
Решается сбой следующими способами:
- Убедитесь, что сервис Software Protection включен. Жмем комбинацию Win+R, вводим запрос services, запускаем компонент «Сервисы». В его окне найдите строку, где указано Software Protection. Клацните на нее дважды — в поле «Тип запуска» должно стоять «Автоматически» и сам сервис должен быть включен.
- Используйте стандартную утилиту для решения сбоя. Для этого переходите на эту страничку, правильно указываете вашу версию Виндовс и качаете файл. Запускаете и он автоматически начнет искать неисправности Центра обновлений.
- Сбрасывайте настройки. Запускаете под правами администратора Командную строку и вводите следующие команды, не забывая подтверждать их нажатием на Enter:
- taskkill /f /fi «SERVICES eq wuauserv»multiple times
- net stop cryptSvc
- net stop bits
- net stop msiserver
- ren C:\Windows\SoftwareDistribution SoftwareDistribution.old
- rmdir C:\Windows\SoftwareDistribution\DataStore
- rmdir C:\Windows\SoftwareDistribution\Download
Еще стоит создать в Блокноте документ, куда копируете следующее:
- Windows Registry Editor Version 5.00
- [HKEY_LOCAL_MACHINE\SYSTEM\CurrentControlSet\services\wuauserv\Parameters]
- «ServiceDll»=hex(2):43,00,3a,00,5c,00,57,00,49,00,4e,00,44,00,4f,00,57,00,53,\ 00,5c,00,73,00,79,00,73,00,74,00,65,00,6d,00,33,00,32,00,5c,00,77,00,75,00,\61,00,75,00,73,00,65,00,72,00,76,00,2e,00,64,00,6c,00,6c,00,00,00
Сохраните файл под названием update и расширением reg. Откройте его и подтвердите изменения. Далее — перегрузка системы, после чего ошибка 0x8007041d должна исчезнуть.
Updated May 2025: Stop error messages and fix your computer problem with this tool. Get it now at this link
- Download and install the software.
- It will scan your computer for problems.
- The tool will then fix the issues that were found.
Error code 0x8007041d indicates that “the service did not respond to the start or check request in a timely manner” during the Windows update process.
The malfunction can be caused by one of the following factors:
- Restricted access rights to Windows Update Services or
have not been configured correctly. - Domain policies or proxy settings block access to the application.
- Windows Update Service.
Open Windows Services Manager
To open the Windows Service Manager on a Windows 10 computer, follow these steps:
- Right-click the Start button to open the WinX menu.
- Select Run
- In the Run window that opens, enter services.msc.
- Windows Service Manager will open.
This is where you can start, stop, disable and suspend Windows services.
Let’s see how to do this in more detail.
Right-click the Start button to open the WinX menu. Select Run. This opens the Run window. Now type services.msc and press Enter to open Service Manager.
Here, in the “Name” column, you can see a list of services running on your system and their descriptions. You can also view their status – started or stopped – and startup types.
Run SFC scannow in Windows 10
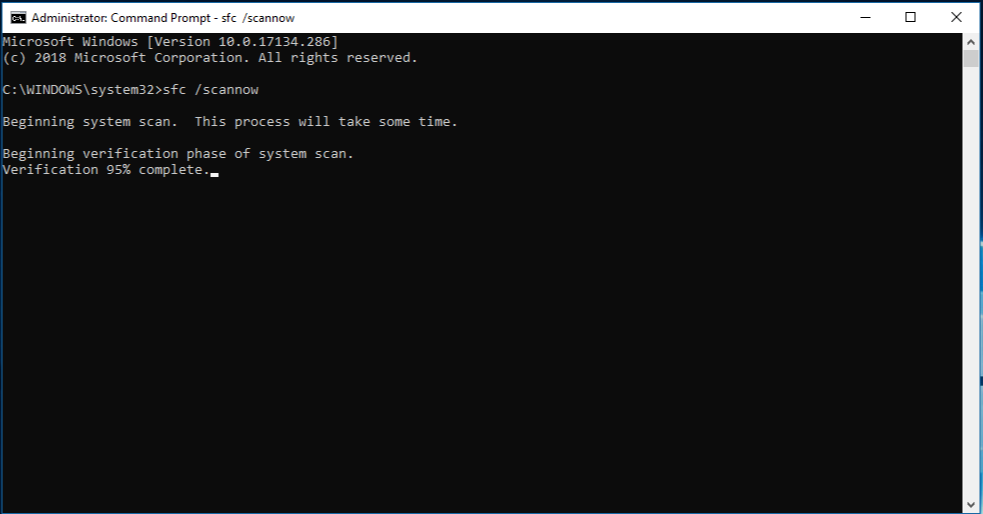
SFC is a DOS command that is mainly used in conjunction with the SCANNOW switch separated by a /. SFC / SCANNOW is used to detect corrupted or missing files in Windows 10 and automatically repair them.
Updated: May 2025
We highly recommend that you use this tool for your error. Furthermore, this tool detects and removes common computer errors, protects you from loss of files, malware, and hardware failures, and optimizes your device for maximum performance. This software will help you fix your PC problems and prevent others from happening again:
- Step 1 : Install PC Repair & Optimizer Tool (Windows 11, 10, 8, 7, XP, Vista).
- Step 2 : Click Start Scan to find out what issues are causing PC problems.
- Step 3 : Click on Repair All to correct all issues.
To use the SFC command on Windows, an elevated Command Prompt must be open. If your Windows 10 PC won’t boot and you want to run a command from the outside, you need to boot your PC from Windows 10 bootable media and open a command prompt from there.
You can use the SFC / SCANNOW command to scan your Windows 10 computer for errors and fix them automatically as follows:
- Turn on your Windows 10 computer and log in with an administrator account.
- When the desktop screen appears, right-click the Start button.
- From the context menu, select Command Prompt (Admin).
- In the User Account Control confirmation box, click Yes to confirm your action.
- Wait for the Admin Command Line UI to open.
- In the Admin: Command Prompt window, type SFC / SCANNOW and press Enter.
- In the command window, enter SFC / SCANNOW and press Enter.
- Wait until Windows 10 has successfully scanned for missing or corrupted files and the problems are automatically resolved.
- When you’re done, close the command window and click Next on the Select an option window.
- Wait for Windows 10 to start normally before using it.
Check the related Windows Update services.
- Click “Start”, “Run” and type “services.msc” (without quotes) in the file.
- Open the window and click OK.
- Double click Automatic Updates.
- Click the “Connection” tab and make sure the “Local System Account” checkbox is selected.
- and the option “Allow the service to interact with the desktop”
- not verified.
- Make sure this service is enabled in the specified hardware profile. if you are
- If not, click the “Activate” button to activate it.
- Click the General tab. Make sure Startup Type is set to Automatic.
- or “Manually”. Then click the Stop button in the Service Status section to
- Stop the service.
- Then click the Start button in the Service Status section to launch the program.
- Service.
- Repeat the steps above with two additional services:
- Intelligent transfer service in the background
- Remote Procedure Call (RPC)
RECOMMENATION: Click here for help with Windows errors.
The Windows update download Error 0x8007041D commonly arises from stopped Windows Update services and interference from third-party antivirus software. While these are the leading causes, other factors, such as corruption in the Windows update file folders or incorrect date and time settings, can also trigger this error.

If you are encountering this issue, this article discusses the methods that can help you resolve the error message.
Before you jump to the methods, make sure the date and time of your system are set correctly. Also, check your internet speed, as it is a download error that can be caused by a weak internet connection.
1. Run the Windows Update Troubleshooter
The Windows Update Troubleshooter automatically detects problems and attempts to repair them. It is the easiest way to fix a Windows update error, as it performs common troubleshooting steps that might resolve the issue.
- Press the Win + I keys simultaneously to open the settings.
- Go to System from the left and scroll down to the Troubleshoot option.

- Click Other troubleshooters. Then, run the Windows Update Troubleshooter.

- Follow the on-screen instructions to run the Windows Update Troubleshooter. Once done, check if the issue is fixed.


2. Reset the Windows Update Component
Resetting the Windows Update component involves several steps. First, it stops the Windows Update services. Next, it clears the SoftwareDistribution and Catroot folders, which are responsible for storing Windows update files. Then, it fixes any registry issues related to the Windows update component.
Finally, it restarts the Windows Update services. This process can resolve Windows update errors caused by corruption or stopped services.
- Download the Windows update reset component bat file from the link.

- Once the bat file is downloaded, right-click on it and select Run as administrator.
- Once all the commands have been executed, the error should be resolved.

3. Disable the Third-Party Antivirus Software
Another factor that causes Windows update errors is interference from third-party antivirus software. If you use third-party antivirus software on your PC, please note that sometimes, antivirus software interferes with critical Windows processes and blocks them, resulting in several error messages. In this case, you should try disabling it temporarily to see if the problem persists.
- Right-click the Antivirus Icon from the system tray and hover over the option related to Manage.
- Select Disable permanently or Disable for 30 minutes.

- Check the Windows Update Download Error 0x8007041D. If it persists, move on to the next method.

Note: Ensure to enable the antivirus again if it’s not causing the issue.
4. Manually Download the Windows Update
If everything mentioned above fails to resolve the error message, you can try downloading the update manually. This is especially helpful when the Windows update utility fails to update Windows. Follow these steps to download the Windows update manually.
- Visit the Microsoft Catalog website and search for the update that the Windows update utility keeps failing to download.
- Click the Download button associated with the update according to your Windows version.

- Once done, double-click the update file to start the installation process.
- After installation, ensure your Windows is updated by restarting the system.

Hamza Mohammad Anwar
Hamza Mohammad Anwar is an intermediate JavaScript web developer with a focus on developing high-performance applications using MERN technologies. His skill set includes expertise in ReactJS, MongoDB, Express NodeJS, and other related technologies. Hamza is also a Google IT Certified professional, which highlights his competence in IT support. As an avid problem-solver, he recreates errors on his computer to troubleshoot and find solutions to various technical issues.
Fix: Windows 10 Update Error Code 0x8007041d
Introduction
Windows 10 is a popular operating system used by millions of people worldwide. However, like any other software, it is prone to errors and bugs. One common error that users may encounter when trying to update Windows 10 is error code 0x8007041d. This error code can be frustrating and prevent users from installing important updates on their system.
In this article, we will discuss what causes the Windows 10 update error code 0x8007041d, how to troubleshoot and fix it, and some preventive measures to avoid encountering this error in the future.
What is Windows 10 Update Error Code 0x8007041d?
Error code 0x8007041d is an error that occurs when trying to install Windows updates on your system. This error can occur for a variety of reasons, including corrupted system files, network issues, or conflicts with third-party software.
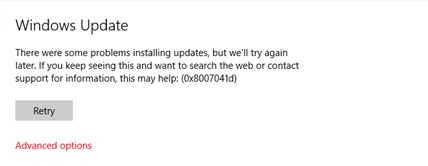
When you encounter this error, you may see a message like «There were some problems installing updates, but we’ll try again later. If you keep seeing this and want to search the web or contact support for information, this may help (0x8007041d).» This error can prevent you from installing important updates that can improve the performance and security of your system.
Causes of Windows 10 Update Error Code 0x8007041d
There are several reasons why you may encounter error code 0x8007041d when trying to update Windows 10. Some of the common causes include:
-
Corrupted system files: If your system files are corrupted or damaged, it can cause issues with installing updates on your system.
-
Network issues: Problems with your internet connection or network settings can prevent Windows from downloading and installing updates.
-
Third-party software conflicts: Some third-party software installed on your system may conflict with the Windows update process, leading to error code 0x8007041d.
-
Outdated drivers: Outdated or incompatible drivers can cause errors when trying to update Windows 10.
-
Windows Update service issues: Problems with the Windows Update service itself can also cause error code 0x8007041d.
Now that we know some of the common causes of the Windows 10 update error code 0x8007041d, let’s discuss how to troubleshoot and fix this error.
Troubleshooting and Fixing Windows 10 Update Error Code 0x8007041d
There are several methods you can try to troubleshoot and fix error code 0x8007041d when updating Windows 10. Here are some of the most effective solutions:
Method 1: Run Windows Update Troubleshooter
The Windows Update Troubleshooter is a built-in tool in Windows 10 that can help diagnose and fix issues with Windows Update. To run the Windows Update Troubleshooter, follow these steps:
-
Press the Windows key + I to open the Settings app.
-
Go to Update & Security > Troubleshoot.
-
Click on Windows Update and then click on Run the troubleshooter.
-
Follow the on-screen instructions to complete the troubleshooting process.
After running the Windows Update Troubleshooter, check if the error code 0x8007041d has been resolved. If not, try the next method.
Method 2: Reset Windows Update Components
If the Windows Update Troubleshooter does not fix error code 0x8007041d, you can try resetting the Windows Update components. Here’s how to do it:
-
Press the Windows key + X and select Command Prompt (Admin) from the menu.
-
In the Command Prompt window, type the following commands and press Enter after each one:
net stop wuauserv
net stop cryptSvc
net stop bits
net stop msiserver
- Next, type the following commands to rename the SoftwareDistribution and Catroot2 folders:
ren C:WindowsSoftwareDistribution SoftwareDistribution.old
ren C:WindowsSystem32catroot2 Catroot2.old
- Finally, restart the Windows Update services by typing the following commands:
net start wuauserv
net start cryptSvc
net start bits
net start msiserver
After resetting the Windows Update components, try updating Windows 10 again to see if the error has been resolved.
Method 3: Check for System File Corruption
Corrupted system files can cause error code 0x8007041d when updating Windows 10. To check for and repair corrupted system files, you can use the System File Checker (SFC) tool. Here’s how to run the SFC tool:
-
Press the Windows key + X and select Command Prompt (Admin) from the menu.
-
In the Command Prompt window, type «sfc /scannow» and press Enter.
-
The SFC tool will scan your system for corrupted files and attempt to repair them.
-
Once the scan is complete, restart your computer and try updating Windows 10 again.
Method 4: Disable Third-Party Antivirus Software
Sometimes, third-party antivirus software can interfere with the Windows Update process, causing error code 0x8007041d. To rule out this possibility, try disabling your antivirus software temporarily and then check for updates.
If you are able to install updates without any issues after disabling the antivirus software, consider adding an exception for the Windows Update process in your antivirus settings to prevent future conflicts.
Method 5: Update Drivers
Outdated or incompatible drivers can cause errors when updating Windows 10. To update your drivers, follow these steps:
-
Press the Windows key + X and select Device Manager from the menu.
-
Expand the categories and look for any devices with a yellow exclamation mark, indicating an issue with the driver.
-
Right-click on the device and select Update driver.
-
Follow the on-screen instructions to update the driver.
Repeat this process for all devices with outdated or incompatible drivers and then try updating Windows 10 again.
Preventive Measures to Avoid Error Code 0x8007041d in the Future
To prevent encountering error code 0x8007041d when updating Windows 10 in the future, here are some preventive measures you can take:
-
Keep your system up to date: Regularly install Windows updates to ensure that your system is running smoothly and securely.
-
Scan for malware: Use a reliable antivirus program to scan your system for malware and remove any threats that could interfere with the Windows Update process.
-
Avoid third-party software conflicts: Be cautious when installing new software on your system and ensure that it is compatible with Windows 10 to avoid conflicts with the update process.
-
Check your internet connection: Ensure that you have a stable internet connection when trying to update Windows 10 to prevent network issues.
-
Create system backups: Regularly back up your important files and create system restore points to restore your system to a previous state in case of any issues with Windows updates.
Conclusion
Error code 0x8007041d can be a frustrating issue when trying to update Windows 10, but with the troubleshooting methods and preventive measures outlined in this article, you should be able to resolve this error and keep your system up to date. By following these steps and keeping your system well-maintained, you can ensure that your Windows 10 system runs smoothly and securely.