
Did you encounter Error code 0x8007010b while trying to update Windows 10 Build OS to the latest version? Well, this error generally arises owing to invalid directories, corrupt system files, damaged Windows Images, etc. This bug is often accompanied by an error message that reads – ERROR_DIRECTORY.
This implies that the folder containing the important update files have somehow become invalid. Or, the entire update mechanism has gone corrupt. Since the folder doesn’t exist or its name is not valid, no matter how many times Update services attempt to download patches, it always throws an error.
To solve the Update Error code 0x8007010b in Windows 10, try the following suggestions –
Solutions List
- Run Windows Update Troubleshooter
- Repair System Files using SFC
- Repair Windows Image using DISM
- Manually download and Install Standalone Package
- Reset Windows Update Components.
1. Run Windows Update Troubleshooter
Windows consists of an in-built troubleshooter that can resolve any update-related issues. This is quite an effective tool that can find and repair the reasons behind 0x8007010b error. You may start troubleshooting for bugs and errors using the below steps –
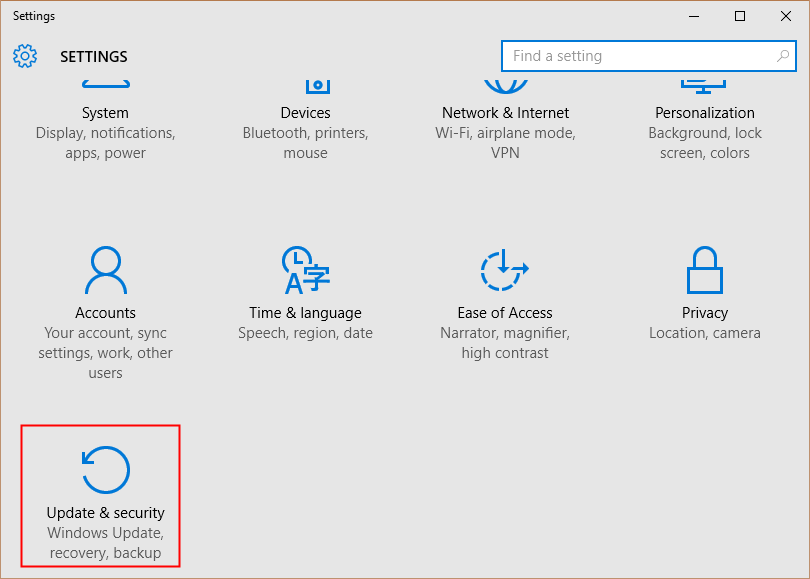
- Jointly press Win+I to start the Settings App.
- Browse to
Update & Security > Troubleshoot. - On the right-side pane, you should find “Windows Update”. If not, you must be on Windows 10 2004, May 2020 Update. Such users should click the “Additional troubleshooters” option.
- Click to expand “Windows Update” and hit Run the troubleshooter.

- When this wizard finishes doing its task, a report appears on the screen that reads “troubleshooter fixes the issue”. If not, try the below solutions –
2. Repair System Files using SFC
If the 0x8007010b error exists even after troubleshooting for bugs and errors, there may lie some corrupt/missing system files on the computer. To repair such files, Windows offers a great in-built program – SFC utility program. Here’s how to use this tool –
- First of all, launch the Command Prompt having Admin rights.
- On the elevated console, type sfc/ scannow and press the Enter key.

- This will take approximately 15-20 minutes to complete the search/repair process, so wait till then.
- Once over, Restart Windows to make the changes effective from the next login.
3. Repair Windows Image using DISM
Sometimes, this is Windows Image itself that becomes corrupt and thus leads to 0x8007010b update error on the computer. To solve this, one should try running the DISM codes. The DISM short for (Deployment Image Servicing and Management) is a command-line program. One may use this to install, uninstall, correct, or repair Windows features, packages, drivers, etc. Here are the essential steps to work upon –
- Make a right-click on the Win icon and select “Run“.
- Type “cmd” inside the text field and press Ctrl+Shift+Enter keys together.
- When the UAC window comes into view, hit Yes to sanction admin rights.
- Now, execute the below codes one after another. Make sure to hit Enter at the end of each command.
Dism /Online /Cleanup-Image /ScanHealth
Dism /Online /Cleanup-Image /CheckHealth
Dism /Online /Cleanup-Image /RestoreHealth
- After running the above codes successfully, you will no longer receive the update error code 0x8007010b.
Note: The first code is for scanning the health of Windows Image while the second and third ones are to repair the corrupt image file.
4. Reset Windows Update Components
Windows Update consists of several components and requires each one of them to run smoothly and efficiently. If any component becomes corrupt, this may cause different update-related bugs or errors. The main components include – Cryptographic Services, Background Intelligent Transfer, Application Identify Service, and Windows Update Service. So, to resolve 0x8007010b error, you must reset all its components using the below steps.
Note: While resetting them, it would be better to clean the SoftwareDistribution and Catroot2 folders.
- Launch Command prompt as Admin – Type “cmd” in the search box, right-click on the top result and choose Run as administrator.
- When the UAC prompts, tap Yes to authorize the access.
- Next, execute the following codes one by one. Just make sure to press Enter at the end of each command lines –
 net stop wuauserv
 net stop cryptSvc
 net stop bits
 net stop msiserver
- The above codes will stop the basic update services. Next, rename SoftwareDistribution and Catroot2 folder executing the below two commands –
Ren C:\Windows\SoftwareDistribution SoftwareDistribution.old
Ren C:\Windows\System32\catroot2 Catroot2.old
- Now, restart the services that you have stopped earlier –
net start wuauserv
net start cryptSvc
net start bits
net start msiserver
- Restart Windows to implement the recent changes.
- Sign back into Windows 10 and navigate to the following path –
Settings > Update & Security > Windows Update
- Hit Check for Updates button and if there is any pending update, download, and install the same.
5. Manually download and install Standalone Package
Many a time, update errors are simply a result of incorrect installation of recent security-patches. If you had lately installed a cumulative update, just roll back OS to its previous state.
However, if not, you should manually download and install the latest Standalone package on the computer. To do so, get to know the pending updates “KB” number using the below steps –
- Jointly press Win+I to open the Settings UI.
- Click Update & Security then Windows Update.
- Head over to the right pane and hit “View Update history”.
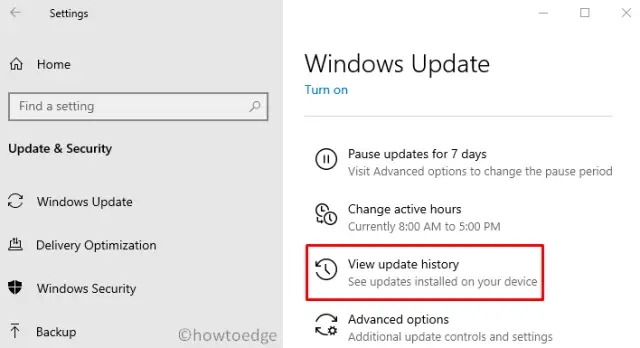
- On the next screen, you may find the list of failed updates.
- Note down the CU number and follow the next part –
Manually Install the Pending Updates
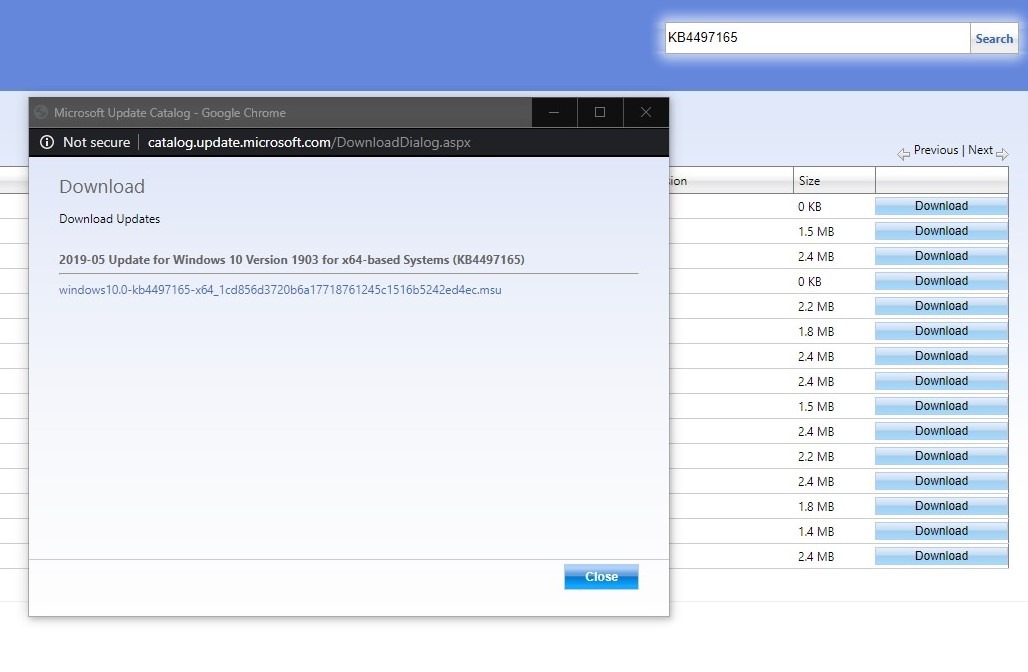
- Visit the Microsoft Update Catalog website and type the “KB” number noted above.
- This will present a list of well-matching results, choose one as per the system architecture.
- Click Download next to the update link thereafter the top link on the upcoming window.
- When the download completes, click twice on the setup file to upgrade the operating system.
That’s it, you now know the essential workarounds to solve the Update Error code 0x8007010b on Windows 10.
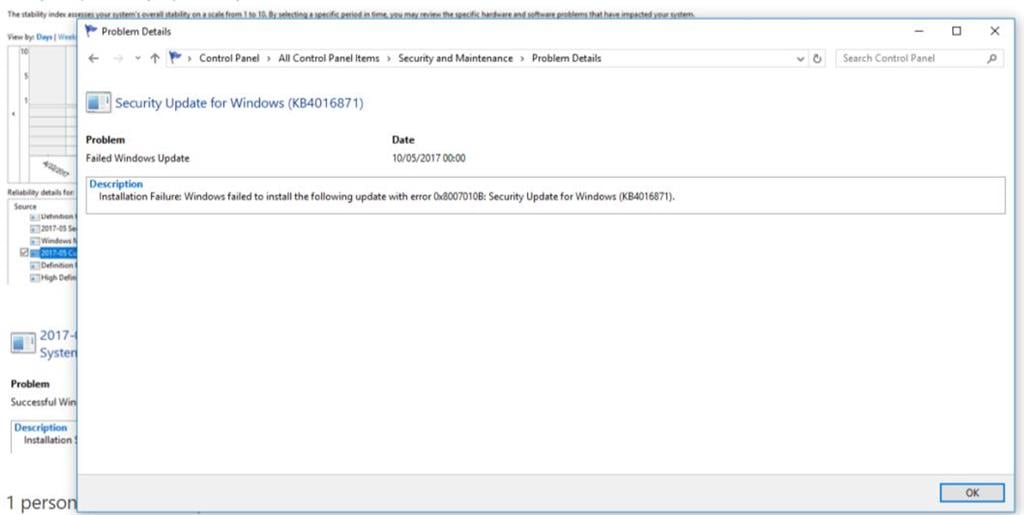
Annoyance during Windows update is quite a common thing as the process can anytime fail and show some error. 0x8007010B is such an issue that appears when trying to install a security or functional update.
The issue prevents the computer from installing the patch or build whatever it is and throws a message – Update failed. Some users might see “0x0000010B, ERROR_DIRECTORY The directory name is invalid” when the error occurs. Main reasons for this error are not working update cache, missing system resources, broken Windows image, or low disk space. Sometimes, buggy Windows update files may also cause error code 0x8007010B.
Windows 11 or 10 error 0x8007010b during trying to install
Here is how to Fix Windows 11/10 update Error 0x8007010B –
1] Run DISM Restore health tool
This update problem commonly appears when Windows image is defective and fails to install drivers, packages, and other components. DISM is the tool that repairs the problem using servicing commands and solves the error ending up in resolving this error code. Follow the steps –
- Hit the – Win+R.
- Type – cmd.
- Press – Ctrl + Shift + Enter.
- A user account control dialog will prompt up on the desktop, select – Yes.
- Once the command prompts appears, type the following codes one by one and hit enter –
DISM /Online /Cleanup-Image /CheckHealth

DISM /Online /Cleanup-Image /ScanHealth

DISM /Online /Cleanup-Image /RestoreHealth
- Running the tool may take some amount of time so wait patiently after running each command.
- Restart your PC and see if error code 0x8007010B is fixed.
2] Use System File Checker
In order to rectify Windows update errors sometimes, SFC utility works like a trick particularly when it occurs because of corrupt system files. Actually, malfunctioning or missing system resources might be a reason for blocking the update files from installing. So use the tool according to the following guidelines –
- Access elevated command prompt as explained in the above method.
- Type –
SFC /Scannow.
- Press the – Enter.
- When the repairing is finished, reboot your PC and check if the error code is solved and you can now install the update.
3] Perform CHKDSK
Windows update failed to install 0x8007010B error code might also occur because of either low space or bad areas in a disk. Thankfully, you can easily execute the CHKDSK tool is to check status and repair if any issue with the integrity of the filesystem. This will give you a way to install the patch without encountering the error code –
- Once more open the command prompt having administrator right (Click Start, type cmd.exe, and press Ctrl+Shift+Enter).
- Type –
chkdsk C: /f /r /x - Hit the Enter key.
- You will be asked to check the volume the next time the system restarts; select – Yes.
4] Reset Windows update
The most common cause behind Windows 11/10 update Error 0x8007010B is the broken update cache . Windows 10 as well as 11 stores the updates into C:\Windows\SoftwareDistribution\Download and when anything wrong with this folder throws the error code. However, you can reset the component using the following instructions –
- Download Reset_Windows_update
- Unpack the file and double click on WuReset2.0.bat.
- Once a CMD Window appears, press any key to continue.
- At last, reboot your PC and check for updates if it runs smoothly.
5] Download the update from Windows Update Catalog
If the error still persists, Windows update catalog provides all the patches and files rolled out time and again. Simply, download the relevant update (in the form of a standalone file) from there in MSU format and install it. You can take help from this post – How to Download and Install Update from Microsoft update catalog on Windows 11/10. Furthermore, you can follow the method –
For Windows 11
- First of all, Open Windows Settings (Win+I).
- Select Windows Update from left column
- Move to right and click on Update history.
- From the next page, note the KB number generating the error.
- Now, click this link and go to the catalog website.
- Paste the KB number you noted in the given box and hit the – Enter.
- Determine which file matches your system architecture and click Download from the right.
- An isolated page is prompted; click the link there.
- After downloading gets finished access its location.
- Right click on the .MSU file and choose – Install.
For Windows 10
Press – Windows + I.
Click – Update & Security.
Move to the right of appearing Windows Update page.
Click – View update history.
6] Windows update troubleshooter
Error 0x8007010B sometimes can be fixed directly by running Windows update troubleshooter. The tool is a built-in Fixit resource from the operating system that helps you to diagnose and repair the issue. You are able to run this utility using only a few clicks by following below steps –
- Click on the – Start.
- Type – troubleshoot.
- Hit the – Enter.
- From the Settings page, click on – Additional troubleshooters. For Windows 11, click – Other troubleshooters.
- Next, Select – Windows update.
- Click – Run the troubleshooter or Run as in the following screenshot –
- The utility will Start detecting a problem if any and instruct you to follow some actions.
- Pursue till end to fix 0x8007010B and finally, restart the system.
7] Upgrade using the media creation tool
In case, all the solutions fail to work you are left with this option in which you will have to install the current version using media creation tool. This will upgrade the operating system where you will experience no hassle or any error on your computer. Keep in mind to have a backup of your data before advancing with this method.
- Navigate to – this page.
- Click – Download tool now.
- Double click on the .exe file of the tool and select Yes on User account control pop up.
- Accept the license terms.
- Select Upgrade this PC now.
- Click – Next.
- Windows Setup will download the files, Click – Install (ensure that Keep personal files and apps option is checked.
Methods list:
1] Temporary solution
2] Install Windows update
3] Uninstall Windows 10 21H11] Run DISM Restore health tool
2] Use System File Checker
3] Perform CHKDSK
4] Reset Windows update
5] Download the update from Windows Update Catalog and install
6] Windows update troubleshooter
7] Upgrade using the media creation tool
That’s all!!
В данной статье мы рассмотрим как исправить ошибку активации Windows 0x8007010b.

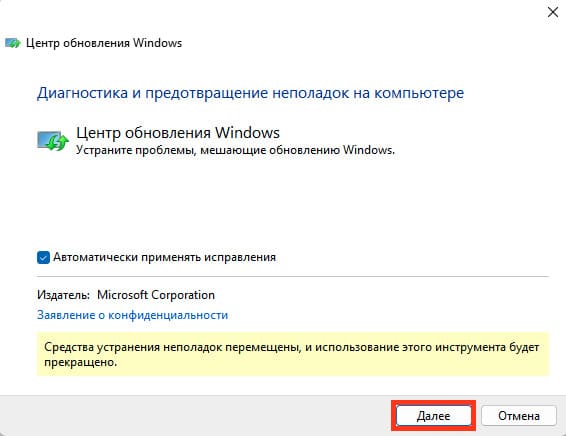
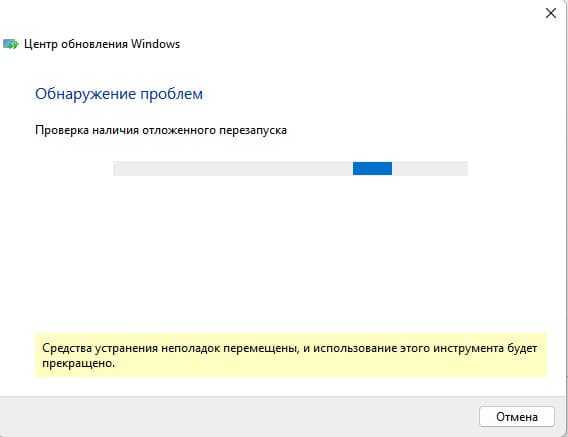
Первый вариант решения проблемы: Запустить «Поиск и устранение неполадок Центра обновления Windows».
1. Откройте поиск и введите «Панель управления».
2. Далее в поиске в левом верхнем углу введите «Устранение» и выберите из списка «Поиск и устранение неполадок Центра обновления Windows».
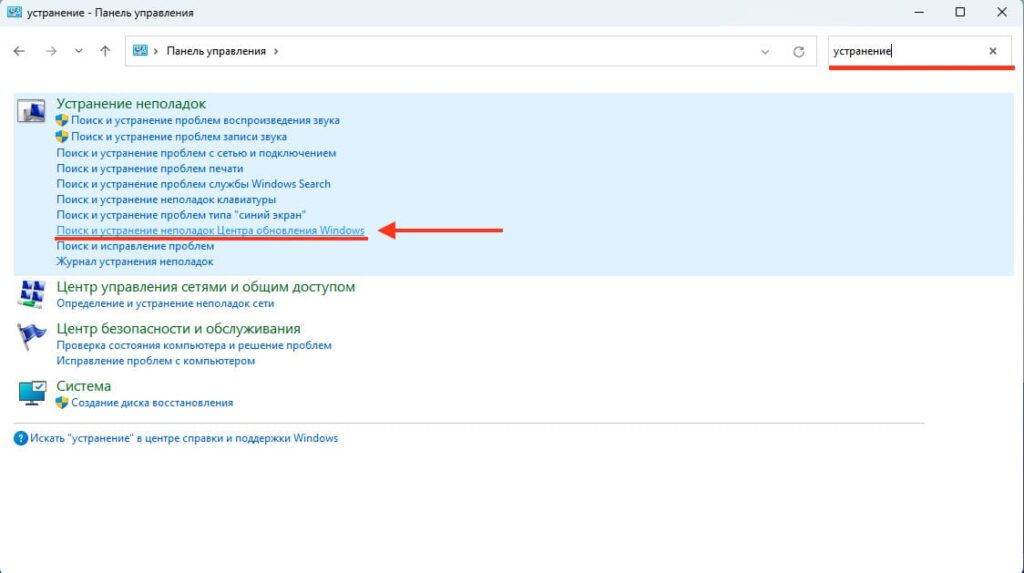
3. Теперь нажимаете «Далее» и ждете когда система автоматически решит проблему и после этого повторяете активацию.
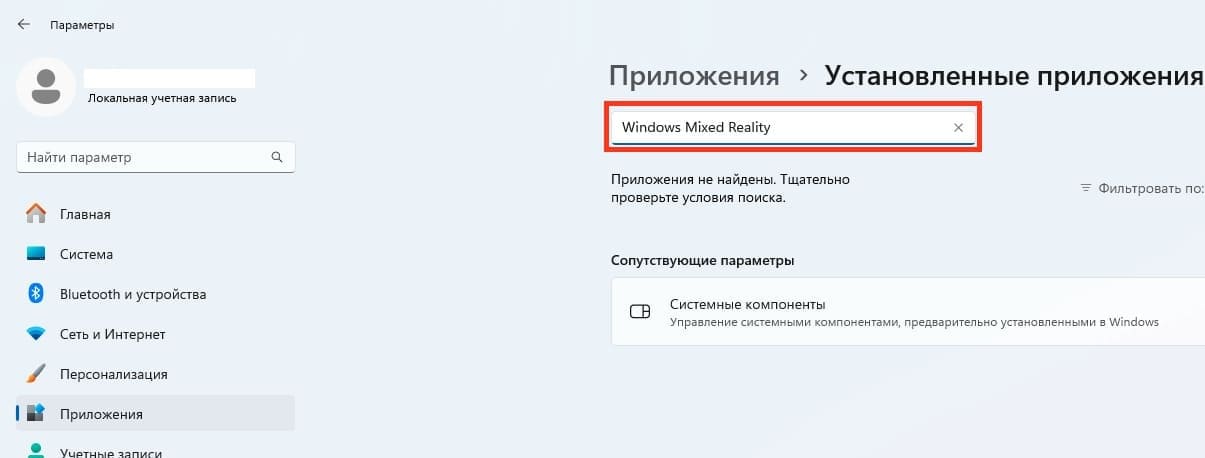
Второй вариант решения проблемы: Проверить установлен ли у вас «Windows Mixed Reality». Eсли да, то удалить.
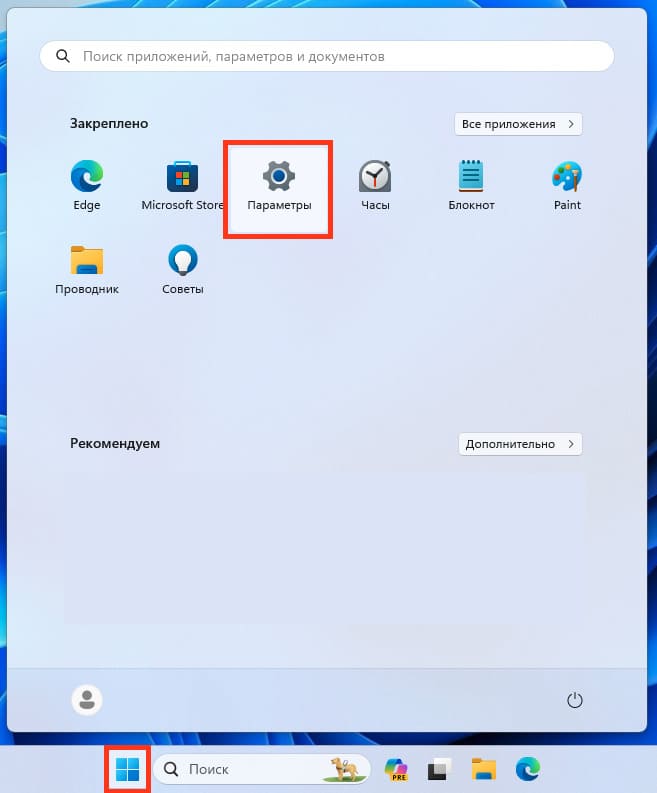
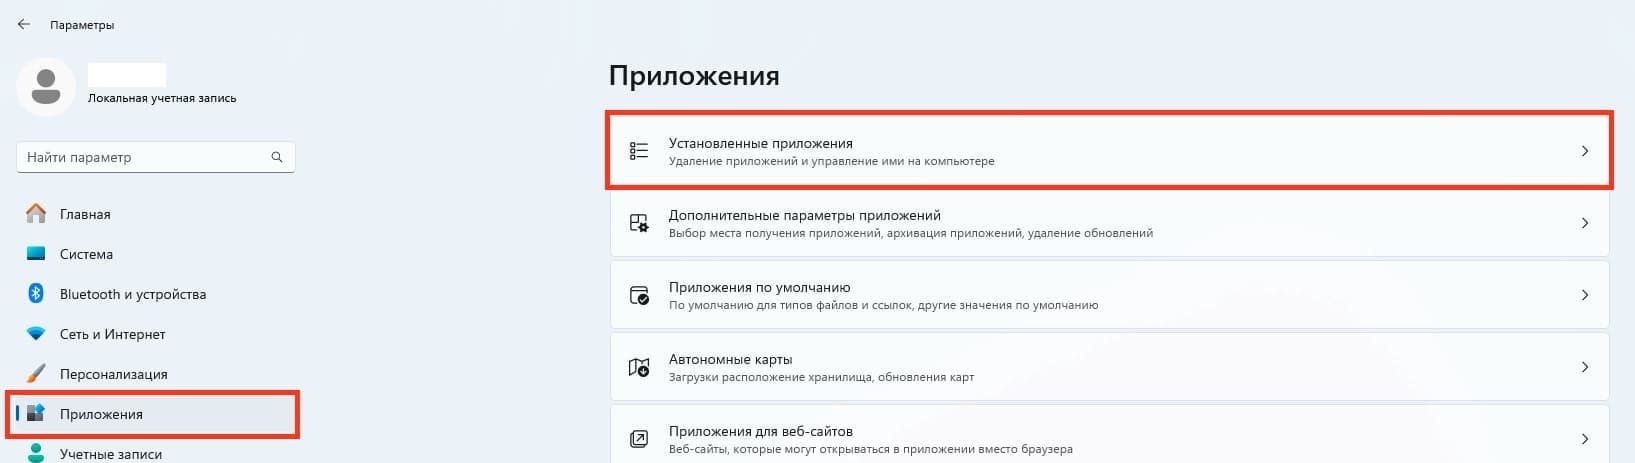
1. Заходите в «Параметры» => «Приложения» => «Установленные приложения».
2. В поиске вводите «Windows Mixed Reality» и если он находит данную программу у вас в системе, то удаляете ее. Повторяете попытку активировать Windows.
Третий вариант решения проблемы: Обновить систему в Windows Clean Boot.
1. Вводите в поиске «Конфигурация системы».
2. Далее переходите в раздел «Службы», ставите галочку «Не отображать службы Майкрософт», нажимаете «Отключить все», и теперь кликаете «Ок» => «Применить».

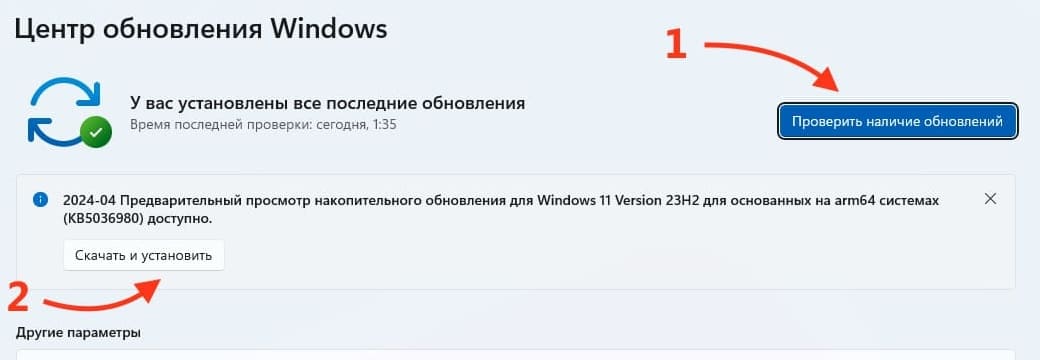
3. После переходите обратно в поиск и вводите «Проверить наличие обновлений».
4. Нажимаете «Проверить наличие обновлений» и если есть доступное обновление, то скачиваете и устанавливаете. Теперь пробуем снова активировать Windows.
Если вышеперечисленные варианты не сработали, попробуйте активировать Windows через терминал по инструкции:
— Для Windows 11.
— Для Windows 10.
Надеюсь данные решения помогли вам исправить ошибку активации Windows 0x8007010b. Так же хочу напомнить, что оригинальные ключи активации Windows вы всегда можете приобрести у нас в магазине!
Лицензионный ключ активации Windows 11 от
Ошибка 0x8007010b появляется во многих случаях. Следовательно, в каждом варианте нужно действовать по-особому.
№1: при неудачном обновлении системы
Откройте Командную строку под правами администратора и запустите следующие команды:
- net stop bits
- net stop wuauserv
- net stop appidsvc
- net stop cryptsvc
- ren %systemroot%\SoftwareDistribution SoftwareDistribution.bak
- ren %systemroot%\system32\catroot2 catroot2.bak
- net start bits
- net start wuauserv
- net start appidsvc
- net start cryptsvc
№2: при установке Service Pack для Windows 7
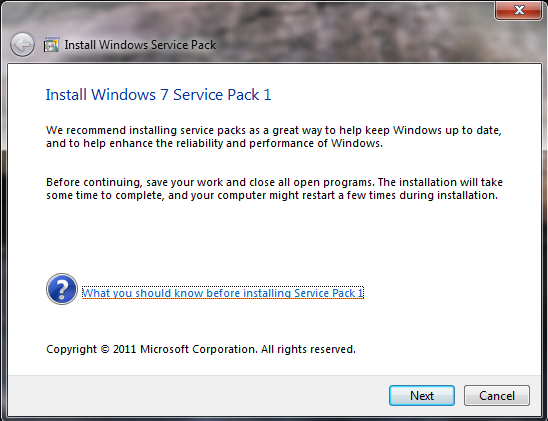
Если при автоматическом апдейте возник сбой, то проще всего установить сервис пак вручную. Для этого скачайте и запустите этот файл. Перед установкой рекомендуется выключить антивирус, отсоединиться от интернета и закрыть все запущенные приложения.
№3: при установке System Center Configuration Manager Console в Windows 10

Удалите директорию C:\Program Files (x86)\ConfigMgr10 и устраните в Редакторе реестра ветку Computer\HKEY_LOCAL_MACHINE\SOFTWARE\Microsoft\ConfigMgr10. После — повторите инсталляцию SCCMC.
№4: при задании отложенного процесса в Планировщике заданий
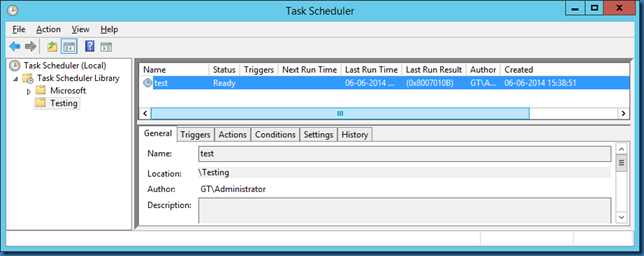
Для этого необходимо указать путь к исполняемому файлу/процессу без кавычек. Перейдите в «Действие» => «Запуск программы» => «Рабочая папка (необязательно)». Убедитесь, что в этом поле путь указан без кавычек и тогда ошибка 0x8007010b не будет беспокоить.
Do you find yourself trying to update Windows, but instead receive error code 0x8007010b?
Updating Windows can sometimes be a struggle. Windows tells you there is an update available, so then you update your computer. But then the update fails, or Windows Update tells you the update was installed when in reality it wasn’t.
In a previous article from us, we discussed how to fix the ‘Windows Update error code 8020002E’. Well, today we are going to teach you how to fix another Windows Update error, and that is ‘Windows Update error code 0x8007010b’.
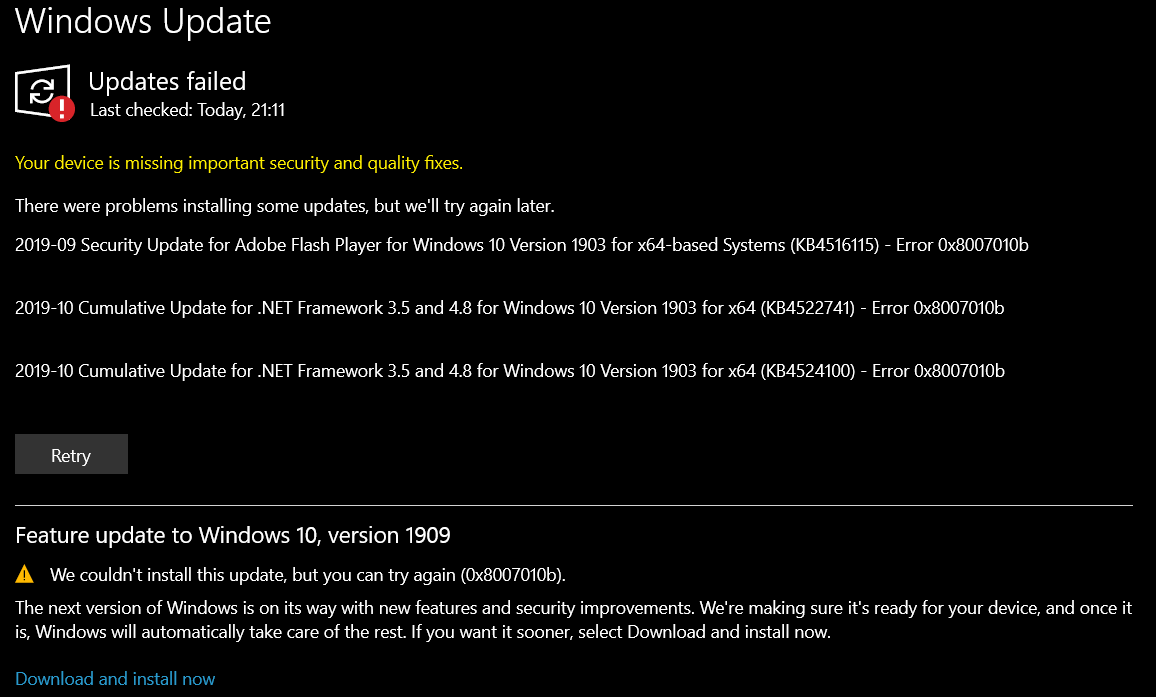
‘Windows Update error code 0x8007010b’ is typically thrown when Windows is updating your machine or when Windows Task Scheduler is running. So what does the error code mean? If you received error code 0x8007010b, then it means Windows attempted to access a directory that no longer exists or the name of the directory is invalid. The error code is short for ‘ERROR_DIRECTORY’.
If you encountered this error, then you’re not alone. Other Windows users have reported their encounters with this error also.
Not being able to update Windows and becoming behind on security updates makes your system vulnerable to viruses, trojans, and other sorts of dangerous malware. Therefore, today we will provide you with various methods you can use to fix the ‘Windows Update error code 0x8007010b’ on your machine. 😀
Let us begin!
- 1. Running the Windows Update Troubleshooter
- 2. Resetting the Windows Update Component
- 3. Manually Install the Update
- 4. Running a System File Checker Scan and DISM
- 5. Install the Update Through Clean Boot
1. Running the Windows Update Troubleshooter.
Windows Troubleshooter is a useful tool when attempting to resolve errors that occur on Windows. The Windows Troubleshooter is especially efficient in fixing particular errors with Microsoft’s applications, which includes Windows Update.
Since Windows Troubleshooter is capable of fixing errors with Windows Update, we will use it first today in hopefully fixing the ‘Windows Update error code 0x8007010b’.
To open Windows Troubleshooter, follow the following steps below:
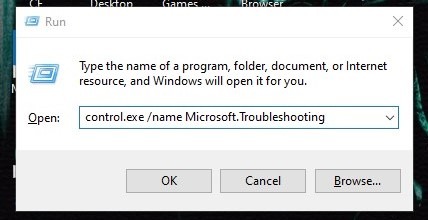
- On your computer, press Windows Key + R. This will bring up the Run Dialogue.
- Then, type in ‘control.exe /name Microsoft.Troubleshooting’ and press the Enter key (as shown below).
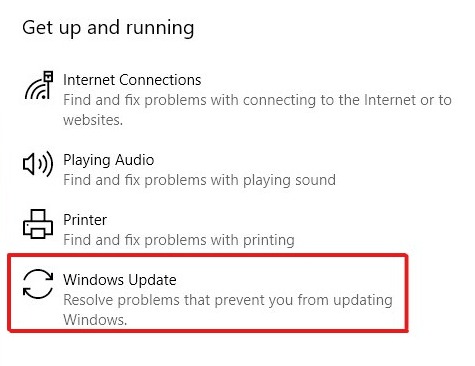
3. Once the Windows Troubleshooter is visible on your screen, you should see Windows Update under Get up and running. Simply click on Windows Update. Then, click on Run the troubleshooter.
Note ⚠️
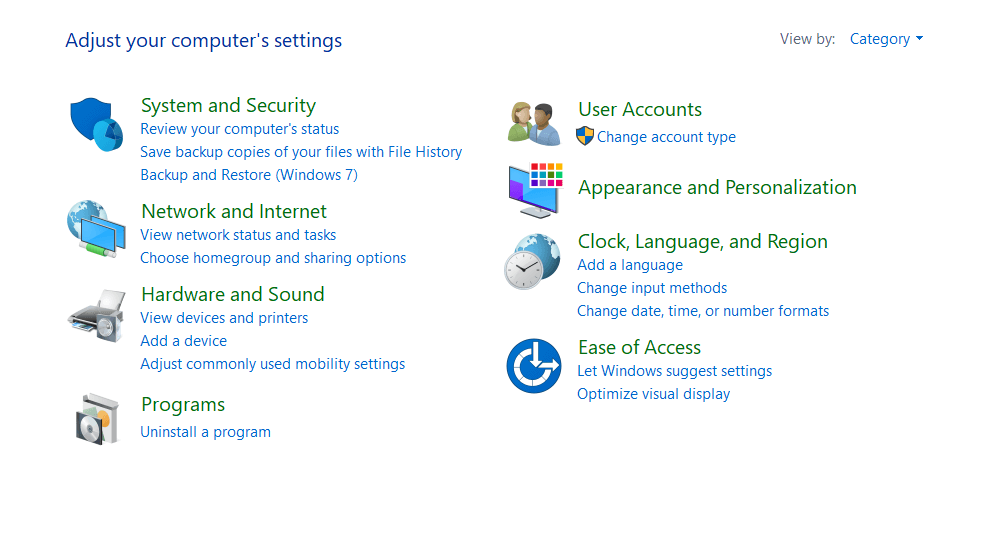
If you are on Windows 7 or Windows 8, then you should see Fix problems with Windows Update under System and Security instead. Therefore, click on Fix problems with Windows Update.
After completing the steps above, the Windows Update troubleshooter should now appear on your screen. If the troubleshooter asks you to run it, then do so.
The troubleshooter will now run and possibly detect the ‘Windows Update error code 0x8007010b’ you have been receiving. If it did detect an error and fixed it, then try to install the Windows update again.
2. Resetting the Windows Update Component.
This error code doesn’t necessarily have to do Windows Update, but rather a directory missing or named differently on your computer that Windows Update is trying to access.
However, there is a potential chance that this error does have to do with Windows Update, in that one of Windows Update’s directories is missing or has been renamed.
So it doesn’t hurt to reset the Windows Update component. Maybe this will fix the issue! 🙂
Follow these instructions to reset the Windows Update component using Windows Command Prompt:
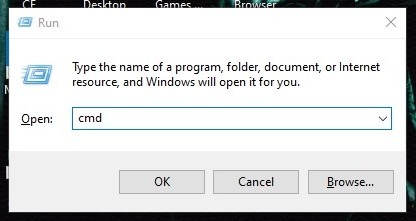
- On your computer, press Windows Key + R. This will bring up the Run Dialogue.
- Then, type in ‘cmd’ and press the Enter key (as shown below).
3. Once you’re in the Windows Command Prompt, type in the following commands in the same order and press the Enter key:
net stop wuauserv
net stop cryptSvc
net stop bits
net stop msiserver
Note ⚠️
Typing in these commands will stop the Windows Update services, Cryptographic services, BIT services, and the MSI services from running. We must stop these services in order to fix the potentially corrupted Windows Update directories.
4. After disabling those services, type in these following commands within the Windows Command Prompt and press the Enter key:
ren C:\Windows\SoftwareDistribution SoftwareDistribution.old
ren C:\Windows\System32\catroot2 Catroot2.old
Note ⚠️
The two files you renamed are used by Windows Update when updating your machine. While this error is thrown when a directory is missing or renamed, these two files could still be possibly corrupted. Since these two files are used by the operating system, you can’t just delete them. Therefore, we are renaming them. After renaming them, Windows will make new versions of the files.
5. Once you have renamed those two files, we can now restart all the services we stopped earlier with the following commands:
net start wuauserv
net start cryptSvc
net start bits
net start msiserver
After restarting the services we stopped earlier, Windows Update will create new versions of those files. This may, potentially, fix the error code we have been attempting to fix.
Now try installing the Windows updates again. If they still won’t install, then proceed to the next step.
3. Manually Install the Update.
If you have tried the other methods above and you’re still out of luck, then we could try manually downloading and installing the update.
In order to manually download and install Windows Updates, it is generally pretty simple. So let’s try it! 🙂
Doing this will involve us grabbing the update’s ‘ID’ then searching for it on Microsoft’s Update Catalog.
To update Windows manually, follow the following steps below:
If you are on Windows 10
- Go to the bottom left of your taskbar and click on the Windows logo.
- Then, type in ‘Settings’ (as shown below).
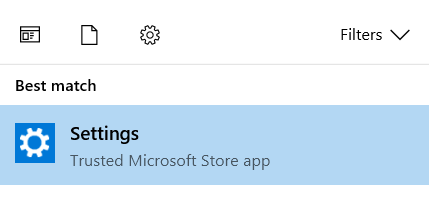
3. Next, click on Settings.
4. The Settings application should now be visible. At the very bottom of the list, click on Update & Security.
5. Your available update should now be visible. Write down or copy the KB number next to your visible update.
6. Now, go to the Microsoft Update Catalog and search for that KB number.
7. Once you have searched for that number, Sort the page by Last Updated. Then, look for your update on the list and click on the Download button on the right-hand side of the page.
8. A pop-up window should now appear. Click on the Link provided in that window and Download the file to a location on your computer.
Now once you have manually downloaded the update file, simply run the file and install the update. If you have other updates that won’t install due to the error as well, then do the same for them too.
If you are on Windows 7 or 8
- Go to the bottom left of your taskbar and click on the Windows logo.
- Then, type in ‘Control Panel’ (as shown below).
3. Next, click on Control Panel.
4. The Control Panel menu should now appear. At the very top left of the list, click on System and Security.
Note ⚠️
If you do not see System and Security, then just skip Step 4 and move on to Step 5.
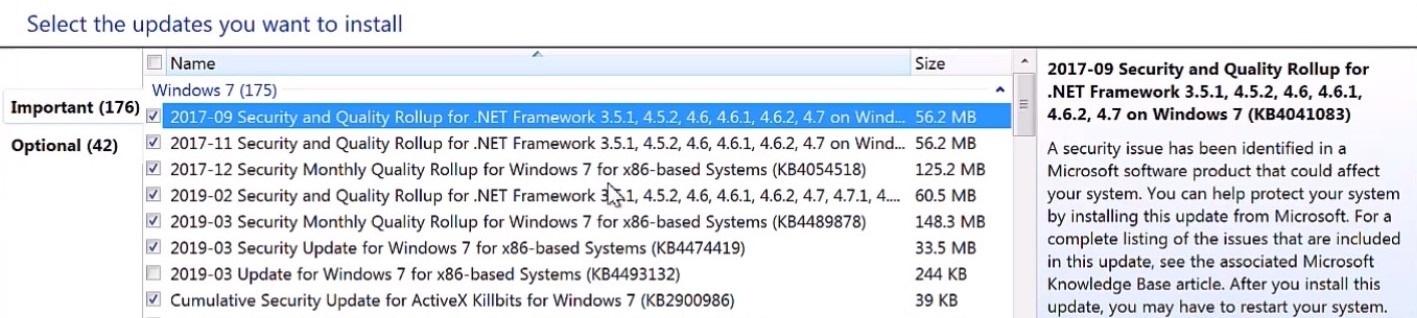
5. Now click on Windows Update. Then, you should see ‘X’ important updates are available or ‘X’ optional updates are available. Depending on what your update is, click on either of the two.
6. From here you can see your available updates for your computer. Next, click on the Update you have been having trouble installing. Then, write down or copy the KB number next to your visible update on the right-hand side of your screen.
7. Now, go to the Microsoft Update Catalog and search for that KB number.
8. Once you have searched for that number, Sort the page by Last Updated. Then, look for your update on the list and click on the Download button on the right-hand side of the page.
9. A pop-up window should now appear. Click on the Link provided in that window and Download the file to a location on your computer.
Once you have manually downloaded the update file, run the file and install the update. Make sure to do the same for other updates that are also available and won’t install due to the error.
4. Running a System File Checker Scan and DISM.
One way we can find the missing or renamed files on our computer, that Windows Update is trying to access, is by using two of Windows built-in tools.
The first built-in tool is known as ‘Windows System File Checker’, or also known as SFC for short.
So what can SFC do exactly? SFC is capable of searching your computer’s hard disk and locating missing or corrupted files. It will then repair those files it deems are corrupted.
The second tool is called DISM, short for ‘Deployment Image Servicing and Management’. DISM will fix corrupted Windows files by using a Windows Image that already exists on the system. Essentially, it will replace corrupted files with healthy versions of them.
Because SFC is capable of locating files and folders that have been modified, or corrupted, we will then be using it today along with DISM to hopefully fix our ‘Windows Update error code 0x8007010b’.
To run an SFC scan and DISM on your machine, follow the following steps below:
- On your computer, press Windows Key + R. This will bring up the Run Dialogue.
- Then, type in ‘cmd’ and press Ctrl + Shift + Enter (as shown below).
3. Once Windows Command Prompt opens as Administrator, type in the following command and press the Enter key:
sfc /scannow
Note ⚠️
When running an SFC scan, Windows will replace corrupted files with non-corrupted versions of them. This way the files will no longer be corrupted. Since this command will actively search your machine and replace system files, it is advised to not interrupt the service at all when it is running (such as shutting off your computer). Doing so could potentially corrupt more files on your machine, or corrupt Windows in general.
4. After running the SFC scan, simply Restart your computer. After your computer restarts, do what was done in steps 1 and 2 again.
5. Now that you have re-opened the Windows Command Prompt as an Administrator, type in these additional commands and press the Enter key:
Dism /Online /Cleanup-Image /ScanHealth
Dism /Online /Cleanup-Image /CheckHealth
Dism /Online /Cleanup-Image /RestoreHealth
Note ⚠️
When running DISM, it will connect to the internet. So if you have a slow connection, it may take a while to finish running the command.
6. Once DISM has finished running, Restart your computer one last time.
Now that your computer has rebooted up, attempt to install the update again.
If Windows is still throwing the error ‘Windows Update error code 0x8007010b’, then proceed to the next step.
5. Install the Update Through Clean Boot.
So you have tried every other method in this article and Windows is still refusing to update. Now what?
Well perhaps there is another method we could try, and that is booting up our computer in a clean boot.
When booting up a Windows computer in a clean boot, all startup programs and services will be disabled. Windows will then boot with the minimal drivers necessary in order for it to function properly.
Hopefully from booting up our computer in clean boot, the ‘Windows Update error code 0x8007010b’ will go away! 😀
To learn how to boot up your computer in a clean boot, go to this guide.
This sums up our guide on how to fix the ‘Windows Update error code 0x8007010b’. Know of any other solutions that were not mentioned in this article? Then kindly share them in the comment section below! Whenever we update this article again, we will credit you for your feedback.
Do you still have questions? If so, then feel free to leave a comment below! 😄
If this guide helped you, please share it. 🙂
-
Mako is a staff writer at Saint. He’s been writing about tech for more than a decade. When he isn’t reading about the latest news on Apple, he’s busy studying cybersecurity, cryptocurrency, cloud computing, and other IT-related sectors. His exceptional work graces technology and Apple-related blogs like How-To Geek, VEED.io, Macgasm, onMac, PhotoWorkout, GameRant, and many more. He also has a Bachelors in Computer Science and has been writing since 2018, with over 400 posts published.
LinkedIn
X (Twitter)
View all posts