
Существует множество причин, по которым при обновлении или установке Windows 11 может появиться сообщение об ошибке, но распространенные ошибки можно исправить с помощью нескольких действий, которые можно выполнить самостоятельно. Примечание. При обновлении устройство с более старой версии Windows, например Windows 7, Windows 8.1 или Windows 10, будет Windows 11.
Прежде чем искать определенный код ошибки, воспользуйтесь советами в разделе Общие решения. Если они не помогут решить проблему с обновлением или установкой, воспользуйтесь таблицей кодов ошибок в конце этой статьи.
Общие решения
Вот несколько советов, которые помогут вам исправить ошибки обновления и установки:
Отсоедините все ненужные устройства. Это могут быть наушники, принтеры, сканеры, динамики, USB-устройства флэш-памяти и внешние жесткие диски.
Если вы используете ноутбук, подключенный к стыковочному узлу, отстыкуйте его.
Прежде чем пытаться обновить Windows, убедитесь, что на устройстве установлены все важные обновления, в том числе обновления драйверов оборудования.
Чтобы убедиться, что на устройстве установлены все обновления, просмотрите статью Центр обновления Windows: вопросы и ответы.
Используйте Защитник Windows для защиты своего устройства во время обновления — антивирусное программное обеспечение не от Майкрософт может вызывать проблемы с обновлением. Если у вас есть установочный носитель и вся необходимая информация для активации, вы можете переустановить программное обеспечение после обновления.
Чтобы удалить антивирусное приложение, перейдите в раздел Панель управления\Программы\Программы и компоненты. Выберите программу и нажмите Удалить. Нажмите кнопку Да, чтобы подтвердить операцию.
Устаревшее программное обеспечение может мешать обновлению Windows, поэтому попробуйте удалить старые или ненужные приложения.
Если вы хотите переустановить приложение позже, перед удалением убедитесь, что у вас есть установочный носитель и вся необходимая информация для активации.
Чтобы удалить программное обеспечение, перейдите в раздел Панель управления\Программы\Программы и компоненты. Выберите программу и нажмите Удалить. Нажмите кнопку Да, чтобы подтвердить операцию.
Чтобы выполнить обновление до Windows 11, на жестком диске требуется достаточно места для установки.
Чтобы просмотреть объем свободного места на жестком диске на компьютере, выберите проводник на панели задач (в Windows 7 она называется Обозреватель Windows) или нажмите клавишу с логотипом Windows + E.
Затем выберите Компьютер или Этот компьютер и найдите раздел Жесткие диски или Устройства и диски. Системным считается диск, на значке которого есть логотип Microsoft Windows. Количество свободного места будет указано под диском.
Если свободное место на диске заканчивается, ознакомьтесь с советами по освобождению места на диске компьютера.
Ошибки 0xC1900101
Ошибка, начинающаяся с 0xC1900101 — это, как правило, ошибка драйвера. При отображении какого-либо из этих кодов ошибок, попробуйте сначала выполнить следующие действия, чтобы устранить проблему. Если эти действия не помогли, дополнительные технические сведения см. в статье Устранение ошибок обновления Windows .
-
0xC1900101 — 0x2000c
-
0xC1900101 — 0x20017
-
0xC1900101 — 0x30018
-
0xC1900101 — 0x3000D
-
0xC1900101 — 0x4000D
-
0xC1900101 — 0x40017
-
Убедитесь, что на вашем устройстве достаточно свободного места. На вашем устройстве требуется не менее 16 ГБ свободного места для обновления 32-разрядной ОС или 20 ГБ для 64-разрядной ОС. Дополнительные сведения см. в статье Освобождение места на диске в Windows.
-
Запустите Центр обновления Windows несколько раз. Скачайте и установите все доступные обновления в Центре обновления Windows, в том числе обновления программного обеспечения, обновления для оборудования и некоторые сторонние драйверы. Используйте средство устранения неполадок клиентский компонент Центра обновления Windows для исправления ошибок обновления Windows 11.
-
Проверьте сторонние драйверы и скачайте все обновления. Сторонние драйверы и инструкции по установке для любого оборудования, которое вы добавили к устройству, можно найти на веб-сайте изготовителя.
-
Отключите дополнительное оборудование. Удалите все внешние устройства хранения данных и диски, док-станции и другое оборудование, подключенное к устройству, которое не нужно для основных функций.
-
Проверьте диспетчер устройств на наличие ошибок. В поле поиска на панели задач введите диспетчер устройств. Выберите в результатах Диспетчер устройств. В появившемся окне найдите все устройства с желтым восклицательным знаком рядом (может потребоваться выбрать каждую категорию, чтобы перейти в список устройств). Нажмите и удерживайте (или щелкните правой кнопкой мыши) имя устройства и выберите один из вариантов Обновить драйверы или Удалить, чтобы исправить ошибки.
-
Удалите программы безопасности сторонних разработчиков. Убедитесь, что вы знаете как переустановить программы, а все необходимые ключи под рукой. Защитник Windows защитит ваше устройство на это время.
-
Исправьте ошибки жесткого диска. В поле поиска на панели задач введите командная строка. Выберите из списка результатов Командная строка. В появившемся окне введите chkdsk/f C: и нажмите клавишу ВВОД. Исправление ошибок на жестком диске начнется автоматически, и вам будет предложено перезапустить устройство.
Примечание: Чтобы выполнить это действие, у вас должны быть разрешения администратора.
-
Выполните корректный перезапуск в Windows. См. раздел Выполнение «чистой» загрузки в Windows.
-
Восстановление и восстановление системных файлов. В поле поиска на панели задач введите командная строка. Выберите из списка результатов Командная строка. В появившемся окне введите DISM.exe /Online /Cleanup-image /Restorehealth и нажмите клавишу ВВОД. (Узнайте, как восстановить образ Windows)
Примечание: Чтобы выполнить это действие, у вас должны быть разрешения администратора.
Другие распространенные ошибки
В следующей таблице перечислены наиболее распространенные ошибки обновления и установки, а также некоторые действия, которые можно попытаться исправить. Если у вас по-прежнему возникают проблемы с обновлением или установкой Windows, обратитесь в службу поддержки Майкрософт.
|
Ошибка |
Что она означает и как ее исправить |
|---|---|
|
0xc1900223 |
Это означает, что возникла проблема с загрузкой и установкой выбранного обновления. Центр обновления Windows повторит попытку позже, при этом вам не потребуется выполнять никаких действий. |
|
0xC1900208 — 0x4000C |
Эта ошибка может означать, что на компьютере установлено несовместимое приложение, которое не позволяет завершить процесс обновления. Удалите все несовместимые приложения, а затем попробуйте выполнить обновление снова. |
|
0xC1900107 |
Операция очистки предыдущей попытки установки по-прежнему ожидает завершения, для продолжения обновления требуется перезагрузка системы. Перезагрузите устройство и снова запустите программу установки. Если перезапуск устройства не решил проблему, воспользуйтесь программой очистки диска для удаления временных и системных файлов. Дополнительные сведения см. в статье Очистка диска в Windows. |
|
0x80073712 |
Файл, необходимый Центру обновления Windows, поврежден или отсутствует. Попробуйте восстановить системные файлы. В поле поиска на панели задач введите командную строку. Выберите из списка результатов Командная строка. В появившемся окне введите DISM.exe /Online /Cleanup-image /Restorehealth и нажмите клавишу ВВОД. |
|
0xC1900200 — 0x20008 0xC1900202 — 0x20008 |
Это может означать, что ваш компьютер не соответствует минимальным требованиям для скачивания или установки обновления до Windows 11. Узнайте больше о минимальных требованиях для Windows 11. |
|
0x800F0923 |
Это может означать, что драйвер или другое программное обеспечение на компьютере несовместимо с обновлением до Windows 11. Чтобы узнать, как устранить эту проблему, обратитесь в службу поддержки Майкрософт. |
|
0x80200056 |
Эта ошибка может означать, что процесс обновления был прерван, поскольку вы случайно перезагрузили компьютер или вышли из системы. Попробуйте снова выполнить обновление и убедитесь, что компьютер подключен к электросети и остается включенным. |
|
0x800F0922 |
Эта ошибка может означать, что вашему компьютеру не удалось подключиться к серверам Центра обновления Windows. Если вы используете VPN для подключения к рабочей сети, отключитесь от сети и выключите программное обеспечение VPN (если применимо), а затем попробуйте снова выполнить обновление. Эта ошибка также может означать, что в разделе, зарезервированном системой, недостаточно свободного места. Возможно, эту проблему удастся решить, используя стороннее программное обеспечение для увеличения размера раздела, зарезервированного системой. |
|
Ошибка: нам не удалось завершить обновления. Отмена изменений. Не выключайте компьютер. Ошибка: не удалось настроить обновления Windows. Отмена изменений. |
Это общие ошибки, которые могут возникать в случае сбоя обновления Windows. Чтобы выбрать оптимальный способ решения проблемы, необходимо определить конкретный код ошибки. Код ошибки, вызвавшей сбой обновления, можно найти в журнале обновлений. Найдите обновление, которое не было установлено, запишите код ошибки и обратитесь в службу поддержки Майкрософт. Чтобы просмотреть журнал обновлений в Windows 11, выполните приведенные далее действия.
|
|
Ошибка: обновление не применимо к этому компьютеру. |
Эта ошибка может означать, что на компьютере не установлены обязательные обновления. Убедитесь, что на вашем компьютере установлены все важные обновления, прежде чем пытаться выполнить обновление. |
|
0x80070070 — 0x50011 0x80070070 — 0x50012 0x80070070 — 0x60000 |
Эта ошибка может означать, что на компьютере недостаточно свободного места для установки обновления. Освободите место на диске и повторите попытку. Советы по освобождению места на диске |
|
0x80300024 |
Конечный диск, раздел или том не поддерживает указанную операцию с диском. Убедитесь, что компьютер соответствует минимальным требованиям для установки Windows. |
|
0x80070002 0x20009 |
Системе не удается найти указанный файл. Если у вас есть диск или диски, на которых вы не устанавливаете Windows 11, удалите эти диски. |
|
0xC1900101 0x20017 0xC1900101 0x30017 |
Драйвер вызвал проблему. Отключите или удалите все сторонние антивирусные или антишпионские программы в системе. Отключите все периферийные устройства, подключенные к системе, за исключением мыши, клавиатуры и дисплея. Обратитесь к поставщику оборудования за обновленными драйверами устройств. |
|
0x8007042B 0x4000D |
Программа установки Windows непредвиденно завершена из-за другого процесса, запущенного в фоновом режиме. Во время загрузки Windows в штатном режиме автоматически запускается несколько приложений и служб, которые потом работают в фоновом режиме. К ним относятся основные системные процессы, антивирусные программы, системные служебные программы и другое ранее установленное ПО. Эти приложения и службы могут вызвать помехи при попытке обновления до последней версии Windows 11. Чтобы определить, мешает ли фоновая программа обновлению, может потребоваться «чистая загрузка». См . статью Как выполнить чистую загрузку в Windows. |
|
0x800700B7 0x2000a |
Программа установки Windows непредвиденно завершена из-за другого процесса, запущенного в фоновом режиме. Удалите антивирусное или антишпионское программное обеспечение и повторите попытку обновления. |
Several users reported being not able to upgrade to Windows 11 or install the latest cumulative updates of Windows 10 because of an error code 0x800700b7 – 0x2000A. If you are one such user and are looking for ways on how to deal with this problem, this post is intended for users like you. So, go through the workarounds outlined in this post and see if any works in your favor.
What causes Error code 0x800700B7 – 0x2000A?
The error 0x800700b7 – 0x2000A may arise when your system meets one or more of the below conditions –
- The device is not compatible with the operating system.
- Enabled Fast Startup or Legacy USB support.
- Missing system files/folders or corrupted Windows 11/10 Image.
- The presence of faulty or obsolete device drivers.
- Antivirus prevents Windows update from occurring smoothly.
Error 0x800700B7 – 0x2000A Solutions
If you are not able to upgrade to Windows 11 or install Windows 10 latest updates because of an error code 0x800700B7 – 0x2000A, try applying these solutions and check if any resolve this issue.
1] Check System Requirements
First of all, when you are trying to upgrade your existing operating system, check if your device meets the minimum system requirements to support the transition. For example, if you are planning to upgrade to Windows 11, your PC must meet these prerequisites –
- Processor: 1 GHz or faster with 2 or more cores on a compatible 64-bit processor or System on a Chip (SoC)
- RAM: 4 GB (minimum), 8 GB would be fine
- Storage: 64 GB or larger storage device
- Graphics card: Compatible with DirectX 12 or later with WDDM 2.0 driver
- System firmware: Trusted Platform Module (TPM) version 2.0
- S mode is only supported on the Home edition of Windows 11. If you are running a different edition of Windows in S mode, you will need to first switch out of S mode prior to upgrading.
Only when your computer meets these minimum system configurations, yet are experiencing an error 0x8007007B7 – 0x2000A, try the below set of solutions –
2] Disable Fast Startup
Fast Startup enables your device to open up faster after a recent shutdown. With Fast Startup enabled, your device enters into an inactive mode when you shut down your computer instead of full shut down. That’s the reason why it starts pretty fast during the subsequent turn ON.
In most cases, an enabled fast startup prevents your computer from a regular upgrade. So, disable this feature and check if you can upgrade your PC after then. Here’s how to perform this task –
- Launch Control Panel first and hit Power Options. You may find this option by navigating to the below path –
Control Panel > All Control Panel items > Power Options
- On the left pane, click “Choose what the power button does“.
- Moving ahead, click the link – “Change settings that are currently unavailable”.
- Under Shutdown settings, uncheck the box left of “Turn on fast startup (recommended)” and hit the button – Save changes.

That’s it, your PC will turn off the Fast startup. Go and check if you can now upgrade your OS without getting into an error 0x8007007B7 – 0x2000A.
3] Disable Legacy USB support
Just like Fast startup, Legacy USB support when enabled may also trigger different update-related issues on Windows 11 or 10 PC. In order to fix this issue then, one must disable this feature using the steps below –
- First of all, boot into the system’s BIOS. To do so, press and hold the Shift button while restarting your PC. When your device wakes up, click Advanced startup options.
- Click
Advanced options > UEFI Firmware Settings. Your device is now booted into its BIOS mode. - While inside this, check the menus for an option to enable or disable the onboard USB ports. In addition to this, make sure that all USB options and Legacy USB support options are disabled or off.
- Save this configuration and come out of the BIOS mode.
I hope you are now able to upgrade to any Windows version you wish provided your PC already meets the minimum system requirements.
4] Run Windows Update Troubleshooter
If the error 0x8007007B7 – 0x2000A still appears while upgrading your Windows OS, there might lie some internal glitches. In order to know what they are and how to fix them, you may take the help of an inbuilt tool i.e. Windows Update Troubleshooter.
Here’s how you can troubleshoot Windows update –
- Press Win + I to launch the Settings app.
- Click System > Troubleshooter > Other troubleshooters next on Windows 11. If you are on Windows 10 PC, browse to this path instead – Settings > Update & Security > Troubleshoot > Additional troubleshooters.
- Select Windows Update and hit the button – Run the troubleshooter. Windows 11 users may hit the Run button available besides Windows update.

- When the troubleshooting window launches, click Next and follow the on-screen instructions.
The troubleshooter will try identifying the problems that were preventing Windows updates from occurring smoothly. In case it does find the root cause, this will either fix that problem or suggest ways on how to achieve this task.
5] Run SFC and DISM scans
System files corruptions or glitches inside Windows 11/10 Image file may also throw an error code 0x8007007B7 – 0x2000A. You may nullify their significances by running in-built command-line programs i.e. SFC and DISM. Though you may run both these scans separately, running both of them simultaneously on the same prompt might address the update-related problems more effectively.
In this method, we present how you can create a batch file comprising both SFC and DISM scans, and how to execute them.
- For this to happen, press Win + R first.
- Type Notepad and press Enter to launch a text document.
- Copy/paste the following inside it, and save it as
SFC_DISM.batfile. Make sure to select All files under Save as type section.
echo off
date /t & time /t
echo Dism /Online /Cleanup-Image /StartComponentCleanup
Dism /Online /Cleanup-Image /StartComponentCleanup
echo …
date /t & time /t
echo Dism /Online /Cleanup-Image /RestoreHealth
Dism /Online /Cleanup-Image /RestoreHealth
echo …
date /t & time /t
echo SFC /scannow
SFC /scannow
date /t & time /t
pause
- Right-click on the newly created batch file and choose the option – Run as administrator.
- When both these scans are completed successfully, reboot your PC so that it deletes any leftover or residual files as well.
Sign back into your PC and check if you can now upgrade to Windows 11 or 10 whichever you opt to.
6] Update device drivers to Fix Error 0x800700b7 – 0x2000A
The presence of outdated device drivers may also cause issues like 0x8007007B7 – 0x2000A. If you haven’t updated any of your device drivers for a long time, this is the right time to do so.
Update all your drivers using the steps below and check if this resolves the issue that you were struggling with. These are the two ways by which you can update all your device adapters –
Using Windows Update
With Windows 10 20H1 onward, Microsoft changes the way by which you can search for available driver updates and install them into your computer. Now, all recent driver updates come bundled under optional updates that you may find by browsing the path below and hitting Check for updates.
Windows 10:
Settings (Win + I) > Update & security > Windows update > View optional updates
Windows 11:
Settings (Win + I) > Windows Update > Optional updates

Using Device Manager
- Open the Power menu by pressing Win + X.
- Select Device Manager.
- When this launches, expand the driver’s section that you want to update.
- Right-click on the drivers inside, and hit the option – update driver.
- Choose the one that suits your update –
- Search automatically for updated driver software: Click over this option if you haven’t downloaded any driver updates by manually visiting its official site.
- Browse my computer for driver software: Go for this option only when you own the latest updates on the drivers in question.
Note: If you choose the first option while being on Windows 11 or Windows 10 20h1 and later versions, the system will simply redirect you to Windows update.
7] Disable/Uninstall Security software
Many a time, the external security applications or even Windows Defender may prevent Windows from getting its usual updates. If that’s the case, you should temporarily remove or disable the antivirus.
Do as stated above and reboot your PC. From the next logon, check if you can now upgrade to Windows 11 OS or still not.
8] Upgrade your PC while booting into the Clean boot state
If none of the above solutions work in your case, there may lie some third-party apps obstructing Windows updates. In such cases, you may boot into the Safe boot state and see if you can upgrade your device while remaining in that state.
Here’s how you can boot into the Safe Mode and initiate the Windows update –
- Type MSConfig in start search and press Enter key to open the System Configuration Utility.
- Go to the General tab, and then click Selective startup.
- Clear the Load Startup Items checkbox.
- Check the Load System Services and Use the Original boot configuration.
- Now, click on the Services tab.
- Mark the checkbox – Hide All Microsoft Services and hit Disable all.
- Click Apply and then OK to restart your computer.
When the system boots into the Clean Boot state, go to Windows Update and hit Check for updates. The system should be able to upgrade to the available versions now as there are no interactions from any third-party apps or services.
9] Upgrade to Windows 11/10 using an ISO image
In cases where even the booting into the Safe Mode doesn’t count implies that your system reaches an extent from where it can’t be repaired. What you can do at max is get an ISO image of the operating system that you want to install and, make it bootable, and perform a fresh Windows 11 installation.
,
This tutorial contains instructions to fix the following error when trying to restore a Windows 10, 8 or 7 based PC: «System Restore did not complete successfully. Your computer’s files and settings were not changed. An Unspecified error occurred during System Restore. (0x800700b7)» in Windows 10, 8 or 7 OS.

The System Restore error 0x800700b7, is commonly caused because an antivirus or security program prevents the system restore to run properly. In other cases the error 0x800700b7 in system restore is caused because the Windows file system is corrupted, after a power outage or after an unsuccessful installation of a Windows update.
How to Resolve System Restore Unspecified Error 0x800700b7.
Notice: In some cases, the System Restore errors can be solved after a system restart. So, when you face the error in System Restore, Power Off you system and then try to boot to Windows normally and see if the error is resolved.
Case A. If you can sign in to Windows (Windows Starts Normally).
- Method 1. Run System Restore in Safe Mode.
- Method 2. Disable or Uninstall the Antivirus/Security Program.
- Method 3. Repair Windows System Files.
- Method 4. Modify Windows Registry.
- Rename the ‘WindowsApps’ folder from WinRE (Method-7)
Case B. If you cannot sign in to Windows (Windows Cannot Start).
- Method 5. Run System Restore from WinRE.
- Method 6. Repair Windows System files from Windows RE.
- Method 7. Rename the ‘WindowsApps’ folder (Windows 10)
Case A. If you can sign in to Windows (Windows Starts Normally).
Method 1. Run System Restore in Safe Mode.
The first method to resolve System Restore problems, is to run the System Restore in Windows Safe Mode.
1. Press Windows + R keys to load the Run dialog box.
2. Type msconfig and press Enter.
3. Click the Boot tab and then check the Safe Boot option.
4. Click OK and restart your computer.
Note: When you finish your job, open the System Configuration utility again and uncheck the “Safe Boot” option to start Windows normally.
![windows-8-safe-mode_thumb[2]](https://www.wintips.org/wp-content/uploads/2014/04/windows-8-safe-mode_thumb2_thumb.jpg "windows-8-safe-mode_thumb[2]")
5. Simultaneously press the Windows + R keys to open the Run box.
6. Type rstrui and hit OK to open System Restore..
7. Press Next at the first screen and then select an older restore point to restore your computer.
Method 2. Disable or Uninstall the Antivirus/Security Program.
The next method to bypass the Error 0x800700b7 in System Restore, is to turn off or to completely uninstall the Antivirus/Security protection before running System Restore Restore.
Method 3. Repair System Files.
In some case the System Restore error 0x800700b7, is caused because the Windows System Files are corrupted. To repair the system files:
1. Open command prompt as administrator. To do that:
1. In the Search box type: cmd or command prompt
2. Right click on the command prompt (result) and select Run as Administrator.
2. At the command prompt window, type the following command & press Enter:
- SFC /SCANNOW

3. When SFC scan is completed, restart your computer.
4. Try System Restore again.
Method 4. Modify Windows Registry.
1. Simultaneously press the Windows + R keys to open run command box.
2. Type regedit and press Enter.
3. At the left pane, navigate to this key:
- HKEY_LOCAL_MACHINE\SOFTWARE\Microsoft\Windows NT\CurrentVersion\Schedule\TaskCache\Tree\Microsoft
4. Right click at ‘Windows‘ key and select Export, to backup the key contents in case that something goes wrong.

5. Type a name for the exported registry (e.g. «RegistryBackup») key and Save the file to your desktop.

6. Then right click to «Windows» key and select Delete.

7. Close Registry Editor and Restart your computer.
8. After the restart, run System Restore. If the error persists, then double click at the registry backup file, to restore the delete registry key and continue to Method-7 below.
Case B. If you cannot sign in to Windows (Windows Cannot Start).
If Windows cannot start, then you have to boot your PC, from a Windows Installation Media*, in order to troubleshoot the System Restore errors, from the Windows Recovery Environment (WinRE).
* Note: If you don’t own a Windows installation media, then (from another working pc) you can create one (according your Windows Version) by using the Media Creation tool.
Method 5. Run System Restore from WinRE.
1. Boot your computer from the Windows Installation Media.
2. At the Windows Language Setup screen press SHIFT + F10 to access command prompt, or click Next –> Repair your computer –> Troubleshoot –> Advanced Options –> Command Prompt.

3. At command prompt type the following command to launch System Restore.
- rstrui

4. Try to restore your system.
Method 6. Repair Windows System files from Windows RE.
1. Boot your computer from the Windows Installation Media.
2. At the Windows Language Setup screen press SHIFT + F10 to access command prompt.
3. At command prompt give the following commands to locate the Windows drive letter.
- diskpart
- list volume
4. Notice the drive letter of the Windows volume. *
* The Windows volume is the partition where the Windows are installed and commonly is the largest volume in size (GB).
e.g. In this example, the drive letter of the Windows volume is “D“.

5. Type exit to close DiskPart utility.
6. At command prompt type the following command to repair the Windows file system:
- sfc /SCANNOW /OFFBOOTDIR=D:\ /OFFWINDIR=D:\windows
* Note: Replace the letter «D« at the above command, according to your case.

7. When SFC scan is completed, restart your computer.
8. Try System Restore again.
Method 7. Rename the WindowsApps folder. *
* Note: This method applies only in Windows 10 OS.
1. Follow the steps 1-5 from the method-6 above, to launch Command Prompt in WinRE and to locate the Windows drive letter.
2. Then, navigate to the Windows drive, by typing its drive letter (e.g. «D») and press Enter.
3. Next, give the bellow command (and press Enter) to navigate to the «Program Files» folder:
- cd Program Files
4. Give the following command to unhide the WindowsApps folder.
- attrib –h WindowsApps
5. Then type the following command to Rename the WindowsApps folder.
- ren WindowsApps WindowsApps.BAK

6. Type rstrui to launch System Restore and try to restore your system again.
That’s it! Let me know if this guide has helped you by leaving your comment about which method is worked for you. Please like and share this guide to help others.
If this article was useful for you, please consider supporting us by making a donation. Even $1 can a make a huge difference for us in our effort to continue to help others while keeping this site free:
- Author
- Recent Posts
Konstantinos is the founder and administrator of Wintips.org. Since 1995 he works and provides IT support as a computer and network expert to individuals and large companies. He is specialized in solving problems related to Windows or other Microsoft products (Windows Server, Office, Microsoft 365, etc.).
Windows 10/11 update Error code 0x800700B7 is a common error that indicates an issue with input/output (I/O) operations. This windows 11 update Error 0x800700B7 message is usually encountered when performing disk-related tasks like copying, moving, or deleting files and folders.

1) There are several solutions you can try to resolve this Windows 10/11 Error code 0x800700B7
Method 1: Run hardware diagnostic tool steps:
1. It’s essential to check your hardware and ensure that your hard drive and RAM are functioning properly. You can run a hardware diagnostic tool to identify and fix any issues that may cause the Windows 10/11 update Error 0x800700B7.
2. Running a hardware diagnostic tool can help identify potential hardware issues with your computer. Here are some steps to follow:
3. Identify a hardware diagnostic tool that is compatible with your computer. Many computer manufacturers provide their own diagnostic tools, and there are also third-party options available.
4. Download and install the diagnostic tool on your computer. Follow the installation instructions provided by the tool’s developer.
5. Launch the diagnostic tool and select the tests you want to run. Most diagnostic tools provide a range of tests for different hardware components, such as the CPU, RAM, hard drive, and graphics card.
6. Start the tests and let them run to completion. Depending on the size of your hard drive and the number of tests you select, this process can take anywhere from a few minutes to several hours.
7. Review the results of the diagnostic tests. The tool should provide a report of any issues it found, as well as recommendations for how to address them.
8. If the diagnostic tool identifies hardware issues, take appropriate action to address them. This may involve replacing a faulty component, updating drivers, or adjusting settings in your computer’s BIOS.
9. If the diagnostic tool does not identify any issues, but you are still experiencing hardware problems, consider seeking additional help from a professional technician. They may be able to identify more subtle issues that the diagnostic tool missed.
10. Ensure that all your device drivers are up-to-date or reinstall them if necessary. Updating your drivers can help resolve any issues caused by outdated or incorrect drivers.
Chat with our tech expert now for instant support. Click here!
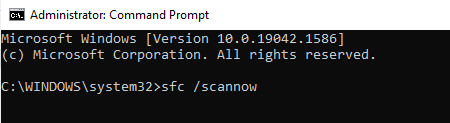
2) Run SFC SCAN To fix windows 11 update Error code 0x800700B7

1. Run the System File Checker (SFC) utility to scan and repair any corrupted or damaged system files.
2. SFC scan to fix the broken or corrupt file.
3. Open Windows Terminal in Admin
4. Type SFC /scan now in the command prompt window
Wait for the scan to finish.
5. You will get the following message on the command windows “Windows Resource Protection” may indicate that the SFC program detected no integrity issues or found corrupt or broken files but could not repair some of them.
6. If SFC finds no issues, that you can now close the Windows Terminal console. ”
7. If SFC finds any issue, type the command below in same window
DISM/Online /Clean-up-Image/restore health.
Disabling any third-party software temporarily steps
- You can try disabling any third-party software or anti-virus program temporarily to check if they are causing the issue.
- Open the task manager: Press “Ctrl+Shift+Esc” or “Ctrl+Alt+Delete” on your keyboard, then click on “Task Manager”.
- Identify the software: In the task manager, look for the software that you want to disable. You can sort the list by name, CPU usage, or memory usage to help you find it.
- End the task: Once you have identified the software, right-click on it and select “End task” from the context menu. This will stop the software from running.
- Disable startup programs: To prevent the software from running automatically when you start your computer, you can disable it from the startup programs list.
- To access this list, press “Windows key + R” on your keyboard, type “msconfig” in the “Run” dialog box, and press “Enter”. In the “Startup” tab, uncheck the box next to the software that you want to disable.
- Use safe mode: If you’re having trouble disabling the software while in normal mode, you can try booting your computer in safe mode.
- To do this, restart your computer, then press and hold the F8 key as your computer boots up. This will bring up the advanced boot options menu. From here, select “Safe Mode”.
- Press “Enter”. Once you’re in safe mode, you can try disabling the software again.
- Remember that disabling third-party software can cause problems with your computer’s functionality.
-
Run check Disk utility steps:
- Open to File Explorer and right-click on the drive that you want to check.
- Select to “Properties” from the drop-down menu.
- Press “Tools” tab in the Properties window.
- Under “Error checking,” click on “Check” button.
- If prompted, select “Scan drive” to check for errors or “Scan and repair drive” to fix any windows update Error 0x800700B7 found during the scan.
- If the drive is in use and cannot be checked, you will be asked to schedule a disk check for the next time you restart your computer.
- Restart your computer to allow the Check Disk utility to run.
- Once the Check Disk utility completes the scan, it will display the results in the Event Viewer.
Note: It is recommended to close all open files and programs before running the Check Disk utility. Also, it may take some time to complete the scan depending on the size of the drive and the extent of any errors found.
Reset windows:
Restoring Windows can refer to several different things, depending on the specific situation you are facing. Here are some common scenarios and their corresponding steps for restoring Windows:
Reset Windows to previous point in time:
- Press to the Windows key + R to open the Run dialog box.
- Enter in field “rstrui.exe” and press Enter to open the System Restore wizard.
- Follow the on-screen instructions to choose a restore point and restore your system to that point in time.
Reset Windows to its original factory settings:
- Back up any important files and data before proceeding, as this will erase everything on your system.
- Press the Windows key + I to open the Settings app.
- Click on “Update & Security” > “Recovery”.
- Under “Reset this PC”, click “Get started” and follow the on-screen instructions to reset your system to its original factory settings.
Conclusion :
- If you have problem while doing this method, we recommend you to chat with our online experts. I am sure they will guide you and help resolve this issue. You can also visit website for more details and more information.
Need help? Chat with our tech expert now for instant solutions and top-notch support. Click here to get started!
The 0x800700b7 error code on Windows 10/11 is affecting users’ daily routines. However, there are ways to fix it and prevent it from happening again in the future. In this article, we will discuss the meaning of the error code and the steps to resolve it.
System Restore is an important tool that works by restoring Windows to an earlier and functional state. It is especially useful when you encounter issues with your Windows device that cannot be fixed. By using this tool, you undo the recent system changes.
However, as any other Windows tool, the System Restore utility can encounter problems. The provisioning failure 0x800700b7 error is just one of those problems.
The System Restore 0x800700b7 error is generally associated with corrupted or missing system files. It may be a result of an incomplete uninstallation of software programs and components. However, system file corruption may also be caused by malware attacks or hardware issues.
The System error 0x800700b7 may manifest itself in various ways. But most of the time, it comes with the error message “an unspecified error occurred during system restore 0x800700b7” or “app container profile failed with error 0x800700b7.”
What Causes Error Code 0x800700b7?
The error code 0x800700b7 on Windows can be triggered by different things. We’ll enumerate some of them below:
- Network issues – If your network connection is not properly established while installing an update or doing an action, the error 0x800700b7 can appear. To fix this, double-check your connection and ensure you are connected to the internet. Check the Ethernet cables and ensure your connection is stable.
- Damaged system files – System files play an integral role in the Windows 10/11 environment. If they get damaged, errors such as 0x800700b7 code may show. Fix these damaged system files by running an SFC scan.
- Temporary and junk files – As you use your computer on a day-to-day basis, temporary and junk files accumulate, potentially using significant system space. This can limit resources available for more critical tasks. Getting rid of these files can sometimes resolve issues such as 0x800700b7 error.
- Incorrectly uninstalled programs – Sometimes, we just uninstall a program by hitting the Delete button. But doing so will not suffice. It will only leave files that hide in your system and interfere with essential processes. Uninstall programs properly to avoid issues like this.
- Hardware issues – When a hardware component is not compatible with some software programs or vice versa, problems may arise. An example is the error 0x800700b7.
- Overly sensitive security suite – Antivirus and security suites may block processes, which they think are a threat to your device. Disabling them temporarily can resolve problems such as error 0x800700b7.
- Registry problems – The Windows registry is home to many instructions and information needed to run the operating system efficiently. When there are problems with the registry, errors such as 0x800700b7 can surface.
- Malware entities – And lastly, malware entities can mess with the processes on Windows. They can even corrupt system files, which results in more complicated problems. Getting rid of these malware entities can fix the most common Windows errors.
Ways to Fix System Restore and Xbox Error Code 0x800700b7
If you are among those who find dealing with the error 0x800700b7 on Xbox or System Restore, the fixes below should be of great help. You don’t have to test all the fixes, though. You can go ahead and try the best one which you think works best for you.
Fix #1: Check Your Network Settings
The error 0x800700b7 may appear because of problems with your network settings. Thus, make sure that your Wi-Fi or Ethernet settings are enabled and allow both computers to share files. Here’s how to do it:
- You can access Network Settings in Control Panel.
- From there, open Network and Sharing Center, choose Change Adapter Settings and select your adapter from Network Connections.
- In the Advanced Settings for that connection, check File and Printer Sharing for Microsoft Networks. If you don’t see it there, you’ll need to install it by clicking Install from a list or specific location (Advanced).
- Finally, restart your computer and try again.
Fix #2: Run System File Checker
The System File Checker (SFC) utility can scan your computer’s registry and hard drive for errors and recover damaged files.
To run the SFC utility, follow these steps:
- Search your Start menu for Command Prompt, right-click on it, and select Run as administrator.
- Once you’re in Command Prompt, type sfc /scannow and hit Enter.
- After waiting a few minutes for SFC to complete its scan, you should see a prompt at the bottom of your screen confirming that all repairs were successful.
- Once done, check if the error 0x800700b7 persists.
Fix #3: Clear Temporary Files
Many programs create temporary files and folders that are stored in your user directory. Clearing these out can help alleviate problems when you’re updating a program or installing new software.
To repair these corrupt system files, you need to clear them out first to generate new ones. Follow these steps:
- Type %LocalAppData%\Temp into a search box and then click Select Folder.
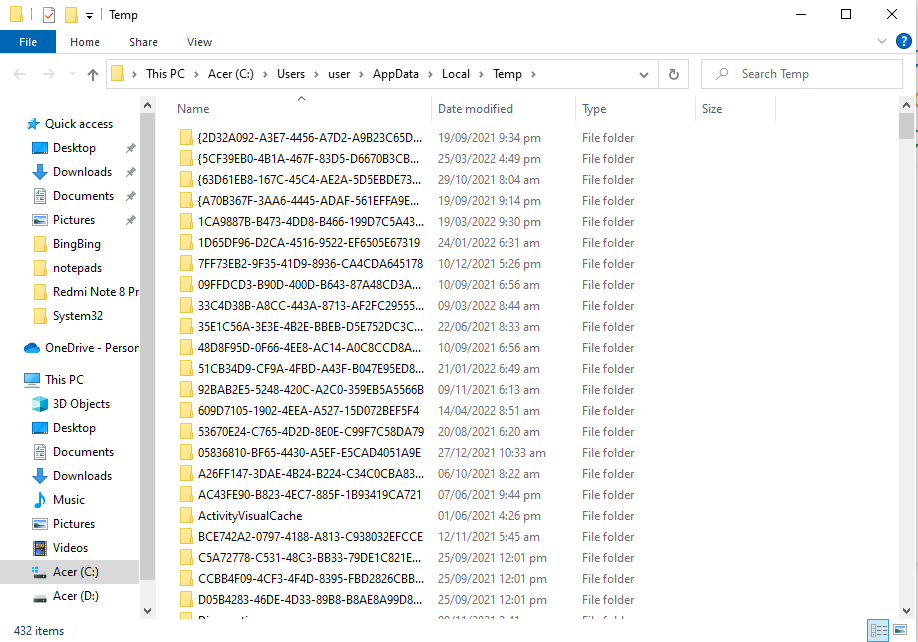
- From there, select everything inside of Temp and delete it.
- And then, repeat with %LocalAppData%. That should clear out all of your temporary files.
- Now, restart your Windows PC and check if the error 0x800700b7 is gone.
Fix #4: Uninstall and Reinstall Programs
The first step in figuring out why you’re getting the error code 0x800700b7 is to find out what software or action is causing it. If you’re not sure how that works, here’s a quick explanation:
When you install a program, Windows creates special files (called registry entries) to record where its files are and other information about it. If there are problems with your registry, you might get error messages when you try to use certain programs. To fix them, all you have to do is remove and reinstall those problematic programs – which should fix any errors that have been caused by a bad registry entry.
To uninstall programs on Windows 10/11, do the following:
- Type Control Panel into the search box. Click the top-most result.
- Next, select Programs and navigate to the Programs and Features section.
- Find the problematic program where the error 0x800700b7 appears. Click on it.
- Select the Uninstall button.
- Confirm your actions by hitting Yes then follow the instructions on your screen.
Fix #5: Delete Junk Files
The first solution that is commonly recommended when you get the 0x800700b7 error code is to delete junk files. This will almost always fix your issue, so it’s definitely something you should try if you are having such trouble.
Here is your guide on how to fix it:
- Head into Disk Cleanup by going through Control Panel and then clicking Free up disk space by deleting unnecessary files under System and Security.
- Once there, choose all of your drive options (C: in most cases) and check all of the boxes in front of Temporary Files.
- Wait for it to scan and then delete what it finds before rebooting your computer. You’ll likely see an immediate improvement when you log in again. If not, move on to some other solutions.
Alternatively, some users find third-party PC repair tools useful in getting rid of junk files on their system.
Fix #6: Enable Automatic Updates
To fix the 0x800700b7 error, you may want to enable automatic updates on Windows 10/11. The easiest way to do that is by following these instructions:
- Go to Settings in your Start menu, then head over to Update & Security and choose Windows Update from there.
- In that menu, just make sure you’ve got it set so that it automatically downloads and installs any updates it finds for Windows.
- Restart your computer once you’re done doing that, and check again – the update should now be downloaded without the error! If not, continue to another fix.
Fix #7: Look for Solutions Online
When you run into the error 0x800700b7 while installing a Windows update, you may want to check Microsoft’s support website. Specifically, look for articles about your error code.
For example, if you have an error that reads 0x800700b7, then open up Google and search for 0x800700b7. This should direct you to some pages that provide additional information on how to troubleshoot or fix your error code.
If there are no specific articles related to your particular error code, try searching for a related general problem. Chances are good that it has already been identified and a solution has been posted.
Fix #8: Check for Hardware Problems
Another troubleshooting step you must not skip is to check if there are any problems with your hardware. If a device has an issue, such as a faulty driver or corrupted software, it may not be properly communicating with Windows.
You can check for hardware issues by restarting your computer and then pressing F8 when you see Starting Windows on your screen. This will take you to a menu where you can choose advanced options that allow you to run different tools, including Device Manager and System Restore.
You can also open Device Manager directly by typing Device Manager into Cortana’s search box and then clicking Device Manager when it appears in her search results.
Fix #9: Disable Your Antivirus or Security Suite
Antivirus and security suites are quite infamous for causing error codes to appear, and the error 0x800700b7 is no exemption. Thus, to rule out the possibility of having an overly protective antivirus, try to disable it first.
To do that, head over to the system tray icon in the taskbar and find the icon of your antivirus. Right-click on it and select Disable. This should disable your antivirus temporarily. Then re-do the action where the error 0x800700b7 appears. If the error is gone, then you can re-enable the antivirus again since you need it to ensure your device remains protected.
Don’t worry about threats while your antivirus is disabled, though. You still have Windows Defender up and running in your background.
Fix #10: Modify the Registry
This fix may appear technical, but with careful steps, it’s manageable for many users. As long as you follow the steps thoroughly, you should get by and be able to resolve the error 0x800700b7 like many affected users.
To modify the Windows registry and fix the error 0x800700b7, do the following:
- Press the Windows + R keys simultaneously to launch the Run utility.
- Input regedit and hit Enter.
- Scan the left pane of the window and navigate to this location: HKEY_LOCAL_MACHINE\SOFTWARE\Microsoft\Windows NT\CurrentVersion\Schedule\TaskCache\Tree\Microsoft.
- Then right-click Windows and choose Export. This will create a backup of the primary contents of the folder in case something happens in the process.
- Give the folder a name and save it.
- Next, right-click on Windows and choose Delete.
- Exit the Registry Editor and restart your computer.
- Upon restart, launch System Restore.
- If the error 0x800700b7 persists, double-click on the registry backup file you created to restore it.
Fix #11: Restore Windows in Safe Mode
If all else fails, you can restore Windows 10/11 in Safe Mode. Here’s how:
- Press the Power button to access the Start menu.
- Now, hold the Shift key on your keyboard and choose Restart.
- Windows will now reboot with the Advanced Startup Options window. Select Troubleshoot.
- Go to Advanced Options to access more settings.
- Choose Startup Settings and tap Restart.
- Then press the number 4 key to start Windows in Safe Mode.
- Once Windows restarts, input System Restore into the text box. Choose the Create a restore point option.
- Hit the System Restore button.
- After that, select the Choose a different restore point option.
- Tap Next to continue.
- Select a system restore point and press Next.
- Then tap Finish.
Summary
The 0x800700b7 error code can be frustrating to deal with if you aren’t sure how to fix it. Luckily, this guide will walk you through the process of resolving this error, step by step, so that you can get back to using your computer!
The fixes also include checking your network settings and running the System File Checker utility. If that doesn’t resolve the error, try to delete temporary and junk files. These files are quite notorious for messing with crucial system processes and programs. Enabling automatic updates may also work at times because we all know that Windows updates often contain fixes to known errors such as 0x800700b7.
You may also disable your antivirus temporarily to see if it resolves the error 0x800700b7. However, if you choose this option, remember to enable it again promptly as your antivirus suite plays a vital role in maintaining your computer’s security.
If you have encountered other reasons for the 0x800700b7 error or have alternative solutions to resolve it, we’d like to hear from you. Please share your experiences and suggestions in the comments section below!
Give us some love and rate our post!