
Ошибка 0x80070013, появляющаяся на операционной системе Windows 10, указывает пользователю о том, что тот пытается установить на компьютер драйвер, который уже и так установлен. Также возможно, что вы пытаетесь установить драйвер менее или несовместимый с системой.
Теперь, когда мы поняли из-за чего возникает данная ошибка, мы также можем понять, что будет происходить в системе после ее появления. Сообщение ошибки не даст вам устанавливать обновления на систему Windows 10 и Центр обновления Windows будет каждый раз «сбоить» из-за нее. Так как вашей системе все равно нужно будет выполнять обновления, то решить проблему в виде ошибки 0x80070013 нужно как можно скорее.
К счастью, решить данную проблему можно довольно простым и быстрым способом. Заключается он в том, что вам необходимо будет в ручную перезапустить работу компонентов Центра обновления Windows.
Ручной перезапуск работы компонентов Центра обновления Windows
В данном методе вам понадобится использовать Командную строку, которая перезапустит компоненты Центра обновления Windows. Для этого сделайте следующие действия:
- Нажмите комбинацию клавиш Win+X, либо нажмите правой кнопкой мыши по Пуску.
- Выберите в контекстном меню пункт «Командная строка(администратор)». Если вы получите сообщение на запрос прав, то нажмите «Да».
Как только вы окажитесь в Командной строке, то первым делом вам нужно будет остановить работу служб MSI Installer, Центра обновлений Windows и Фоновой интеллектуальной службы передачи(BITS).
- Введите в Командную строку следующие команды и нажимайте Enter после каждой из них. На выполнение какой-то команды может уйти некоторое время, но это в порядке вещей. Просто немного подождите:
- net stop wuauserv
- net stop cryptSvc
- net stop bits
- net stop msiserver
- Теперь, когда вы остановили нужные службы, вам нужно переименовать две папки — Catroot2 и SoftwareDistribution. Так как Командная строка все еще у вас должна быть открыта, то выполнить это можно прямо оттуда. Опять таки, вписывайте следующие команды и нажимайте Enter после каждой из них:
- net start wuauserv
- net start cryptSvc
- net start bits
- net start msiserver
- Затем впишите в Командную строку Exit и нажмите Enter.
После выполненных действий, ошибка 0x80070013 должна быть исправлена.
In this guide, we will talk about an error code 0x80070013, what triggers it, and a handful of solutions that may make this issue go away.
Though some users encountered this error while creating a restore point or using the existing ones, this mostly occurs when you try to install available updates on your device. Whatever the reason in your case, fix that by applying the workarounds discussed in this article.

If you are getting this error while updating Windows 11/10 OS, try out these workarounds –
- Troubleshoot Windows Update
- Enable all update-related services
- Reset Update Components
- Manually download and install updates
1] Run Windows Update Troubleshooter
This is the best way to find and repair any issues that are blocking Windows Update from installing pending updates on your computer. Here’s how to troubleshoot Windows Update –
- Press WinKey + I to launch Settings.
- Click Update & Security > Troubleshoot.
- Jump to the right pane, and click – Additional troubleshooters.
- On the next screen, click to expand Windows Update, and hit Run the troubleshooter.

- This tool will then scan for underlying causes and resolve them.
When the troubleshooting completes, restart your PC, and check if you can now update your Build OS.
2] Check the status of all update-related services
In case any one of the update-related services is disabled, this may throw some errors including 0x80070013. So, go and check the current status of all services and re-enable them (if you find any disabled). Here’s how to proceed –
- Hit over the Windows icon and start typing ‘Services‘.
- Select the top result to launch the Windows Services Manager.
- Locate the Windows Update service, put a right-click over it, and hit Properties.
- Check what is there inside the Startup type. If this is set as disabled, change it to Manual.

- Click Apply then OK to confirm the changes made so far.
Restart your PC and see if this has helped make the error go away.
3] Reset Update Components
In case the above tool doesn’t fix the error code 0x80070013, the update components must have become corrupted. You may fix this issue then by purging out the Windows Cache folders, and stopping/restarting update-related services.
Here’s a complete guide on how to reset Windows Update Components.
4] Manually download and install pending updates
If the error still occurs while updating Windows, you may go for the manual method. For each cumulative update that Microsoft releases, it uploads a standalone package at its Update Catalog site.
Visit Microsoft’s Update Catalog and search for the update that is failing on your device. If you do find a standalone package corresponding to this, download and install it on your computer. In case you don’t know how to proceed, follow this tutorial.
Note: Though it helps you to install the pending Windows 11/10 updates, it doesn’t fix the actual problem. You might encounter this error again when the new updates become available.
Fix System Restore Error 0x80070013
Several users reported that they encounter this error while creating a new restore point or using the existing ones. If that’s the case, go through the below list of solutions for this –
1] Inspect HDD by running CHKDSK
A hardware problem may also trigger such errors to occur and thus block available security/non-security/optional patches from ever installing. You may rule this out by checking for possible corruption on your hard disk drive. Here’s how to perform this task –
- Press Win + X, and choose the option – Windows PowerShell (Admin).
- On the elevated console, type the following, and press Enter –
chkdsk C: /f /r /x
- This code won’t run automatically as the volume is in use. Press “Y” when it says so, and restart your PC.

- When your system reloads, CHKDSK will take over.
- After the scanning completes, this will report the anomalies that it found during the scan.
If it does report any issue with the HDD, replace the same by purchasing a new one. We advise going for an SSD as this is considered 5 times better than the conventional hard disk. In case the above scan doesn’t reveal any issue on the hard drive, the error 0x80070013 must be occurring due to file corruption.
2] Use System File Checker
Restoring a PC or generating restore points may fail if there are files missing on your computer. To find and fix this, take the help of an inbuilt tool that goes by the name “SFC”. Here’s how to perform a scan using this utility program –
- Open Command Prompt as an administrator.
- Type “sfc /scannow” and press Enter.
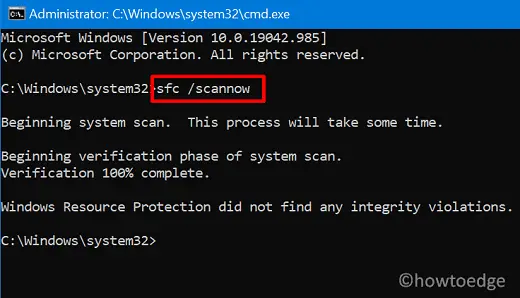
- Wait for this tool to analyze and repair possible file corruption on your device.
- Once this is over, restart your PC.
When Windows 11/10 reloads, see if that helps.
3] Run DISM scan
Corruption of any kind inside Windows 10 Image may also start this nuisance. As a workaround, try running the DISM scan. The essential steps are outlined below –
- Press Win + X, and select Run.
- When it opens up, type ‘CMD’, and press Ctrl + Shift + Enter keys altogether.
- Doing so will invoke the Command Prompt as an administrator.
- On the elevated console, run these codes one after another –
Dism /Online /Cleanup-Image /CheckHealth
Dism /Online /Cleanup-Image /ScanHealth
Dism /Online /Cleanup-Image /RestoreHealth
- When this is over, reboot your PC.
Sign back into your computer and check if you can now update Windows 11/10 normally.
Updated: May 2025
We highly recommend that you use this tool for your error. Furthermore, this tool detects and removes common computer errors, protects you from loss of files, malware, and hardware failures, and optimizes your device for maximum performance. This software will help you fix your PC problems and prevent others from happening again:
- Step 1 : Install PC Repair & Optimizer Tool (Windows 11, 10, 8, 7, XP, Vista).
- Step 2 : Click Start Scan to find out what issues are causing PC problems.
- Step 3 : Click on Repair All to correct all issues.
There are two main reasons why you might encounter the Windows Update Error Code 80070013. Either the device drivers are corrupt or the wrong version of the same driver is installed. In both cases, the solution is easy.
The most common cause of the problem is that the device drivers are corrupt. If you use a laptop, it’s very likely that you’ll find yourself facing this issue. You can check whether your device drivers are damaged by downloading the latest versions of the drivers from the manufacturer’s website. To do this, open the Start menu and type %windir%\system32 into the Search bar. Then select Device Manager from the list of programs. Next, double-click on each device driver listed under Display adapters. Make sure that none of the devices show yellow exclamation marks next to them. If one does, replace it immediately.
If the problem persists, try installing the correct version of the same driver. For example, if you use a wireless adapter, download the latest version of the driver from the manufacturer’ s website. After doing this, restart your computer and see whether the problem disappears. If it doesn’t, repeat the process.
Another possible cause of the problem is the presence of incompatible versions of the same driver. This happens when you install multiple versions of the same driver on the system. To avoid this situation, make sure that you uninstall the previous version of the driver before installing the newest version.
Under Installed Updates, locate the entry named Microsoft.NET Framework 4 Client Profile and then delete it. After deleting the entry, reboot your PC.
This error occurs when there is a compatibility issue between the new drivers and older ones. In order to fix it, you must uninstall all previous versions of Windows 10 drivers before installing the new ones.
Uninstalling the old driver prevents further errors. If you are still experiencing problems after uninstalling the old drivers, please contact Microsoft support.
How to fix Windows update error 0x80070013
There are many different causes of the Windows Error 0x80070013, including viruses, malware infections, registry errors, hardware issues, power management problems, out of date drivers, improper installation of software and compatibility issues. Reimage specializes in Windows repair. It scans and diagnoses, then repairs, your damaged PC with technology designed to work on ALL PCs, regardless of brand, model or operating system.
Fix for Windows update error 0x80070013
Windows 10 includes many features that make it easy to use, such as Cortana voice commands and OneDrive cloud storage. However, some people experience issues while installing updates. This article provides solutions to resolve the following common errors related to Windows Updates:
0x80070013 – “The requested URL could not be retrieved.”
0x80070490 – “A required system component is unavailable. Please try again later, or contact your support personnel.”
0x80240011 – “An unexpected error occurred during installation of one or more updates. Contact your support personnel or package vendor.”
0x80070002 – “Error downloading file from internet. Try again later.”
0x800704CD – “Cannot connect to the remote server.”
0x80070530 – “Failed to retrieve data from the server. Verify your network connection and try again.”
Updated: May 2025
We highly recommend that you use this tool for your error. Furthermore, this tool detects and removes common computer errors, protects you from loss of files, malware, and hardware failures, and optimizes your device for maximum performance. This software will help you fix your PC problems and prevent others from happening again:
- Step 1 : Install PC Repair & Optimizer Tool (Windows 11, 10, 8, 7, XP, Vista).
- Step 2 : Click Start Scan to find out what issues are causing PC problems.
- Step 3 : Click on Repair All to correct all issues.
Manual reset and Windows update error 0x80070013
To fix this issue, you must perform a manual reset. You can do this by pressing F8 repeatedly during boot up. When prompted, select Safe Mode and press Enter. Once in safe mode, restart your computer normally.
RECOMMENATION: Click here for help with Windows errors.
Frequently Asked Questions
What does error code 0x80070001 mean?
This error code occurs when you attempt to install or uninstall software while running under limited privileges. You must run setup programs as an Administrator to avoid getting this error. If you’re installing a program that requires administrative access, select Run As Administrator when prompted, and follow the instructions to complete the process.
What does error code 80010000 mean?
If you see this error code, it means that the computer is trying to load a driver, but cannot find one that meets the requirements. For example, this error could happen if you’re attempting to use a USB device that isn’t recognized by the operating system. To resolve this issue, make sure that the correct drivers are installed. Try uninstalling and reinstalling the device. If you still experience issues, contact your hardware manufacturer.
What does error code 80040000 mean?
This error is similar to error code 80010000, except that it refers to a missing DLL. In most cases, this error is caused by a corrupt DLL. Check your hard disk for viruses and malware, and scan your files with anti-virus software. To repair this type of error, download and install the latest version of the affected DLL.
The Symptoms of Error 0x80070013
Error code 80070013 is one of those annoying Windows errors that pop up every now and then. If you are experiencing it, here are some things you can do to fix it.
1. Check Disk – Run chkdsk /f /r on the affected system.
2. Scan For Viruses – You can use anti-virus software like Malwarebytes Anti-Malware Free Edition. Just make sure you download the latest version.
3. Reboot – Rebooting your computer might help resolve the issue.
4. Try Another Restore Point – Restoring to a different restore point could solve the problem.
5. Reinstall Windows – If none of the above works, you can always reinstall Windows.
6. Update Drivers – Sometimes updating drivers can help resolve the problem.
What is Error 0x80070013
Error 0x80070013 is one of the most common Windows errors you’ll come across. In fact, it’s listed as the number one problem people encounter while trying to fix their computer.
The good news is that there’s usually a simple solution to fixing this error. Here are some tips to help you troubleshoot and resolve the issue quickly.
#1 – Check Your Hard Drive
If you’re experiencing an error code like this, check out your hard disk first. Is it damaged? Are you running low on storage space? You might want to consider upgrading your hard drive.
#2 – Check Your Permissions
You might notice that you don’t have enough access to certain folders or files. If you do, make sure you’ve got sufficient permission levels set up. For example, if you’re having trouble accessing a folder called “C:\Users\UserName,” try changing the permissions settings on that folder to give yourself full control over it.
#3 – Try Reinstalling Programs
In this post, you will be guided on how you can fix error 0x80070013 while executing various operations in your Windows 10 computer like System Restore, Windows Backup, or Windows Updates. When you encounter error 0x80070013, you will see the following error messages.
For System Restore, it states:
“System Restore did not complete successfully. Your computer’s system files and settings were not changed.
Details: System Restore failed while scanning the file system on the drive <Partition Letter>
The drive might be corrupt. You might want to retry System Restore after running chkdsk /R on this disk.
An unspecified error occurred during System Restore. (0x80070013)
You can try System Restore again and choose a different restore point. If you continue to see this error, you can try an advanced recovery method.”
Whereas in Windows Backup, it states:
“Check your backup, Windows Backup failed while trying to read from this shadow copy on one of the volumes being backed up. Please check in the event logs for any relevant errors.
The backup failed, The media is write protected (0x80070013).”
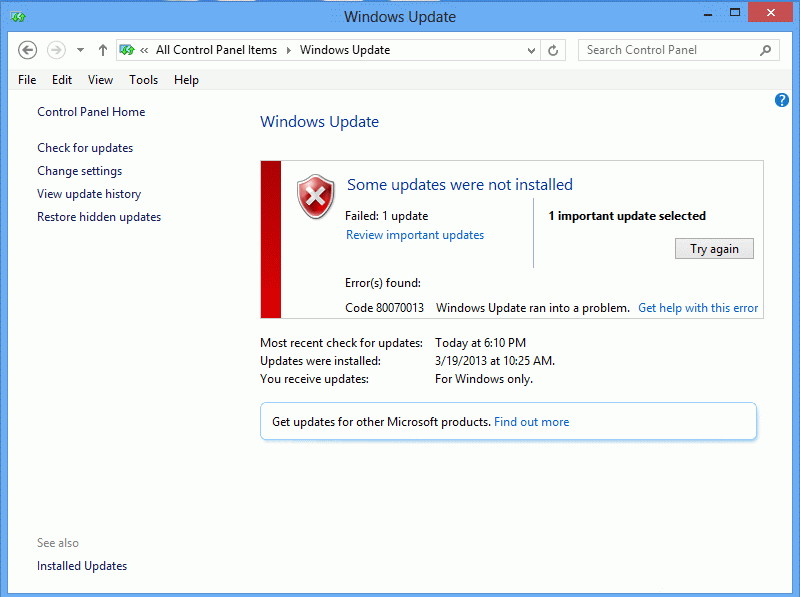
On the other hand, you will see the following error message in Windows Update:
“There were some problems installing updates, but we’ll try again later. If you keep seeing this and want to search the web or contact the support for information, this may help: (0x80070013).”
There are several suggestions you can check out to fix the error depending on where you encountered it. If you encountered it while running Windows Updates, then you can try to reset the Windows Update components or run the Windows Update Troubleshooter. And if you got the error when running System Restore, you can try to run a System File Checker scan or the DISM tool as well as the CHKDSK utility. Lastly, if you got this error when running the Windows Backup service, you can try to check its status in the Services Manager.
Error 0x80070013 in Windows Updates:
Option 1 – Try to reset the Windows Update components
- Open Command Prompt with admin privileges.
- After that, type each one of the following commands and hit Enter after you key in one after the other.
- net stop wuauserv
- net stop cryptsvc
- net stop bits
- net stop msiserver
Note: The commands you entered will stop the Windows Update components such as Windows Update service, Cryptographic services, BITS, and MSI Installer.
- After disabling WU components, you need to rename both the SoftwareDistribution and Catroot2 folders. To do that, type each one of the following commands below, and don’t forget to hit Enter after you type one command after the other.
- ren C:/Windows/SoftwareDistribution/SoftwareDistribution.old
- ren C:/Windows/System32/catroot2/Catroot2.old
- Next, restart the services you’ve stopped by entering another series of commands. Don’t forget to hit Enter after you key in one command after the other.
- net start wuauserv
- net start cryptsvc
- net start bits
- net start msiserver
- Close Command Prompt and reboot your PC.
Option 2 – Run the Windows Update Troubleshooter
You might also want to run the Windows Update Troubleshooter as it could also help in fixing error 0x80070013. To run it, go to Settings and then select Troubleshoot from the options. From there, click on Windows Update and then click the “Run the troubleshooter” button. After that, follow the next on-screen instructions and you should be good to go.
Error 0x80070013 in System Restore:
Option 3 – Try to run both Systems File Checker scan and DISM tool
Running the System File Checker scan as well as the DISM tool can help you resolve error 0x80070013 while performing System Restore. Refer to these steps to do so.
- Open the Command Prompt with admin privileges.
- After opening Command Prompt, execute this command to run a System File Checker scan: sfc /scannow
- Once the scan is completed, restart your computer and then see if the error is now fixed. If not, you can run the DISM tool.
- Open Command Prompt with admin privileges again.
- Then type in the following commands and make sure to hit Enter right after you type each one of them in order to properly run the DISM tool:
- Dism /Online /Cleanup-Image /CheckHealth
- Dism /Online /Cleanup-Image /ScanHealth
- Dism /Online /Cleanup-image /Restorehealth
- Do not close the window if the process takes a while as it will probably take a few minutes to finish.
Option 4 – Run the CHKDSK utility
- In the Windows Search box, type “command prompt” and from the search results, right-click on Command Prompt and select “Run as administrator”.
- After opening Command Prompt, type this command and tap Enter: chkdsk <Partition Letter>: /f /r /x /b
- The command you entered will start to check for errors and fix them automatically. Else, it will throw an error message saying, “Chkdsk cannot run because the volume is in use by another process. Would you like the schedule this volume to be checked the next time the system restarts? (Y/N)”.
- Tap the Y key to schedule Disk Check the next time your computer restarts.
Error 0x80070013 in Windows Backup:
Option 5 – Try checking the status of the Windows Backup Service
- First, you need to tap the Win + R keys on your keyboard to open the Run dialog box.
- Next, type “services.msc” in the field and click OK or tap Enter to open the Windows Services Manager.
- After that, you will see a list of services and from there, look for the Windows Backup Service and double click on it to open its Properties.
- Then check if its Startup type is set to Disabled. If it is, then change it to “Manual”. Note that this service is essential as it provides backup and restores capabilities.
- Now click on the Apply and OK buttons to save the changes made and then restart your computer. Check if the error is now gone.
Do You Need Help with Your Device?
Our Team of Experts May Help
Troubleshoot.Tech Experts are There for You!
GET HELP
Troubleshoot.Tech experts work with all versions of Microsoft Windows including Windows 11, with Android, Mac, and more.
Share this article:
You might also like
Fatal error C0000034 happens during the installation of the Windows update and if you are one of the unlucky users who sadly run into this, keep reading as we will provide solutions to this error and how to get around it.
Start from point 1 to the bottom and hopefully you will have your PC back into working order in no time.
-
Run Windows Update troubleshooter
Usually, a built-in Windows troubleshooter can solve issues painlessly and fast, my advice is to try this as the first option, it is a simple and clean solution worth trying and in 90% it solves the issue all by itself.
-
Do a clean boot
Using task manager, remove all nonessential applications and services from starting up, reboot your computer, and once it is cleanly booted try re-running the update process again, if the issue was running the application this time everything will work since the problematic application is not running.
-
Reset Windows update components to the default
This solution requires you to use the Reset Windows Update Agent Tool to reset Windows Update components to default or use this PowerShell script to reset Windows Update Client. You can also manually reset each Windows Update component to default and then re-run the update.
-
Disable firewall and antivirus
Altho not likely it is still a possibility that some firewalls and antivirus can detect windows updates as malicious software and cut them off. If everything else failed, disable the firewall and your PC protection and when it is fully disabled try updating.
-
Do automatic startup repair
This should be the last thing to do but if everything else failed, do it. Perform Windows 10 Startup Repair. Once the startup repair completes successfully, you can re-run the update. The update should install without errors.
Read More
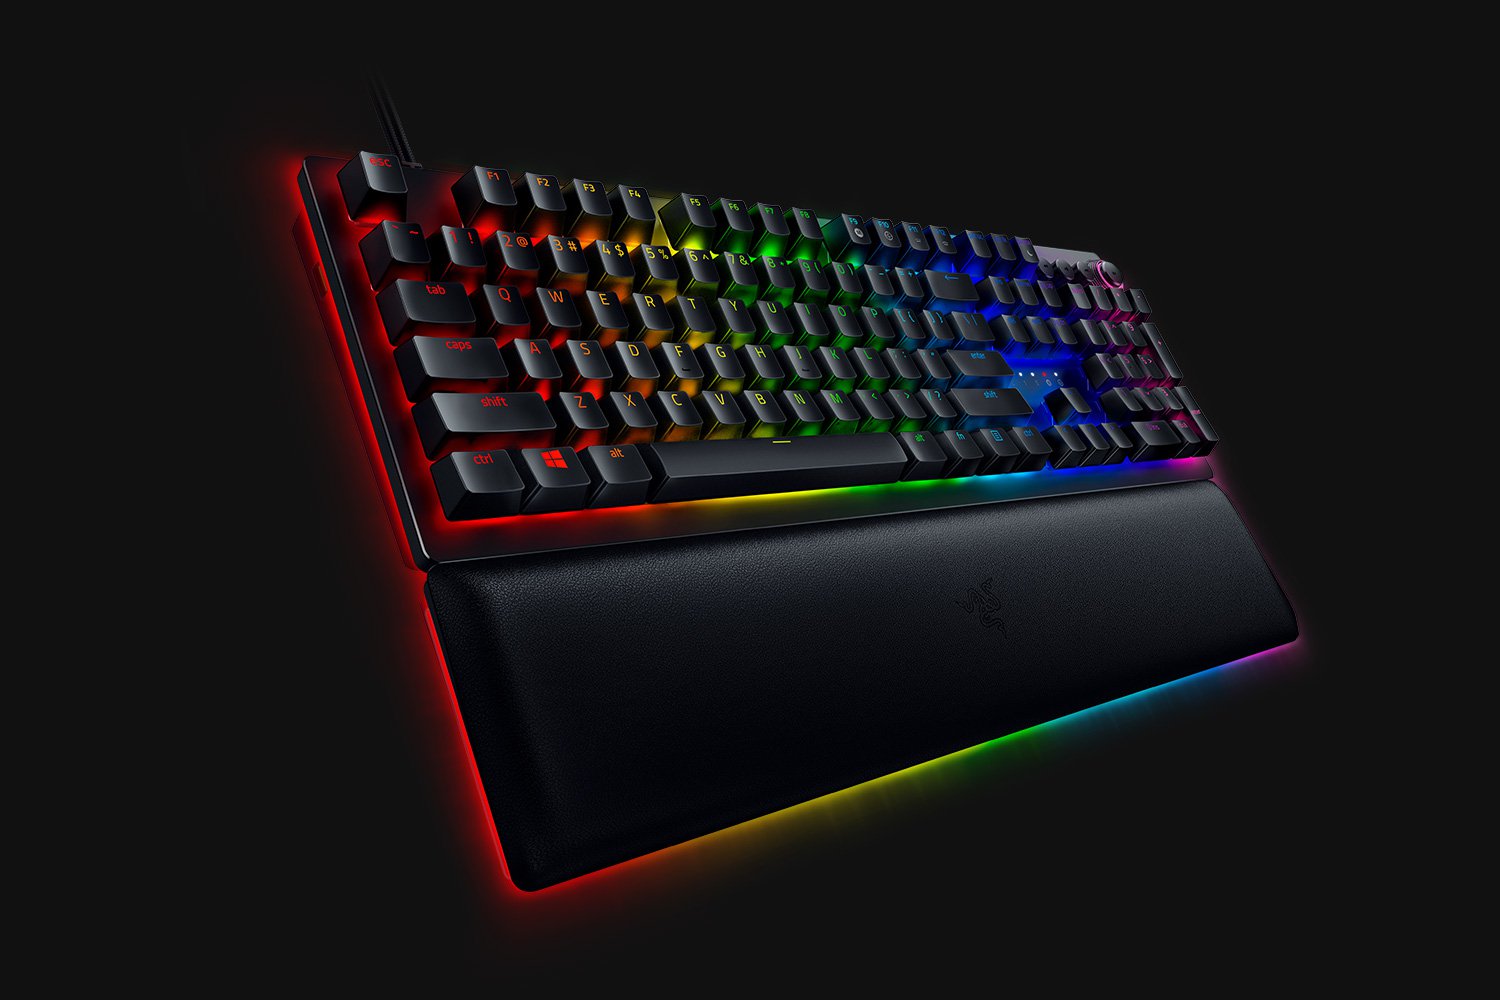
When it comes to computer peripherals first thing that comes to people’s minds is probably Mouse and Keyboard. Also when discussing peripherals brands, Razer is not a stranger and over the years it has built its name and cult following.
Razer’s mechanical keyboards have been always in the upper field of quality and trust from users and Huntsman is no different.
Tech specifics of Huntsman keyboard
- Mechanical optical switches
Razer has introduced their new optical technology switch with this keyboard. These switches are faster and more accurate than typical mechanical switches and if tests are to be believed this is the fastest keyboard currently on the market. - Multi-functional digital dial
A multi-function digital dial with three tactile media keys gives you instant access to everything from brightness to volume in seconds. All programmable and customizable through Synapse 3, so you can set your preferred configurations right at your fingertips. - 10-key rollover
Anti-ghosting technology that enables 10-key simultaneous presses at the same time - 4-side underglow with Razer chroma
Go crazy and personalize lighting effects any way you want with a full 4-side underglow and 38 customization zones. Powered by Razer Chroma
Feel and noise
In the department of noise, well it is the mechanical keyboard so naturally, it will be louder than membrane ones but in terms of comparing it to other mechanical keyboards it is within the same noise range, maybe just a tiny bit silenced.
The keyboard comes with 2 different types of switches, purple clicky ones that are louder and have that *click* sound for sound feedback, and red ones, that are not equipped with clicky sound but are linear providing slightly faster performance.
If you choose the Huntsman elite model of the keyboard it will come with a nice hand resting mat that is very comfortable and feels right. Using a keyboard feels like using a Razer keyboard, it is responsive and gives that superior mechanical feeling.
Conclusion
Razer Huntsman mechanical keyboard is not the cheapest nor the best on the market but it is the fastest one out. It is in the top tier of keyboards and worth the investment.
Read More
EmailAccountLogin is a browser extension for Google Chrome, Mozilla, and Internet Explorer. This extension enables you one-click access to your favorite email providers, allowing you to easily check your email without typing the web address.
From the author: One-Click Access to quick links to the most popular email providers.
The Email Account Login new tab extension provides convenient, one-click access to several popular email services including Gmail, Yahoo, Facebook, Outlook, and Live mail along with providing direct access to a web search.
EmailAccountLogin is a browser hijacker, this extension hijacks your home page and replaces it with its own search engine. While active this extension monitors your website visits, links, clicks, and personal information. This information is later sold/forwarded to better server ads across its network. While using EmailAccountLogin you will see additional unwanted ads injected into your search results, sponsored links, and even sometimes pop-up ads.
Several anti-virus scanners have categorized EmailAccountLogin as a Browser Hijacker and therefore, for security reasons, it is not recommended to keep it on your computer.
About Browser Hijackers
Browser hijack is a very common type of online fraud where your internet browser configuration settings are modified to make it do things you don’t intend. Browser hijacker malware is developed for many different reasons. It redirects you to the sponsored sites and inserts advertisements on the browser that helps its developer generate earnings. It may seem harmless, but most of these sites are not legitimate and could present a significant threat to your online safety. As soon as the program attacks your laptop or computer, it starts to mess things up a whole that slows your PC down to a crawl. In the worst-case scenario, you may be pushed to tackle serious malware threats as well.
Browser hijacking signs and symptoms
Signs that your internet browser is hijacked include:
1. your homepage has been reset to some mysterious webpage
2. when you key in a URL, you find yourself regularly directed to a different webpage than the one you actually meant
3. default web engine is modified
4. you’re getting new toolbars you haven’t witnessed before
5. you notice numerous ads pop up on your browsers or display screen
6. your web browser starts running slowly or displays frequent errors
7. you are blocked to access the websites of computer security solution providers.
How they get into your PC
Browser hijackers may use drive-by downloads or file-sharing networks or perhaps an e-mail attachment in order to reach a targeted computer. Many browser hijackings originate from add-on applications, i.e., toolbars, browser helper objects (BHO), or extensions added to web browsers to provide them additional functionality. A browser hijacker may also come bundled up with some freeware that you inadvertently download to your computer, compromising your internet security. A good example of some notorious browser hijackers includes Anyprotect, Conduit, Babylon, SweetPage, DefaultTab, Delta Search, and RocketTab, but the names are constantly changing.
Browser hijacking can bring about severe privacy issues and even identity theft, disrupt your browsing experience by taking control over outbound traffic, considerably slows down your computer by depleting lots of resources and result in system instability also.
How to repair a browser hijack
Certain hijackers can be removed by simply uninstalling the corresponding free software or add-ons from the Add or Remove Programs in the Microsoft Windows control panel. Yet, some hijackers are far harder to find or get rid of as they might get themselves connected with some critical system files which allow it to operate as a necessary operating-system process. Furthermore, manual removal demands you to execute several time-consuming and complex actions which are very difficult to do for novice computer users.
Browser hijackers can be effectively removed by installing and running anti-malware software on the affected PC. Safebytes Anti-Malware has a cutting-edge anti-malware engine to help you avoid browser hijacking in the first place, and mop up any existing issues. Along with anti-virus software, a PC optimizer tool will help you repair Windows registry errors, eliminate unwanted toolbars, secure your internet privacy, and improve overall system performance.
Find Out How To Install Safebytes Anti-Malware On An Infected Computer system
All malware is bad and the effects of the damage can vary according to the specific type of malware. Some malware variants modify browser settings by adding a proxy server or change the PC’s DNS configurations. In these cases, you will be unable to visit some or all of the websites, and thus unable to download or install the necessary security software to get rid of the malware. So what should you do if malicious software keeps you from downloading or installing Safebytes Anti-Malware? Follow the instructions below to get rid of malware through alternate methods.
Install the anti-malware in Safe Mode
In Safe Mode, you may adjust Windows settings, un-install or install some software, and eradicate hard-to-delete malware. In the event, the malware is set to load automatically when the PC starts, shifting to this mode may well prevent it from doing so. To start the computer into Safe Mode, hit the “F8” key on the keyboard just before the Windows logo screen comes up; Or right after normal Windows boot up, run MSConfig, look over the Safe Boot under the Boot tab, and then click Apply. After you restart into Safe Mode with Networking, you may download, install, as well as update the anti-malware program from there. At this point, you could run the antivirus scan to eliminate viruses and malware without any interference from another application.
Utilize an alternate internet browser to download security software
Some malware might target vulnerabilities of a specific browser that obstruct the downloading process. When you suspect that your Internet Explorer happens to be hijacked by a virus or otherwise compromised by online hackers, the most effective plan of action is to switch over to a different web browser such as Chrome, Firefox, or Safari to download your chosen computer security software – Safebytes Anti-Malware.
Install and run anti-virus from your flash drive
Another option is to save and run an antivirus software program entirely from a USB drive. Do these simple measures to clear up your affected PC using portable anti-malware.
1) On a virus-free PC, install Safebytes Anti-Malware.
2) Plug the Flash drive into the uninfected computer.
3) Double-click the Setup icon of the antivirus program to run the Installation Wizard.
4) Choose the drive letter of the pen drive as the location when the wizard asks you where you would like to install the anti-virus. Follow activation instructions.
5) Transfer the flash drive from the uninfected computer to the infected computer.
6) Double-click the antivirus software EXE file on the thumb drive.
7) Click on “Scan Now” to run a complete scan on the infected computer for malware.
If no other method of downloading and installing an anti-malware program works, then you’ve no other choice than to hit the final resort: a full Windows reinstallation, which can get rid of that nasty virus and help you regain internet access. If you’re unsure which method to use, simply contact our toll-free number 1-844-377-4107 to speak to our technical team. Our experts will take you step-by-step through the malware removal process on the phone and also restore your computer remotely.
SafeBytes Anti-Malware: Lightweight Malware Protection for Windows PC
If you’re looking to download an anti-malware application for your computer, there are numerous tools out there to consider nonetheless, you just cannot trust blindly anyone, irrespective of whether it is paid or free software. Some of them are excellent, some are ok types, and some will harm your PC themselves! You need to choose one that is dependable, practical, and has a strong reputation for its malware source protection. On the list of recommended software programs is SafeBytes Anti-Malware. SafeBytes has a very good history of top-quality service, and customers are very happy with it.
SafeBytes anti-malware is a very effective and easy-to-use protection tool that is made for end-users of all levels of IT literacy. With its cutting-edge technology, this application can help you get rid of multiples types of malware including computer viruses, worms, PUPs, trojans, adware, ransomware, and browser hijackers.
There are numerous great features you will get with this particular security product. The following are some of the features you might like in SafeBytes.
Robust Anti-malware Protection: This deep-cleaning antimalware software goes much deeper than most anti-virus tools to clean your computer system. Its critically acclaimed virus engine locates and disables hard to remove malware that conceals deep inside your computer.
Real-time Active Protection: SafeBytes offers real-time active monitoring and protection from all known computer viruses and malware. This software will always keep track of your computer for any suspicious activity and updates itself regularly to keep current with the latest threats.
Fast Scan: This computer software has one of the fastest and most efficient virus scanning engines in the industry. The scans are highly accurate and take a little time to complete.
Internet Security: SafeBytes gives an instant safety rating on the web pages you are going to check out, automatically blocking harmful sites and making sure that you’re certain of your safety while browsing the net.
Lightweight: This application is not “heavy” on the computer’s resources, so you’ll not notice any overall performance problems when SafeBytes is operating in the background.
24/7 Guidance: You can obtain high levels of support round the clock if you’re using their paid software.
Technical Details and Manual Removal (Advanced Users)
If you wish to manually remove EmailAccountLogin without the use of an automated tool, it may be possible to do so by removing the program from the Windows Add/Remove Programs menu, or in cases of browser extensions, going to the browsers AddOn/Extension manager and removing it. You will likely also want to reset your browser.
To ensure the complete removal, manually check your hard drive and registry for all of the following and remove or reset the values accordingly. Please note that this is for advanced users only and may be difficult, with incorrect file removal causing additional PC errors. In addition, some malware is capable of replicating or preventing deletion. Doing this in Safe Mode is advised.
The following files, folders, and registry entries are created or modified by EmailAccountLogin
Files:
C:Program FilesEmail Account Login
C:UserAppDataRoamingEmail Account Login
C:ProgramDataEmail Account Login
C:UsersUserAppDataLocalEmail Account Login
%TEMP%CF49E01A-6F41-4B56-9743-DBC375176677emailaccountlogin.exe
%LOCALAPPDATA%MicrosoftInternet ExplorerRecoveryHighActiveRecoveryStore.E2864823-7CB8-11E7-989D-0A00278A626A.dat
%LOCALAPPDATA%MicrosoftInternet ExplorerRecoveryHighActiveE2864824-7CB8-11E7-989D-0A00278A626A.dat
%LOCALAPPDATA%MicrosoftInternet Explorerframeiconcache.dat
%TEMP%CF49E01A-6F41-4B56-9743-DBC375176677Commondbg.js
%TEMP%CF49E01A-6F41-4B56-9743-DBC375176677Commonimggreen-btn.png
%TEMP%CF49E01A-6F41-4B56-9743-DBC375176677Commonimggrey-btn.png
%TEMP%CF49E01A-6F41-4B56-9743-DBC375176677Commonjquery.min.js
%TEMP%CF49E01A-6F41-4B56-9743-DBC375176677Commonjson3.min.js
%TEMP%CF49E01A-6F41-4B56-9743-DBC375176677Commonstats.js
%TEMP%CF49E01A-6F41-4B56-9743-DBC375176677Finish.zip
%TEMP%CF49E01A-6F41-4B56-9743-DBC375176677Finishindex.html
%TEMP%CF49E01A-6F41-4B56-9743-DBC375176677Finishscript.js
%TEMP%CF49E01A-6F41-4B56-9743-DBC375176677Finishstyles.css
%TEMP%CF49E01A-6F41-4B56-9743-DBC375176677IES.zip
%TEMP%CF49E01A-6F41-4B56-9743-DBC375176677IESie.png
Registry:
HKEY_LOCAL_MACHINESYSTEMCurrentControlSetServicesWpm
HKCUSoftwareMicrosoftWindowsCurrentVersionInternet Settingsrandom
HKEY_LOCAL_MachineSoftwareClasses[adware name]
HKEY_CURRENT_USERSoftwareMicrosoftWindowsCurrentVersionRun .exe
HKEY_CURRENT_USERSoftwareMicrosoftWindowsCurrentVersionInternet Settings CertificateRevocation = 0
HKEY_LOCAL_MACHINESOFTWAREMicrosoftWindowsCurrentVersionrunrandom
HKEY_CURRENT_USERSoftwareMicrosoftInternet ExplorerMain Default_Page_URL
Read More
The “Unknown Hard” error that keeps on appearing in Windows 10 can put users in an unpleasant situation. This kind of error leads to the freezing of the taskbar, blackening of the screen, and sudden disappearance of the icons on the Desktop. And each time you try to open Windows, the system will only give you an error message saying that it’s a critical error and some applications like Start and Cortana won’t work.
Upon analysis, it seems that the “sihost.exe” is not responding and that it is the one that’s causing the c000021a Unknown Hard error to pop up. Sihost.exe files represent the Shell Infrastructure Host which is an essential component in the Windows operating system. The Windows Shell Infrastructure Host is primarily responsible for handling some graphical elements of the operating system interface such as the Start menu and the taskbar transparency. And so if the Shell Infrastructure or Sihost.exe has stopped, has been removed, or corrupted, you will most likely have issues with the overall functionality of the Windows operating system and you’ll get the Unknown Hard error
In addition, the ctfmom.exe Unknown Hard error may also occur due to incompatible drivers installed on your PC. Ctfmom is a process that identifies inputs such as handwriting, languages, and many more. It’s the one that controls the functions of background behavior. To resolve this issue, you need to first try to identify which application is the one that’s running the sihost.exe file. And if needed, you need to either update or reinstall or completely uninstall the problematic application.
Option 1 – Try to run the System File Checker
The SFC Scan or System File Checker, us a built-in utility in Microsoft Windows that can be found in the C:\Windows\System32 folder. This tool allows users to scan and restore any corrupted system files in Windows that might be causing the Unknown Hard error to appear. Before you use this tool, make sure to find out whether the sihost.exe on your computer is a Trojan that you have to remove or if it’s a file that belongs to a trusted Windows application. Once you have that sorted out, follow the steps below.
- Tap Win + R to launch Run.
- Type in cmd in the field and tap Enter.
- After opening Command Prompt, type in sfc /scannow
The command will start a system scan which will take a few whiles before it finishes. Once it’s done, you could get the following results:
- Windows Resource Protection did not find any integrity violations.
- Windows Resource Protection found corrupt files and successfully repaired them.
- Windows Resource Protection found corrupt files but was unable to fix some of them.
Option 2 – Try to use System Restore
You can also try using System Restore. This is one of the ways you can use it to back up your PC. Since restore points are created automatically each week by System Restore, you can use System Restore to restore your computer back to an earlier good point in time.
Option 3 – Try to troubleshoot the error in a Clean Boot State
Putting your PC in a Clean Boot state can help you diagnose and troubleshoot the issues in your system. During this state, you can start the system with a minimum number of drivers and startup programs that will surely help you in isolating the root cause of the Unknown Hard Error.
- Log onto your PC as an administrator.
- Type in MSConfig in the Start Search to open the System Configuration utility.
- From there, go to the General tab and click “Selective startup”.
- Clear the “Load Startup items” checkbox and make sure that the “Load System Services” and “Use Original boot configuration” options are checked.
- Next, click the Services tab and select the “Hide All Microsoft Services” checkbox.
- Click Disable all.
- Click on Apply/OK and restart your PC. (This will put your PC into a Clean Boot State. And configure Windows to use the usual startup, just simply undo the changes.)
After putting your PC in a Clean Boot State, try creating a system restore point and see if the problem still occurs. Clean Boot troubleshooting is designed to help you isolate the problem. For you to execute a clean boot troubleshooting, you must do a couple of actions (the steps are given above) and then restart your PC after every action. You might have to disable one third-party app after the other to really isolate the issue. And once you’ve narrowed down the problem, you can either disable the third-party app that’s causing the problem or remove it. Note that you must switch your PC back into the Normal Startup mode after you’re done troubleshooting the problem. Here’s how you can do it:
- From the “Start” menu, go to System Configuration.
- After that, switch to the General tab and click the option for “Normal Startup”.
- Next, go to the Services tab and clear the checkbox for “Hide all Microsoft services”.
- Then find and click “Enable all” and if prompted, you have to confirm.
- Afterward, go to the Task Manager and enable all the Startup programs and confirm the action.
- Restart your PC when prompted.
Read More
There is various Blue Screen of Death errors that you can encounter as you use your Windows 10 computer and some of these Stop errors have something to do with the win32kbase.sys file. This post will guide you in fixing the BSOD errors related to the win32kbase.sys file.
- A problem has been detected and Windows has been shut down to prevent damage to your computer. The problem seems to be caused by the following file: Win32kbase.sys.
- Your PC ran into a problem and needs to restart. If you would like to know more, you can search online later for this error: win32kbase.sys.
- SYSTEM_SERVICE_EXCEPTION (win32kbase.sys)
- STOP 0x0000000A: IRQL_NOT_LESS_EQUAL – win32kbase.sys
- STOP 0x0000001E:
KMODE_EXCEPTION_NOT_HANDLED – win32kbase.sys
- STOP 0×00000050:
PAGE_FAULT_IN_NONPAGED_AREA – win32kbase.sys
The win32kbase.sys file is a Windows operating system Base Win32 Kernel Driver file located in the System32 folder so if it ends up getting corrupted or if it went missing, your computer will throw up Blue Screen error. To fix BSOD errors that have something to do with the win32kbase.sys file, here are some possible fixes that could help. Worry not for these possible fixes are not complicated.
Option 1 – Run the Check Disk or CHDSK utility
One of the first things you can try to resolve the win32kbase.sys Blue Screen error is running the CHKDSK utility. If your hard drive has issues with integrity, the update will really fail as the system will think that it’s not healthy and that’s where the CHKDSK utility comes in. The CHKDSK utility repairs hard drive errors that might be causing the problem.
- Open Command Prompt with admin privileges.
- After opening Command Prompt, execute the following command and hit Enter:
chkdsk /f C:
- Wait for the process to be completed and then restart your computer.
Option 2 – Run SFC or System File Checker scan
System File Checker or SFC is a built-in command utility that helps in restoring corrupted files as well as missing files. It replaces bad and corrupted system files to good system files. To run the SFC command, follow the steps given below.
- Tap Win + R to launch Run.
- Type in cmd in the field and tap Enter.
- After opening Command Prompt, type in sfc /scannow
The command will start a system scan which will take a few whiles before it finishes. Once it’s done, you could get the following results:
- Windows Resource Protection did not find any integrity violations.
- Windows Resource Protection found corrupt files and successfully repaired them.
- Windows Resource Protection found corrupt files but was unable to fix some of them.
Restart your PC.
Option 3 – Try to run the DISM commands
You might want to repair potentially corrupted files in your system as having them could also trigger the win32kbase.sys Blue Screen error. To repair these corrupted system files, you can run the DISM commands:
- Tap the Win + X keys and click on the “Command Prompt (Admin)” option.
- After that, input each one of the commands listed below sequentially to execute them:
- Dism /Online /Cleanup-Image /CheckHealth
- Dism /Online /Cleanup-Image /ScanHealth
- Dism /Online /Cleanup-Image /RestoreHealth
- Once you’ve executed the commands given above, restart your computer and check if the dxgkrnl.sys Blue Screen error is now fixed.
Option 4 – Try to run the Blue Screen Troubleshooter
As you know, the Blue Screen troubleshooter is a built-in tool in Windows 10 that helps users in fixing Blue Screen errors related to the win32kbase.sys file. It can be found in the Settings Troubleshooters page. To use it, refer to these steps:
- Tap the Win + I keys to open the Settings panel.
- Then go to Update & Security > Troubleshoot.
- From there, look for the option called “Blue Screen” on your right-hand side and then click the “Run the troubleshooter” button to run the Blue Screen Troubleshooter and then follow the next on-screen options. Note that you might have to boot your PC into Safe Mode.
Read More
One of the most important components of a computer in the network. The network, with the help of network devices, makes it possible for all kinds of devices to exchange information. One of the files associated with the network driver is the netio.sys file. It is a system file used by third-party programs to interact with the devices on the network.
If you encounter a Blue Screen of Death error that’s related to the netio.sys file then you’ve come to the right place as this post will guide you in fixing it. Here are some of the Blue Screen errors related to the netio.sys file:
- KMODE EXCEPTION NOT HANDLED
- PAGE FAULT IN A NONPAGED AREA
- IRQL NOT LESS EQUAL
- SYSTEM_SERVICE_EXCEPTION
- DRIVER IRQL NOT LESS OR EQUAL
- SYSTEM THREAD EXCEPTION NOT HANDLED
To fix the netio.sys Blue Screen errors on your Windows 10 computer, you can check out each one of the following suggestions.
Option 1 – Try to use the System File Checker
One of the built-in tools in Windows that you can use to fix Blue Screen errors is the System File Checker. This built-in command utility can help you restore corrupted or missing files as well as replace bad and corrupted system files. Chances are, the netio.sys file might be corrupted so to fix it, use System File Checker.
- First, right-click on the Start button and click on the “Command Prompt (Admin) option.
- Next, type in the sfc /scannow command and hit Enter to execute it.
The command will start a system scan which will take a few whiles before it finishes. Once it’s done, you could get the following results:
- Windows Resource Protection did not find any integrity violations.
- Windows Resource Protection found corrupt files and successfully repaired them.
- Windows Resource Protection found corrupt files but was unable to fix some of them.
- Finally, restart your computer.
Option 2 – Try checking the Memory for any errors
The first thing you can do to check the memory for errors is to run the CHKDSK utility. The CHKDSK utility repairs hard drive errors that might be causing the problem.
- You need to open “This PC” first.
- And then right-click on your operating system partition for Windows.
- Next, click on Properties and navigate to the Tools tab.
- After that, click on the Check button under the Error Checking section.
- A new mini window will appear and from there, click on Scan drive.
- Now let it scan your disk drive partition to check for errors and then restart your computer.
After running the CHKDSK utility, it’s now time to fix issues with your RAM by running the Memory Diagnostic tool. This tool in windows can help resolve the Blue Screen errors related to the netio.sys file by checking and automatically fixing any memory-based issues. To run it, refer to these steps:
- Tap the Win + R keys to open Run and type mdsched.exe and hit Enter to open the Windows Memory Diagnostic Tool.
- After that, it will give two options such as:
- Restart now and check for problems (Recommended)
- Check for problems the next time I start my computer
- Once your computer has restarted, perform a basic scan or you could also go for the “Advanced” options such as “Test mix” or “Pass count”. Simply tap the F10 key to start the test.
Note: After you select your preferred option, your computer will restart and check for memory-based issues. If it finds any issues, it will automatically fix them and if there’s no issue found, then it’s most likely not a memory-based issue so you should try the other options given below.
Option 3 – Try to update or rollback or disable Network drivers
You might also want to update, roll back or disable your Network drivers to resolve the netio.sys Blue Screen errors.
- Tap the Win + R keys to launch the Run window and then type in the “mdsched.msc” command and hit Enter to open the Device Manager window.
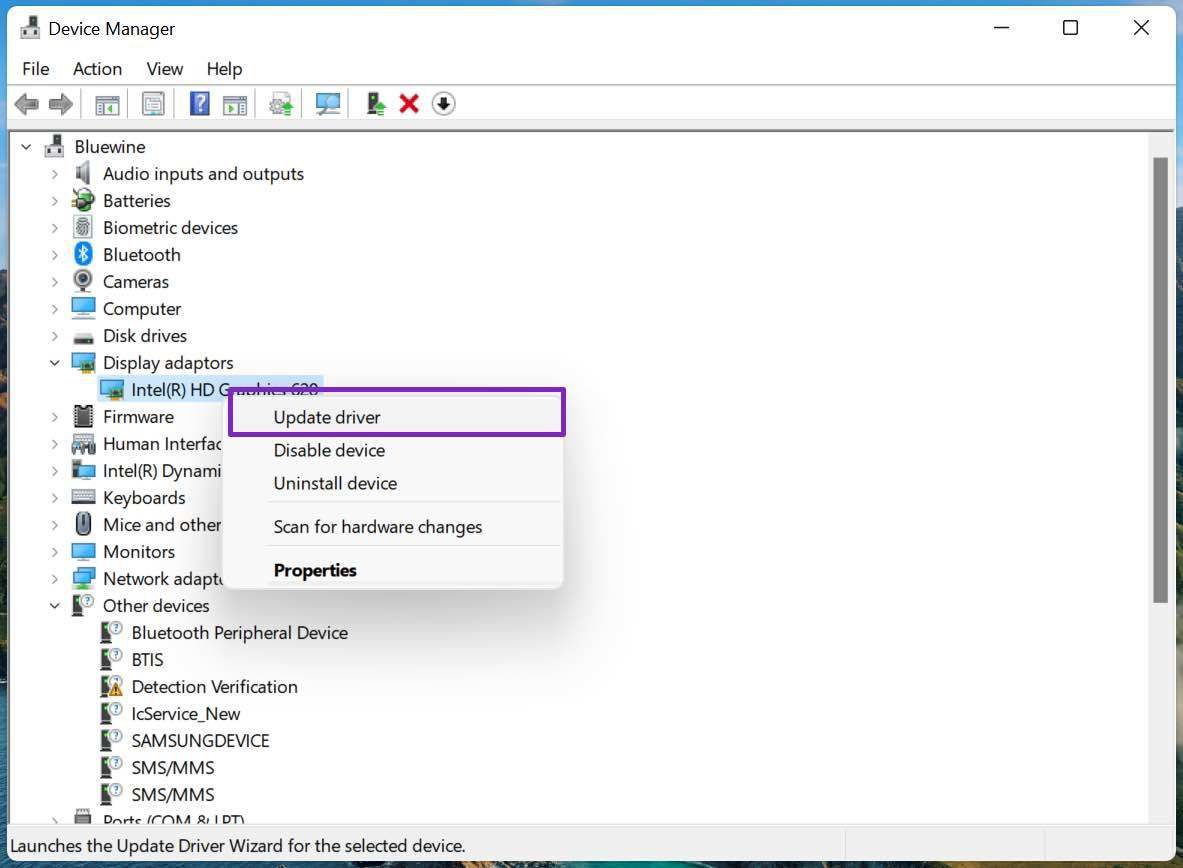
- Under the Device Manager, you will see a list of drivers. From there, look for the Network Adapters and expand it.
- Then right-click on each one of the Network drivers and depending on your preference, you can either select “Update driver”, “Disable device” or “Uninstall device”.
- After that, restart your PC and see if it helped in fixing the netio.sys Blue Screen error.
Option 4 – Perform System Restore
Performing System Restore can also help fix BSOD errors, including the ones related to the netio.sys file. To run System Restore, follow the steps below.
- First, tap the Win + R keys to open the Run dialog box.
- After that, type in “sysdm.cpl” in the field and tap Enter.
- Next, go to the System Protection tab then click the System Restore button. This will open a new window where you have to select your preferred System Restore point.
- After that, follow the on-screen instructions to finish the process and then restart your computer and check if the problem is fixed or not.
Option 5 – Run the Blue Screen Troubleshooter
Troubleshooting Blue Screen of Death errors wouldn’t be complete without the Blue Screen troubleshooter. As you know, it is a built-in tool in Windows 10 that helps users in fixing BSOD errors like Storport.sys. It can be found on the Settings Troubleshooters page. To use it, refer to these steps:
- Tap the Win + I keys to open the Settings panel.
- Then go to Update & Security > Troubleshoot.
- From there, look for the option called “Blue Screen” on your right-hand side and then click the “Run the troubleshooter” button to run the Blue Screen Troubleshooter and then follow the next on-screen options. Note that you might have to boot your PC into Safe Mode.
Read More
Error Code 0xc004c008 — What is it?
This specific Windows 8.1 or Windows 10 error code has to do with the number of times you can use your license number to install windows programs on computers. All windows activation codes are licensed to be used one time for a device, to control piracy, but what happens when your PC crashes, or you have to change a hard drive component and are forced to re-install Windows Operating System. Luckily, there is an easy fix for this issue.
Solution
Error Causes
Basically, when you need to re-install the Windows operating system that you have previously bought and installed on another computer an error code will be displayed with a message telling you that the activation server determined that the specific key could not be used for activation. This occurs because the key has already been used on that computer, or a different one, to install operating systems. There are a few easy fixes for this issue, and most of them should be easily completed on your own.
Further Information and Manual Repair
There aren’t many explanatory ways to repair Error Code 0xc004c008. Below are two methods to go about addressing this issue.
Methods 1:
- The first step is to open the “Run” Window. You can do this in two ways. First, press the “Window” key and press the “R” key simultaneously. This will open the “Run” menu. Or you can start the “run” window by going to the Start menu and selecting Run.
- In the Run window type “SLUI 4” and click enter.
- A Phone Activation window will open up, after which you’ll need to select a few options.
- First chose the country in which you registered the product for the first time.
- Choose your country and a phone number will be displayed specific to your choice. You will now need to call the number provided.
- After you’ve dialed you will be prompted to write your “Installation ID”. Type your “Installation ID” on the phone.
- After that step, you will be asked how many copies of Windows have been installed using this license. Choose “1”, should anything else be chosen but “1”, this will not work.
- After the process is completed, you will be given a confirmation ID and should be able to proceed as normal with installation. You will have a workable product key again.
- Install whatever copy of the Windows Operating System you are attempting to with the new product key.
Method 2:
If the first method did not work, the only other option is to call Microsoft and walk through the process with a technician. To do this, dial “1-800-936-5700”. Explain the error that you received and the steps in the update process during which it was displayed. The technician will be able to walk through the steps from getting a new product key to finishing the installation.
If you’re not a tech-savvy individual but would like to solve this problem without the aid of a technician, download a powerful automated tool to fix error code 0xc004c008.
Read More
Error 0x0000001e is when you start the Windows XP Setup and you see a message which says something like:
STOP: 0x0000001E (0x80000003, 0xBFC0304, 0x0000000, 0x0000001)
Solution
Error Causes
You are most likely to face this error if you restart your PC while the Windows Setup is still under process and yet to complete.
Other causes of this error include any of the following conditions:
- The drive on which you are installing Windows has insufficient disk space to accommodate the installation.
- An incompatible or outdated third-party driver (or more) is installed on your PC which is conflicting with the installation. For instance, this could be a problematic video driver.
- The system BIOS has incompatibilities with the installation.
Further Information and Manual Repair
This error is also called the “Bug check code”.
The STOP 0x1E signifies that there was an unknown or illegal processor instruction detected by the Windows XP kernel. You will see the exception address which shows up to indicate the root of the problem which is usually a driver or faulty hardware.
You should note this address down as well as the link date of the faulty driver or image which includes it.
If at any point it becomes impossible for you to handle and you end up contacting the Windows support center to help you out with the process then this information will help you out in making things a lot easier while the support team tries to troubleshoot the problem.
The parameters included in the STOP 0x1E error message are the following:
- is the exception code which couldn’t be handled.
- shows the module’s address where the exception took place.
- signifies the exception’s parameter 0.
- represents the exception’s parameter 1.
You can use this information which usually is provided in error 0x0000001e message to pinpoint the root cause of the problem and troubleshoot it.
In order to fix this error, you need to follow either one of the following procedures as needed according to your situation.
Clean Up Your Disk
If your disk doesn’t have ample space to accommodate the installation then you should free up some of the space on your disk to make sure the Windows can be installed on it.
You can also reinstall the Windows on another disk that has sufficient space.
Get Rid of the Third Party Driver
If the error 0x0000001e message gives you the name of the driver due to which the installation process is being halted, then get rid of that driver by disabling it or removing it.
If the problem is resolved by this then you should contact the manufacturer of the third-party driver and ask them about any newer versions of the driver that wouldn’t conflict with the installation of Windows.
Upgrade System BIOS
Upgrading your system BIOS is something that you can’t do on your own. You will need to find out more about how you can upgrade. For this, you should contact either your PC’s manufacturer or your motherboard’s manufacturer.
If nothing else works, you can always make use of the Microsoft Debugging Tools which will provide you ample information about the error message.
You will find the Debugging Tools and further information about them including the downloading and installation process on Microsoft’s website.
Read More
Code 33 — What is it?
Code 33 is a typical Device Manager error. This error code occurs when Windows is unable to start a device that you are trying to use on your PC. The error code 33 is usually displayed in the following format:
“Windows cannot determine which resources are required for this device. Code 33”
Solution
Error Causes
Error code 33 may be triggered due to two reasons. One reason can be the translator’s failure to find the correct resource for the device driver.
And since this error code is associated with the Device Manager, another reason can be an outdated or corrupted device driver. In most cases, the underlying problem for Device Manager error code is outdated/corrupted drivers.
The good news is that Device Manager error code 33 is not detrimental. However, if the error is not resolved timely, it can lower the functionality and the performance of your PC. You may not be able to use the hardware device.
Further Information and Manual Repair
To resolve code 33, you don’t need to be technically sound or hire a professional computer programmer. Just like any other Device Manager error code, code 33 is also easy to repair.
To help you fix this issue on your system, below are some of the best, easy, and effective DIY solutions.
Method 1 — Configure Hardware Device
Properly configure the problematic hardware device to fix error code 33. It is important to understand that when you install a device that is not plug-and-play, the resource settings are not configured automatically.
This means for such devices you will have to perform device configuration manually.
For device configuration, here’s what you should do:
- Go to the start menu
- Click Control Panel, then click Performance and Maintenance, and then System
- Now on the hardware tab, click on Device Manager and then double click the device you wish to configure
- Click the resources tab and then click on the check box next to the Use Automatic Setting
- After that click, the ‘Setting Based On’ and then click the hardware configuration you wish to change
- Press the ‘Resource Type’ you will like to configure in the ‘Resource Settings’ box
- Now go to the Change Settings tab and type a new value for the Resource Type
Method 2 — Update the Problematic Drivers
Code 33 can also be generated due to driver problems. In such a scenario, it is recommended to update the outdated or corrupted drivers.
Identifying all problematic drivers and updating them individually can be frustrating and time-consuming. Therefore to save time and avoid the hassle involved in updating drivers manually, it is advisable to download DriverFIX.
Method 3 — Download DriverFIX to Update Drivers Automatically
DriverFIX is a next-generation and user-friendly program compatible with all Windows versions.
This software is exclusively designed to repair and resolve device driver-related problems and error codes.
Once installed, its intelligent and intuitive programming system detects all outdated, corrupted, and misconfigured device drivers on your PC. It automatically updates all the problematic drivers in a few seconds. It makes sure that the driver versions are the latest and compatible with your operating system.
Furthermore, it also ensures that drivers are continuously updated whenever new versions are available. So, you don’t have to worry about keeping device drivers up to date.
Click here to download DriverFIX to resolve Device Manager error code 33 today!
Read More
Microsoft Designer, a new application developed by Microsoft will bring design backed with DALL-E 2, an AI image creation open-source software. The new app is shown as a dedicated graphic design tool that will help you in the creation of stunning social media posts, invitations, digital postcards, graphics, and more, all in a flash.
Use of the application will be by typing headings and then typing text into the prompt to generate a background image. Since Microsoft uses DALL-E 2 for image creation output should be fairly good but if you wish you will be able to use your own images instead of using AI to generate one.

The designer will be a free application once it is ready and it already has a web preview version, also free but with a waitlist. There will be premium features inside the app once it is released that will be available to Microsoft 365 Personal and Family subscribers. Microsoft also wants to add a version of a designer directly to the Edge browser as well.
Read More
Copyright © 2023, ErrorTools. All Rights Reserved
Trademark: Microsoft Windows logos are registered trademarks of Microsoft. Disclaimer: ErrorTools.com is not affiliated with Microsoft, nor claims direct affiliation.
The information on this page is provided for information purposes only.
The Windows update error 0x80070013 trigger when we try to install a driver that is already installed.
As part of our Server Management Services, we help our customers with Windows installations regularly.
Today, let us discuss various methods our Support Techs suggests in order to fix this error.
Windows update error 0x80070013
As we already saw, Windows update error code 0x80070013 indicates that we are trying to install a driver on the computer that is already installed, or we are installing one that is less compatible with our hardware than the one that we already have.

Windows update error 0x80070013 – How to fix
The error code will not allow us to install updates to our system and will cause Windows Update to fail. Since the system should be regularly updated, this is an issue that we should take care of as soon as possible.
Solutions for Windows update error 0x80070013
In order to fix this error, our Support Engineers follow a few general troubleshooting methods. Let us look into it in detail.
-
Stop Windows Update
- Click Start and type for “services.msc”
- In search results, Open it
- A new window will open containing all Windows services on the system
- Then search for “Windows Update”
- Right-click the “Windows Update” and then click Stop.
-
Clean the Windows Update temporary cache folder
- Hold windows-key and hit “R” key simultaneous
- A small new window will appear
- Type
%windir%\SoftwareDistribution\DataStoreand click OK
- This will open Windows Explorer in the correct location
- Delete all contents of this folder.
-
Start the Windows Update Service again
- Switch back to the windows Services
- Locate Windows Update.
- Right-click on it and choose Start.
If the problem still persists, our Support Techs go ahead with some other methods. Let us have a look into them now.
-
Run SFC utility
Since the problem persists, we can run the System File Checker (SFC) utility. This handy in-built tool will check the filesystem.
- Click Start and start type for “
cmd”.
- In the search results, cmd should show up with a black icon.
- Then right-click and select Run as administrator.
- If we are prompted for the admin password, enter the password and click OK.
- Then a new completely black window will open. We can type commands directly into this window.
- Type
sfc/scannowand press Enter.
- This process will take a long time. We can minimize these black windows and work on them.
Later, we come back and check if the process finished.
As soon as the SFC process finished, we restart the computer. After the restart, search for Updates again.
-
Clean Windows Update download path
Next thing is to clean the Windows Update download path.
- Hold windows-key and hit “R” key simultaneously.
- A small new window will appear.
- Then type
regeditin this new window and hit Enter.
- In the new windows, we have a navigation on the left side. Use it to navigate to
HKEY_LOCAL_MACHINE\SOFTWARE\Policies\Microsoft\Windows\WindowsUpdate - Then, search for WUServer and WIStatusServer in the right-hand pane.
- If they are not listed, we cannot clean the download path. Otherwise, delete both.
- Finally, restart the computer.
Now, we try to search for new Updates again.
[Still, stuck with error 0x80070013? We are available 24*7]
Windows update error 0x80070013 and Manual reset
This method suggested by our Support Engineers requires the use of an advanced command prompt.
- In Windows, to open, press simultaneously the Windows and X buttons.
- Find and select Command Prompt (Admin).
- If we get a User Account Control message, press Yes to allow the advanced command prompt to start.
Once inside the command prompt, the first thing to do is to stop the MSI Installer, the Windows Update Services, and the BITS.
To do this, type the following commands, and press Enter on the keyboard after each one. If any of them take more time to complete, be patient, and wait for it to end before typing the next one.
net stop wuauserv net stop cryptSvc net stop bits net stop msiserverNow that the services are stopped, we need to rename two folders, namely the Catroot2 and SoftwareDistribution folders.
Since we are already in an advanced command prompt, we can rename them. We use the following commands and press Enter on the keyboard after both of them.
ren C:\Windows\System32\catroot2 Catroot2.old ren C:\Windows\SoftwareDistribution SoftwareDistribution.oldAfter we rename the folders, we have to restart the services that we stopped earlier, so Windows Update can continue.
This is, again, done in the advanced command prompt, with the following commands (do not forget Enter after we type every command):
net start wuauserv net start cryptSvc net start bits net start msiserverOnce we are done with the command prompt, we can close it.
An important note is to be careful to start the command prompt in the Admin mode. Failure of which will lead to an “Access is denied” message when we attempt to rename the folders, and we will not be able to fix the 0x80070013 error.
Finally, we can again try to go through with Windows Update. We should now have no issues whatsoever and we can update our system with the latest stability and security patches.
[Lost in the process? We’d be happy to help you!]
Conclusion
To conclude, so far we reset the Windows Update Components and got rid of issues we were facing with Windows Update. Today, we saw some of the best ways our Support Engineers employ.
PREVENT YOUR SERVER FROM CRASHING!
Never again lose customers to poor server speed! Let us help you.
Our server experts will monitor & maintain your server 24/7 so that it remains lightning fast and secure.
GET STARTED
var google_conversion_label = «owonCMyG5nEQ0aD71QM»;