
Updated May 2025: Stop error messages and fix your computer problem with this tool. Get it now at this link
- Download and install the software.
- It will scan your computer for problems.
- The tool will then fix the issues that were found.
If you are seeing the following error message while trying to install Windows 10 Creators Update, it could mean that your antivirus software is blocking the installation process. To resolve this issue, disable your antivirus software and run a manual scan with Microsoft Defender.
To do this, follow these steps:
1. In the left pane, select Error Reporting.
2. Select Turn On Automatic Repair.
3. Restart the PC.
4. When prompted, sign into your account again.
5. Open Programs and Features.
6. Find and uninstall the offending application.
7. Reinstall the operating system.
8. Reboot the PC.
9. Sign into your account again. You should now be able to complete the setup without encountering errors.
Fix error 0x80040154 for Windows Update or the Microsoft Store
If you are getting errors while trying to open the Microsoft Store app or Windows Update, it could mean that your computer is infected with malware. Malwarebytes Anti-Malware Premium can detect and remove such threats automatically. This article explains how to fix Error 80040154 for Microsoft Store and Windows Update in case you encounter this issue.
Microsoft says it fixed a bug in Windows 10 version 1809 that caused some PCs to crash during setup. Microsoft has acknowledged the problem and says it will release a fix soon. In the meantime, here are some steps you can take to try to prevent this issue from happening again.
The problem affects computers running Windows 10 version 1809, aka “Anniversary Update,” which was released earlier this month. If you’re still running Windows 7 or 8, don’t worry about it.
If you do run into problems while installing Windows 10, you’ll see a blue screen that reads something like “Windows failed to start because of an unexpected error.” You can press Ctrl+Alt+Del to reboot the computer, or just restart the process manually.
You might also want to check out our guide to fixing common startup errors.
Updated: May 2025
We highly recommend that you use this tool for your error. Furthermore, this tool detects and removes common computer errors, protects you from loss of files, malware, and hardware failures, and optimizes your device for maximum performance. This software will help you fix your PC problems and prevent others from happening again:
- Step 1 : Install PC Repair & Optimizer Tool (Windows 11, 10, 8, 7, XP, Vista).
- Step 2 : Click Start Scan to find out what issues are causing PC problems.
- Step 3 : Click on Repair All to correct all issues.
How to resolve the 0x80040154 Microsoft Store problem
Microsoft Store Error 0x80040154 occurs due to several reasons like invalid product key, missing activation code, expired Windows 10 version etc. In some cases, it might even happen because of malware attack. This article explains how you can solve Microsoft Store error 0x80400534.
1] Examine or alter your Internet connection to see
This problem occurs when there’s no internet connectivity. You might think you’re having issues with your router or modem, but it could actually be something else entirely. First thing’s first: check your internet connection. If you’re experiencing slow speeds, try switching between wired/wirelessness connections and see if it makes a difference. If nothing works, make sure you’ve got enough bandwidth left over for everything else.
If none of those work, try resetting your modem or router. To do that, head into your modem or router settings and make sure “Reset” is checked under the “Advanced Settings.” Resetting your modem or router usually fixes most problems.
2] Clear contents of DataStore folder
Delete any files or folders present inside the DataStores folder. This includes both files and subfolders. If you are unsure what is contained within the DataStore folder, please refer to our article on how to locate it here. After deleting the files/foldes, open the DataStore folder and clear out everything else. Then restart the Windows Update service.
3] Reset the Microsoft Store Cache
The Windows Store is used by millions of people every day. If you are having problems downloading apps or seeing ads, it could be because your local cache isn’t working properly. You can use the wsreset.exe tool to reset your local cache. This will clear out all cached files and allow you to download apps again.
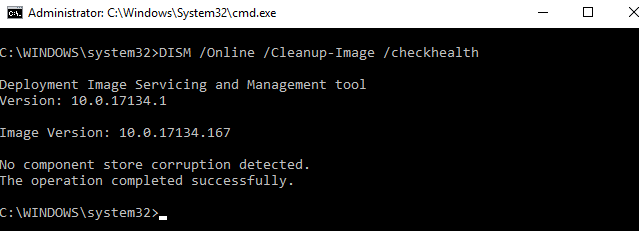
4] Run DISM Tool
Run the SFC and DISMScanner to check and repair corrupt system files
Restoring and repairing corrupted system file will help you solve the windows update error
Run the SFC tool to identify missing or corrupt drivers
Fixing problems caused by driver conflicts can help you fix the windows update error
Use the DISM scan tool to find out what is causing the problem
Check the integrity of your hard disk drives
If it detects errors, run CHKDSK /F to fix them
To avoid data loss, backup important documents and folders before running CHKDSK
5] Check if licensing on Windows Store is synced or not
Sometimes, the Microsoft Store error code 0x80040154 appears due to problems with the Windows 10 license. This happens because there is no synchronization between the store and the license server. To fix this problem, you must make sure that the licenses are synchronized. You can do it manually or automatically.
If the process fails, restart your computer.
If you still face the same issue, try downloading the latest version of Windows 10 from the Microsoft Store.
How to fix Windows Update error 0x80040154
Windows Update Error 0x80040054 occurs due to corrupted files. This issue causes problems while updating the system. You can fix it easily by following the steps mentioned in this article.
Reset Windows Updates components to default settings
Then select Turn Windows Features On/Off again. Now you can see the list of installed programs and uninstall those which are causing issues.
Check Windows Update Services status
Open Command Prompt window and type net stop wuauserv /y. Next open Task Manager and check whether the process named WUAU Service is running or not. If yes, close it. After closing it, restart the computer.
Clear the BITS queue
In command prompt, type bcdedit /set {current} isolation /resetbios. Restart the computer.
1] Run Windows Troubleshooter
Windows 10 includes a number of tools to help diagnose problems with your computer. These tools are called troubleshooting tools. They’re designed to fix common issues like slow startup times, missing features, and system crashes. 2] Click on the option named “Troubleshoot program problems.” This tool will scan your PC for software conflicts and other problems.
3] Next, select the option labeled “Repair your device.” This tool scans your PC for hardware faults and repairs drivers automatically.
4] Finally, click on the option titled “Reset your PC.” This tool resets your PC to a clean state.
5] After running one of these tools, reboot your PC to make sure it works correctly.
6] To prevent future problems, run the Windows Update troubleshooter again.
7] For more information about the Windows Update troubleshooters, check out Microsoft Support.
2] Reset Windows Update Components to default
Reset Windows Update Agent Tool
You can use this tool to fix the issue where you are unable to update Windows 10 due to some error. If you want to know how to do it manually, please read our article “How To Fix Error 0x80073712”.
This tool helps you to reset all Windows Update Components to default settings. It resets all the components including Windows Updates, Windows Store Apps, Windows Features, etc.
The tool will delete the current version of each component and install the latest one.
To run the tool, simply download the file and double-click on it to start the installation process.
After the installation completes successfully, open the program and select the option “Start”. Then follow the instructions displayed on the screen to complete the task.
Please note that this tool might cause system instability during the operation. Please make sure that you have enough free space on your hard disk.
3] Check Windows Update Services status
Open Windows Services Manager and check whether the following Windows Updates related Services are disabled:
1] Windows Update
2] Windows Update Medic Services
3] Update Orchestrator
4] Windows Update Notification Service
5] Windows Update Notifications Provider
6] Windows Update Scheduler
RECOMMENATION: Click here for help with Windows errors.
Frequently Asked Questions
I’m not interested in upgrading! Why am I unable to use this version?
Some features or programs that are available on newer versions of Windows 10 may not be available if you are using an older version. If you are running Windows 7 or 8, for example, you will be unable to install new apps from the Microsoft Store.
Is it possible to cancel or postpone Windows updates?
Yes, you can choose to ignore Windows 10 updates. You must be operating a version of Windows 10 (10240) or later. You cannot skip updates if you are running Windows 7 or 8.1.
Does Microsoft test the security of its software before making it available for free?
Yes! Every day, they test their program for security flaws. If they find any, they promptly rectify them.
Одна из частых ошибок Windows 10, с которой сталкиваются пользователи — «Класс не зарегистрирован». При этом ошибка может возникать в разных случаях: при попытке открыть файл изображения jpg, png или другого, входе в параметры Windows 10 (при этом о том, что класс не зарегистрирован сообщает explorer.exe), запуске браузера или запуске приложений из магазина (с кодом ошибки 0x80040154).
В этой инструкции — распространенные варианты ошибки Класс не зарегистрирован и возможные способы исправить возникшую проблему.
Класс не зарегистрирован при открытии JPG и других изображений
Наиболее часто встречающийся случай — ошибка «Класс не зарегистрирован» при открытии JPG, а также других фотографий и изображений.
Чаще всего проблема бывает вызвана неправильным удалением сторонних программ для просмотра фото, сбоями параметров приложений по умолчанию Windows 10 и подобными, однако решается это в большинстве случаев очень просто.
- Зайдите в Пуск — Параметры (значок шестеренки в меню Пуск) или нажмите клавиши Win+I
- Зайдите в «Приложения» — «Приложения по умолчанию» (или в Система — Приложения по умолчанию в Windows 10 1607).
- Выберите в пункте «Просмотр фотографий» стандартное приложение Windows для просмотра фотографий (или другое, правильно работающее приложение для фото). Также можно нажать «Сбросить» в пункте «Сброс к рекомендуемым Майкрософт значениям по умолчанию».

- Закройте параметры и зайдите в диспетчер задач (меню правого клика по кнопке Пуск).
- Если в диспетчере задач не отображаются задачи, нажмите «Подробнее», потом найдите в списке «Проводник», выберите его и нажмите «Перезапустить».


По завершении проверьте, открываются ли файлы изображений теперь. Если открываются, но вам требуется, чтобы с JPG, PNG и иными фото работала сторонняя программа, попробуйте удалить ее через Панель управления — Программы и компоненты, а затем установить заново и назначить используемой по умолчанию.
Примечание: еще один вариант этого же способа: нажать правой кнопкой мыши по файлу изображения, выбрать пункт «Открыть с помощью» — «Выбрать другое приложение», указать работающую программу для просмотра и отметить пункт «Всегда использовать это приложение для файлов».
Если ошибка возникает просто при запуске приложения «Фотографии» Windows 10, то попробуйте способ с перерегистрацией приложений в PowerShell из статьи Не работают приложения Windows 10.
При запуске приложений Windows 10
При возникновении рассматриваемой ошибки при запуске приложений магазина Windows 10, а также при ошибке 0x80040154 в приложениях, опробуйте способы из статьи «Не работают приложения Windows 10», которая была приведена выше, а также попробуйте такой вариант:
- Удалите это приложение. Если это встроенное приложение, используйте инструкцию Как удалить встроенные приложения Windows 10.
- Заново установите его, здесь поможет материал Как установить Магазин Windows 10 (по аналогии можно установить и другие встроенные приложения).
Ошибка explorer.exe «Класс не зарегистрирован» при нажатии на кнопку Пуск или вызове параметров
Еще один распространенный вариант ошибки — не работающее меню Пуск Windows 10, или отдельные элементы в нем. При этом о том, что класс не зарегистрирован сообщает explorer.exe, код ошибки тот же — 0x80040154.
Способы исправить ошибку в данном случае:
- Исправление с помощью PowerShell, как описано в одном из способов статьи Не работает меню пуск Windows 10 (лучше использовать в последнюю очередь, иногда может еще больше навредить).
- Странным образом часто срабатывающий способ — зайти в панель управления (нажать Win+R, ввести control и нажать Enter), перейти в «Программы и компоненты», слева выбрать «Включение или отключение компонентов Windows», снять отметку с Internet Explorer 11, нажать Ок и после применения перезагрузить компьютер.


Если это не помогло, попробуйте также способ, описанный в разделе про службу компонентов Windows.
Ошибка при запуске браузеров Google Chrome, Mozilla Firefox, Internet Explorer
При появлении ошибки в одном из интернет-браузеров, за исключением Edge (для него следует попробовать способы из первого раздела инструкции, только в контексте браузера по умолчанию, плюс перерегистрация приложений), выполните следующие шаги:
- Зайдите в параметры — Приложения — Приложения по умолчанию (или Система — Приложения по умолчанию для Windows 10 до версии 1703).
- Внизу нажмите «Задать значения по умолчанию по приложению».

- Выберите браузер, вызывающий появление ошибки «Класс не зарегистрирован» и нажмите «Использовать эту программу по умолчанию».


Дополнительные действие по исправлению ошибки для Internet Explorer:
- Запустите командную строку от имени администратора (начните набирать в поиске на панели задач «Командная строка», при появлении нужного результата, нажмите по нему правой кнопкой мыши и выберите «Запустить от имени администратора» в контекстном меню).
- Введите команду regsvr32 ExplorerFrame.dll и нажмите Enter.
По завершении действий, проверьте, была ли исправлена проблема. В случае с Internet Explorer, перезагрузите компьютер.
Для сторонних браузеров, если способы, приведенные выше не сработали, может помочь удаление браузера, перезагрузка компьютера и последующая повторная установка браузера (или удаление разделов реестра HKEY_CURRENT_USER\ SOFTWARE\ Classes\ ChromeHTML\, HKEY_LOCAL_MACHINE\ SOFTWARE\ Classes\ ChromeHTML\ и HKEY_CLASSES_ROOT\ ChromeHTML (для браузера Google Chrome, для браузеров на базе Chromium название раздела может быть, соответственно, Chromium).
Исправление в службе компонентов Windows 10
Этот способ может сработать вне зависимости от контекста появления ошибки «Класс не зарегистрирован», как и в случаях с ошибкой explorer.exe, так и в более специфичных, например, когда ошибку вызывает twinui (интерфейс для планшетов Windows).
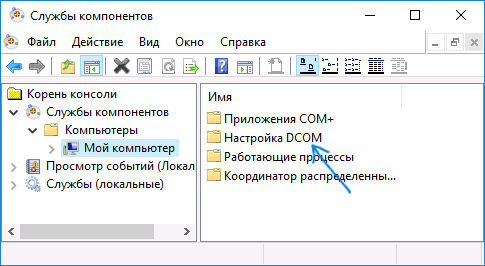
- Нажмите клавиши Win+R на клавиатуре, введите dcomcnfg и нажмите Enter.
- Перейдите к разделу Службы компонентов — Компьютеры — Мой компьютер.
- Дважды кликните по «Настройка DCOM».

- Если после этого вам будет предложено зарегистрировать какие-либо компоненты (запрос может появиться несколько раз), согласитесь. Если таких предложений не появится, то данный вариант в вашей ситуации не подходит.
- По завершении, закройте окно службы компонентов и перезагрузите компьютер.
Регистрация классов вручную
Иногда в исправлении ошибки 0x80040154 может помочь ручная регистрация всех библиотек DLL и компонентов OCX, находящихся в системных папках. Для её выполнения: запустите командную строку от имени администратора, введите по порядку следующие 4 команды, нажимая Enter после каждой (процесс регистрации может занять продолжительное время).
for %x in (C:\Windows\System32\*.dll) do regsvr32 %x /s
for %x in (C:\Windows\System32\*.ocx) do regsvr32 %x /s
for %x in (C:\Windows\SysWOW64\*.dll) do regsvr32 %x /s
for %x in (C:\Windows\SysWOW64\*.ocx) do regsvr32 %x /s
Последние две команды — только для 64-разрядных версий Windows. Иногда в процессе может появиться окно с предложением установить недостающие компоненты системы — сделайте это.
Дополнительная информация
Если предложенные способы не помогли, следующая информация может оказаться полезной:
- По некоторым сведениям, установленное ПО iCloud для Windows в некоторых случаях может вызывать указанную ошибку (попробуйте удалить).
- Причиной «Класс не зарегистрирован» может быть поврежденный реестр, см. Восстановление реестра Windows 10.
- Если прочие методы исправления не помогли, есть возможность сбросить Windows 10 с сохранением или без сохранения данных.
На этом завершаю и надеюсь, что в материале нашлось решение для исправления ошибки в вашей ситуации.
Sign in to your MUO account

Windows Hello is a biometric-based security software available on Windows 11/ 10. It allows users to log in to their accounts and apps by entering the PIN. However, you may come across an error code 0x80040154 while setting up the PIN.
As such, here are all the solutions to eliminate the Windows PIN error code 0x80040154.
What Causes Microsoft PIN Error Code 0x80040154?
The Microsoft PIN Error Code 0x80040154 mainly results from a corrupt Ngc folder or a disabled TPM. Additionally, an outdated Windows version can also trigger the error message.
Fortunately, it’s pretty easy to eliminate the error code. Let’s check out all the solutions you can try in the situation.
1. Update or Roll Back Windows Update
Microsoft rolls out new updates at regular intervals, and each update fixes minor bugs and improves the system performance. And from what it looks like, the error message can result from a temporary bug. You can always download the latest OS update to eliminate such minor bugs.
Here’s how to download the latest Windows update.
- Press Win + I to open Settings.
- Click on Windows Update from the left pane.
- Click on Check for Updates.
Windows will show all the pending updates. Go ahead and install them.
Alternatively, the PIN error can result from a recently installed Windows update. In this case, you will have to revert the update to fix the problem.
Here’s how to uninstall a recent update.
- Open the Control Panel by clicking on the Start icon and searching for the control panel.
- Go to Programs > Programs and Features.
- Click on View installed updates from the left pane.
- Look for the recently installed update under the Microsoft Windows section.
-
Right-click on the update and choose Uninstall from the context menu.

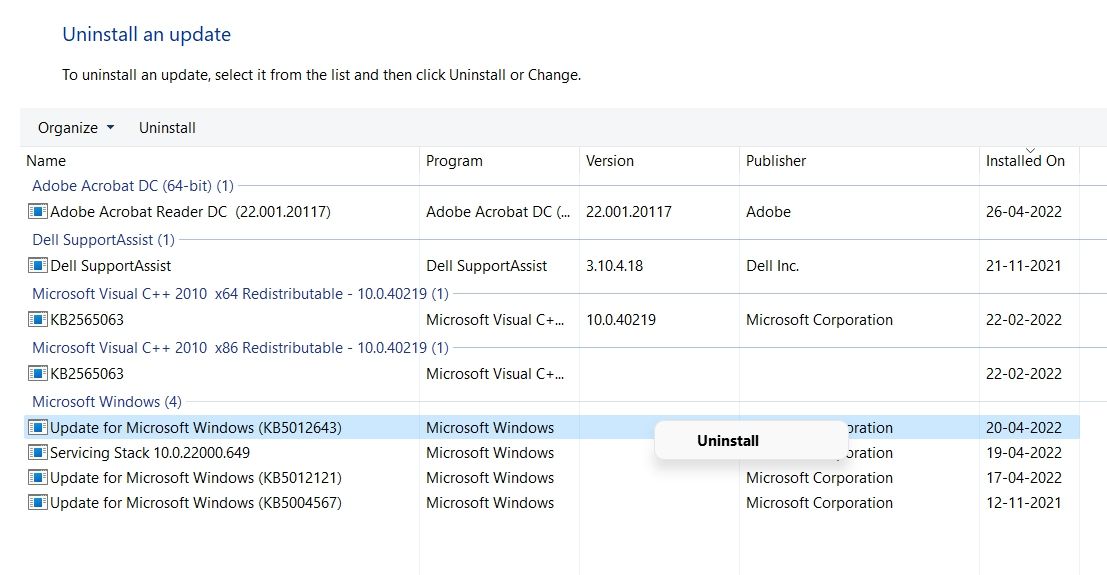
Restart the system and check if you can log in via entering the PIN.
2. Empty the Ngc Folder
The error message can pop up due to corrupt Ngc folders. The Ngc folders feature data associated with PIN settings of Windows 11. Although it is recommended not to tweak with the Ngc folder, you are left with no other option than to clear its content if the data gets corrupted.
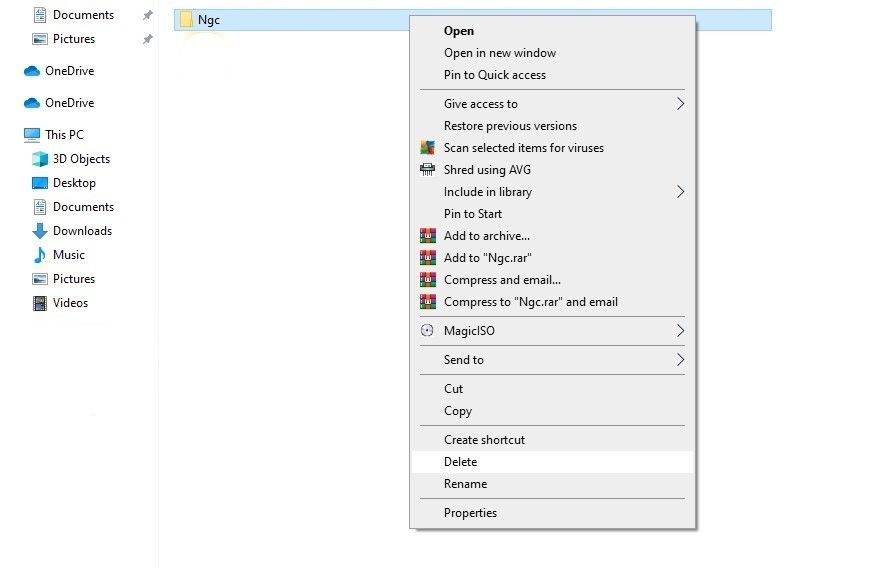
You can clear the content of the Ngc folder by following the below steps.
- Press Win + R to open the Run dialogue box.
-
Type the following command and click on OK.
C:\Windows\ServiceProfiles\LocalService\AppData\Local\Microsoft -
Righ-click on the Ngc folder, and choose Delete.

- Click on Yes to the confirmation box that pops up.
Next, reboot the system and check if the problem continues. If yes, try the next solution on the list.
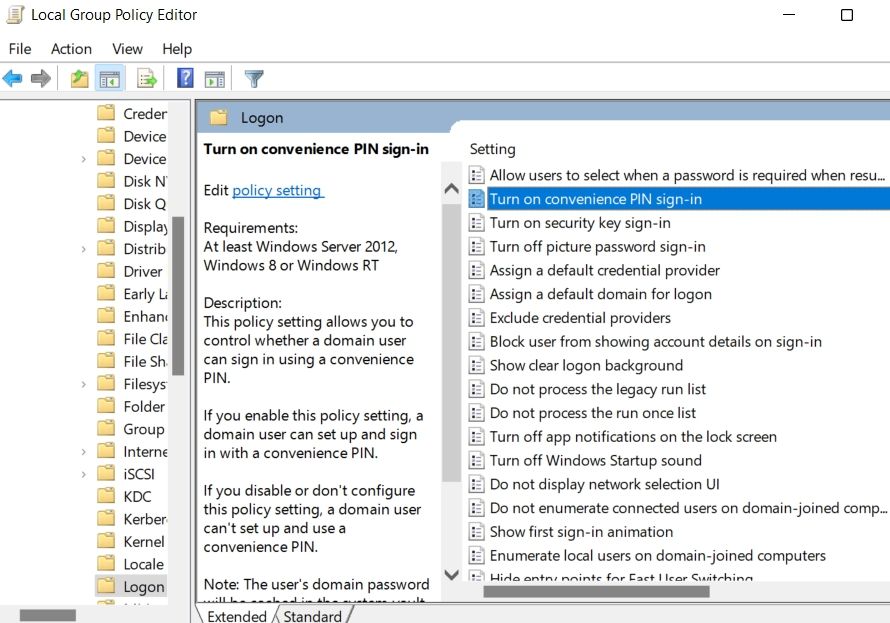
3. Change Group Policy Settings
The next thing you can try is to ensure that the Convenience PIN sign-in setting is enabled under the Group Policy Editor. You can enable the settings by following the below steps.
- Open the Run dialogue box.
- Type gpedit.msc and click on OK.
- Choose Administrative Templates from the left pane.
- Head towards System > Logon.
-
Locate and double-click on Turn on convenience PIN sign-in.

-
Click on Enabled.

- Click on Apply > OK to save the changes.

Next, try to log in via entering the PIN and check if you’re still facing the error message.
4. Disable Antivirus and Run Malware Scan
The error message can pop up due to a third-party antivirus program installed on your system. If this is the case, disable the anti-virus program. After that, use Microsoft Defender to run an offline scan and find hidden malware.
5. Enable TPM
The error code 0x80040154 can appear if TPM is disabled on your system. Trusted Platform Module, aka TPM, provides cryptographic keys to keep your system safe and secure. You’ll have to enable TPM on your system to fix the problem.
Here’s how to turn on TPM on Windows 11.
- Open the Run dialogue box.
- Type tpm.msc and click on OK.
- Click on Action on the toolbar.
- Choose Prepare the TPM option.
Next, you will be asked to restart the system. Go through the onscreen instruction that appears during the boot process.
6. Change Windows Registry
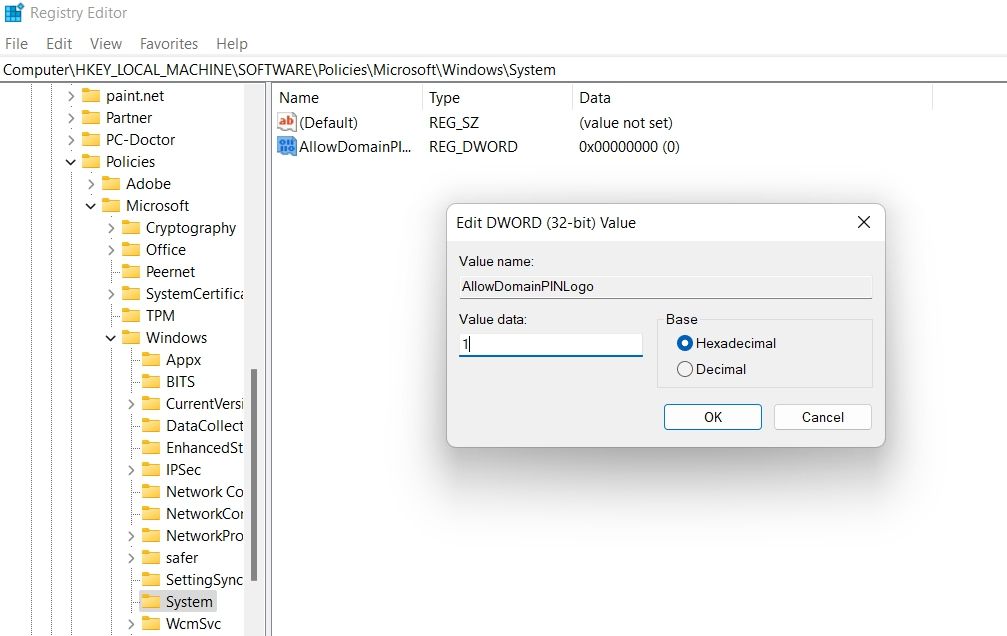
If the PIN login is disabled under the Windows Registry, you are most likely to face the problem in the question. You will have to enable the option to resolve the issue.
Here are the changes you need to make in the Windows Registry.
- Open the Run dialogue box using Win + R hotkeys.
- Type regedit and click on OK.
-
In the Registry Editor, head towards the following location.
HKEY_LOCAL_MACHINE\SOFTWARE\Policies\Microsoft\Windows\System - Look for AllowDomainPINLogo in the right pane. If you can’t find this entry, right-click on the blank space, and choose New > DWORD (32-bit) value.
- Name the value AllowDomainPINLogo.
- Double-click on the newly created value (AllowDomainPINLogo) and enter 1 in the Value data section.
- Change the Base value to Hexadecimal.
- Click on OK to save the changes.
Reboot the system and check if it fixes the issue. If not, move on to the next solution.
7. Verify Microsoft Account
Windows Hello will constantly throw the error message if the Microsoft account is not verified. You will have to verify the account to fix the problem.
Here’s how to verify the Microsoft account on Windows 11.
- Open Settings using Win + I hotkeys.
- Choose Accounts from the left pane.
- Click on Your info.
- Click on the Verify option the under Account settings.
- Choose the email in which you want to receive the verification code.
- Enter the verification code and click on the Verify option.
That’s it. Reboot the system and check if you’re still facing the problem.
8. Run SFC Scan
Corrupt system files can also be the reason why you are facing the error message. You can use an SFC scan to eliminate the corrupt files. System File Checker, aka SFC, looks for and resolves corrupt system file issues.
Here are the steps to run an SFC scan on Windows 11.
- Open Command Prompt in administrator mode.
- Type sfc /scannow and press Enter.
Wait until the command finishes its run.
Login Using PIN With Ease
We hope the solutions helped resolve the issue. But in the worst-case scenario, if the problem continues, you will have to restore the system to the point where the PIN now works fine.
In this guide, we will look into Microsoft Store error code 0x80040154, the reasons behind its occurrence, and four working ways that may fix this issue. Normally, when you encounter this bug, you can’t install/upgrade Microsoft and its apps.
Corrupted system files, damaged Windows 10 components, and accumulated cache are a few reasons that may elevate this bug on your computer. You may fix this problem by applying the solutions – Run Store Apps troubleshooter, Reset Store Cache, Run SFC/DISM, etc. In case the problem remains as it is, try uninstalling/reinstalling the Store App.
If you are receiving an error code 0x80040154 while launching Windows Store or any apps downloading from it, try the below workarounds –
1] Troubleshoot Windows Store Apps
Troubleshooting Microsoft Store is the best way to counter any issues that occur while opening it or upgrading apps downloading from it. The whole process is pretty simple and straightforward to use. Here’s how you may address the error code 0x80040154 on your computer –
- Press Win + I to launch the Settings app.
- Select Update & Security > Troubleshoot.
- Jump to the right side and click over the link – Additional troubleshooters.
- On the subsequent screen, scroll down to Windows Store Apps (you may find it at the bottom end).
- Tap over Windows Store Apps once and hit the button – Run the troubleshooter.

- Do as asked on the troubleshooter window and the problem gets resolved automatically.
- In case it doesn’t fix the issue, you will get a set of instructions following which you may solve this problem.
2] Reset Windows Store Cache
If troubleshooting doesn’t help, the error 0x80040154 might be occurring because of some stored cache inside the Store app. WSreset is a good tool by Microsoft that resets Store to its default state. Go and run this command-line program and see if it helps to solve the problem at hand.
- Launch Command Prompt as an administrator.
- Type “
wsreset.exe” and press Enter. - This code will run next and purge all the cache associated with your Microsoft Store.

- Close all running windows, and restart your PC.
Sign back into your PC and check if it indeed helps to resolve the root cause and thus the problem that you were struggling with.
3] Repair Windows 10 Components and corrupt system files
The presence of corrupted system files or Windows Image itself may also result in different error codes including 0x80040154. So, if you are not able to start Microsoft Store or its apps, we suggest following the below guideline –
- Use the hotkey Win + X, and select Windows PowerShell (Admin).
- When the PowerShell comes into the view, execute the codes below one after another –
DISM.exe /Online /Cleanup-image /Scanhealth
DISM.exe /Online /Cleanup-image /Restorehealth
DISM.exe /online /cleanup-image /startcomponentcleanup
sfc /scannow
- Make sure to press the Enter key after each command.
- Don’t run the next code until the previous one completes.
Proceeding this way, you will repair whatsoever corruption exists inside Windows 10 Images or system files.
- In the end, restart your PC so that the changes made come into effect.
4] Repair the Microsoft Store app
In case you are still unable to install or update apps on Microsoft Store, the problem may lie with the Store app itself. By default, Microsoft doesn’t provide a way to uninstall its store app, however, you may righteously do so using Windows PowerShell. Here’s how to perform this task –
- Press Winkey + X to launch the Power Menu. Select Windows PowerShell (Admin) next.
- When the UAC prompts, hit Yes to authorize opening PowerShell as administrator.
- Copy/paste the codes below and run them separately –
Get-AppxPackage *windowsstore* | Remove-AppxPackage
Get-AppXPackage *WindowsStore* -AllUsers | Foreach {Add-AppxPackage -DisableDevelopmentMode -Register "$($_.InstallLocation)\AppXManifest.xml"}
- That’s it, the Windows Store App is now reset to its default settings.
I hope the information shared in this guide was useful and fixes the error code 0x80040154.
How do I fix Windows Pin Error 0x80040154?
This error code 0x80040154 might also occur when you are trying to create a new PIN or modify the existing passkey on your computer. If that’s the case, you better try out the solutions discussed in this article.
How do I fix a stuck install update?
If you are stuck on some error codes while updating Windows, it’s better to wait for a few hours. In case the error occurs even after that, you may proceed with troubleshooting Windows Update, or manually download the standalone package and install that on your Windows PC.
В этой статье я расскажу об исправлении одной очень распространенной ошибки Windows Installer. Обыскавши Интернет как русскоязычный, так и англоязычный, включая форумы и ньюсгруппы Microsoft, я понял что ошибка довольно распространенная, однако исправить ее, на самом деле никому не удавалось.
Суть проблемы
Как то одним жарким летним вечером я решил установить на свой компьютер ActeiveState ActivePerl. Скачал инсталлятор, который был в .msi файле и запустил его. Каково же было мое удивление, когда вместо привычного инсталлятора я увидел вот это:
Как вскоре оказалось, подобная ошибка выпадала при запуске на моем компьютере любого .msi файла.
Недолго думая, я полез в интернет, ввел в поиск появившееся сообщение, и, «О ужас!» — я увидел сотни постов людей с этой проблемой! В русскоязычном и англоязычном сегменте Интернета у множества людей была аналогичная проблема, и никто ее не смог решить по существу.
Наиболее распространенными советы по решению проблемы были
- Переустановить Windows Installer — на моей Windows 7 x64 и так стоит Windows Installer 5.0, который нельзя отдельно скачать и переустановить
- Перерегистрировать msiexec, что также мне не помогло.
- В конце все советы сводились к одному — переустановить Windows.
Подумав о том, какое количество программ мне придется переустанавливать, а также о количестве потраченного на это дело времени, я решил пойти другим путем.
Решение проблемы
Для начала я включил Log-файл установщика Windows. Как включить лог Windows Installer вы можете почитать здесь, или поискать в любом поисковике по ключевому слову «voicewarmup».
Лог-файлы появляются во временной папке пользователя, которая обычно находится по пути C:\Users\имя_профиля\AppData\Local\Temp. Открыв лог, я увидел следующую ошибку:
MSI (c) (B8:84) [22:08:06:894]: Failed to connect to server. Error: 0x80040154
Поискав по коду ошибки в Интернете, и не нашедши никаких способов решения проблемы, я решил подумать логически.
Что означает ошибка 0x80040154? Поискав в поисковике, и воспользовавшись утилитой Error Lookup, я определил, что ошибка означает «Класс не зарегистрирован».
Обычно такая ошибка появляется, когда вы запрашиваете у системы создать COM-объект, который не был должным образом зарегистрирован в реестре. Но как определить какой именно объект не зарегистрирован?
Для начала я воспользовался старым добрым отладчиком WinDbg, который входит в пакет Debugging Tools For Windows. Мне понадобилась именно 64-разрядная версия данного отладчика.
Перед началом отладки необходимо загрузить отладочные символы для распознавания имен системных функций и переменных. Эти символы являются довольно полезной вещью не только для поиска ошибок, но также и для исследования работы Windows в целом.
Я предпочитаю указывать отладчику путь для поиска символов через переменную среды _NT_SYMBOL_PATH, которая должна быть задана как: C:\Symbols;srv*C:\Symbols*http://msdl.microsoft.com/download/symbols. В данном случае папка C:\Symbols — это хранилище загруженных символов на жестком диске, чтобы отладчик каждый раз не лез в интернет за ними.
Загрузил я в отладчик файл c:\windows\system32\msiexec.exe и задал для него параметры командной строки так, чтобы он открыл .msi файл. В моем случае параметром командной строки было: /i «C:\Users\MAV\Desktop\ActivePerl-5.12.4.1205-MSWin32-x64-294981.msi» однако можно задавать путь к любому другому .msi файлу.
Сам по себе отладчик, конечно не решит проблему, нужно ее локализовать. Поразмыслив, какие функции могут создавать COM-объекты, я остановился на CoCreateInstance, CoCreateInstanceEx и CoGetClassObject
Для установки точек прерывания на эти функции вводим в командной строке отладчика:
bp ole32!CoCreateInstance

bp ole32!CoCreateInstanceEx

bp ole32!CoGetClassObject
Если точки останова у вас не ставятся, значит вы неправильно настроили символы.
После запуска приложения (F5), срабатывает точка останова на ole32!CoCreateInstance. Если точка останова не срабатывает, а выпадает окно с параметрами Wndows Installer, то вы неправильно указали параметры командной строки для запуска.
Давайте теперь посмотрим, из какого же места кода вызывается создание нашего объекта, для этого мы можем нажать Debug->Step Out (Shift+F11). Мне пришлось нажать указанную комбинацию дважды, для того чтобы выйти в исходную вызывающую функцию.
Исходная вызывающая функция называется msi!CreateMsiServerProxy и, очевидно, находится в модуле msi.dll.
Обратим внимание также на регистр rax, который равен нашему коду ошибки 80040154. Для того чтобы узнать содержимое регистра rax, достаточно открыть окно Registers, или ввести в командной строке r rax.
Запомнив имя функции, а также примерный вид искомого кода, я открыл дизассемблер IDA Pro, и загрузил в него файл msi.dll. Следует отметить пару особенностей данного отладчика: во первых, IDA любит блокировать доступ к исследуемому файлу, во вторых, она создает в папке с исследуемым файлом несколько своих файлов баз данных, так что я рекомендую копировать исследуемые файлы в отдельную папку. В третьих, IDA не всегда подгружает файлы с символами, поэтому рекомендую в указанную отдельную папку также скопировать файл msi.pdb из вышеуказанной папки C:\Symbols.
После нахождения функции CreateMsiServerProxy, находим знакомые строки кода в ней:
Не иначе как функция пытается создать объект по CLSID IID_IMsiServer. Здесь я не буду вдаваться в подробности COM и искать различия между CLSID и IID, важно что я получил зацепку — имя интерфейса ID_IMsiServer и CLSID {000C101C-0000-0000-C000-000000000046}.
Запустив поиск в реестре на своей машине по указанным ключевым словам, а также на машине, с установленной Windows 7 x64, где Windows Installer работал, я нашел отличие: на моей машине отсутствовала ветка реестра HKEY_CLASSES_ROOT\AppID\{000C101C-0000-0000-C000-000000000046}. Я экспортировал данную ветку реестра в отдельный .reg файл, а затем импортировал его на своей машине:
Windows Registry Editor Version 5.00
[HKEY_CLASSES_ROOT\AppID\{000C101C-0000-0000-C000-000000000046}]
"ServiceParameters"=""
"LocalService"="MSIServer"
После импорта ключа реестра я вновь попробовал запустить .msi файл, и, «О чудо!», он запустился, после чего я успешно установил ActivePerl.
У вас может быть аналогичная проблема, но при этом отсутствовать другой ключ реестра. Импортировать при этом необходимо те ключи, которых у вас нет.
Выводы
- В итоге я сэкономил себе массу времени — на поиск проблемы и ее устранение ушло не более двадцати минут, зато на переустановку всех программ на моем компьютере ушло бы минимум два дня.
- Не надо спешить переустанавливать Windows по любому чиху. Иногда проблему можно решить довольно просто и быстро.
Спасибо за внимание, я очень надеюсь что статья вам понравилась, жду ваших отзывов, а также с удовольствием отвечу на ваши вопросы.