
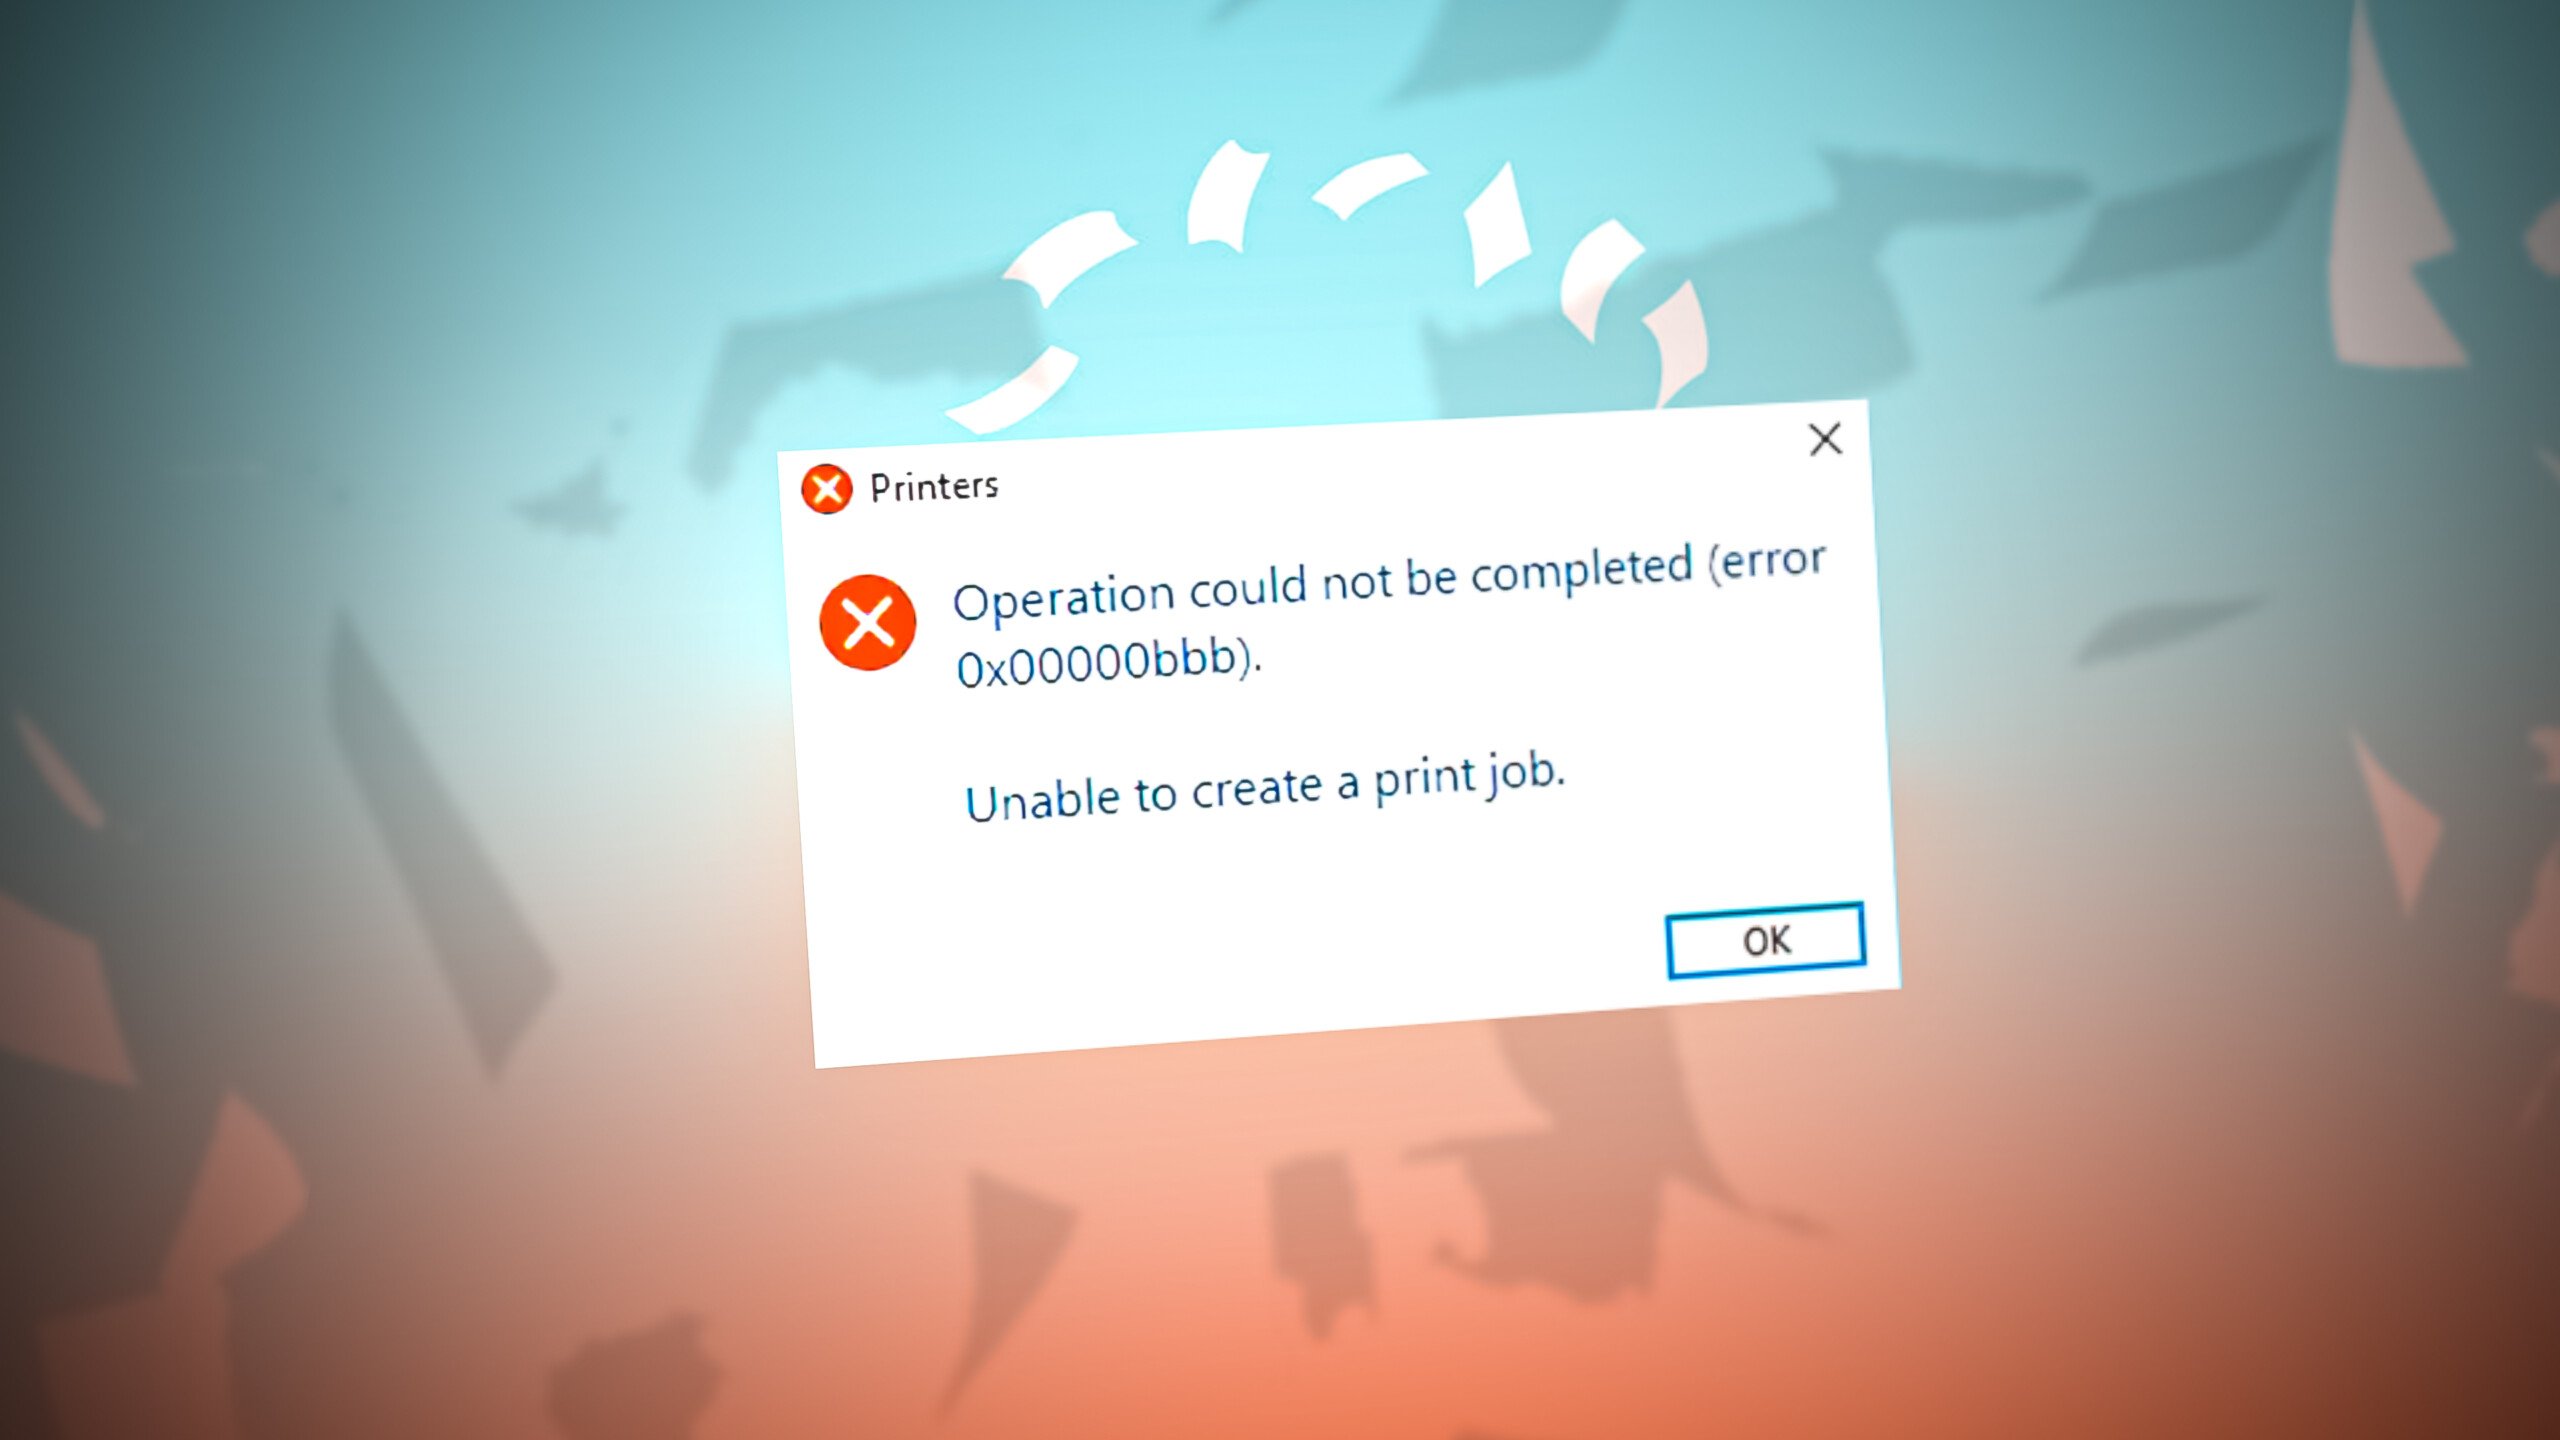
Ошибка «Не удалось создать задание печати» с кодом 0x00000bbb в Windows 10 и 11 может появляться по разным причинам: проблемы с системной службой печати, переполненная очередь печати, неправильная установка принтера и недостаточные права доступа к TEMP.
Решение ошибки с кодом 0x00000bbb
Метод 1: Перезапуск службы печати
Сбой в работе службы «Диспетчер печати» – одна из потенциальных причин. Для ее перезапуска:
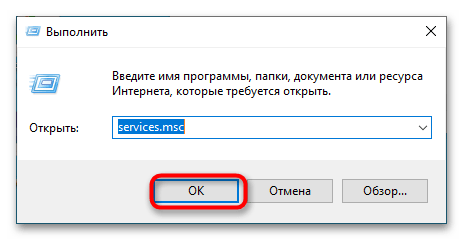
- Нажмите WIN+R, введите services.msc и нажмите ENTER.
- В открывшемся окне найдите службу «Диспетчер печати».
- Если служба не запущена, кликните по ней ПКМ и выберите «Свойства».
- Установите в ниспадающем меню типа запуска значение «Автоматически».
- Нажмите на кнопку «Запустить».
Метод 2: Очистка очереди печати
Переполненная очередь печати также может вызывать подобного рода ошибки. Для очистки очереди:
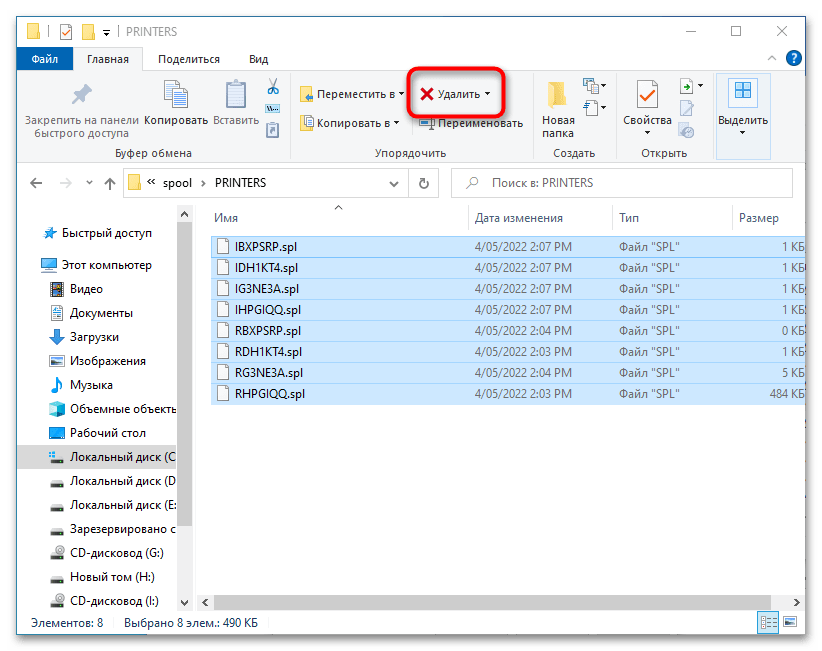
- Откройте «Службы» (как описано в первом методе) и остановите работу службы «Диспетчер печати».
- Перейдите в проводнике по пути C:\Windows\System32\spool\PRINTERS и удалите все файлы в этой папке.
- Вернитесь в окно «Службы» и запустите службу «Диспетчер печати».
Метод 3: Переустановка принтера
Неполадки при печати нередко возникают из-за неправильной установки или поврежденных драйверов принтера. Для переустановки:
- Откройте «Параметры» Windows и перейдите в разделы «Устройства»→«Принтеры и сканеры».
- Выберите принтер и нажмите «Удалить устройство».
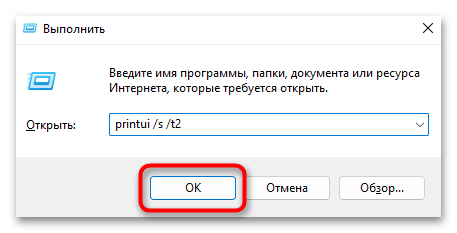
- Нажмите WIN+R, введите printui /s /t2 и нажмите ENTER.
- В новом окне удалите драйверы, связанные с принтером.
- Перезагрузите ПК и повторно установите принтер, следуя инструкциям производителя.
Метод 4: Настройка прав доступа к папке TEMP
Недостаточные права доступа к временной папке могут вызывать ошибки печати. Для проверки и настройки прав:
- Перейдите в папку C:\Windows\Temp.
- Кликните ПКМ на папку «Temp» и выберите «Свойства».
- Перейдите на вкладку «Безопасность» и убедитесь, что у вашей учетной записи есть полный доступ. Если нет, нажмите «Изменить» и установите необходимые права.
Все четыре вышеуказанных метода наверняка помогут в решении ошибки 0x00000bbb при печати.
Если у вас остались дополнительные вопросы, пожалуйста, задайте их в комментариях ниже.
Все способы:
- Способ 1: Запуск службы печати
- Способ 2: Очистка очереди печати
- Способ 3: Переустановка принтера
- Способ 4: Права на папку «TEMP»
- Вопросы и ответы: 0
Способ 1: Запуск службы печати
Чаще всего ошибка возникает из-за отсутствия прав доступа на временную папку печати, некорректной работы драйверов принтера, но может вызываться и сбоем в работе системного сервиса «Очередь печати».
- Откройте оснастку управления службами, для чего вызовите окошко быстрого выполнения команд нажатием сочетания клавиш Win + R и выполните в нем команду
services.msc. - Найдите в списке службу «Диспетчер печати» и убедитесь, что убедитесь, что она выполняется.
- В противном случае откройте ее свойства двойным кликом, тип запуска службы выставьте «Автоматически», нажмите кнопку «Запустить» и сохраните настройки.


Способ 2: Очистка очереди печати
Эффективное решение в отношении разных ошибок печати, в том числе ошибки создания задания печати. Заключается способ в принудительном удалении временных файлов заданий печати.
- Откройте оснастку управления службами как было показано выше, найдите в списке служб службу «Диспетчер печати» и остановите ее из контекстного меню.
- Перейдите в «Проводнике» по адресу
C:\Windows\System32\spool\PRINTERSи удалите из папки «PRINTERS» все файлы с расширениями SHD и SPL. - Вернитесь в оснастку «Службы» и запустите службу «Диспетчер печати».

Способ 3: Переустановка принтера
Если очистка очереди печати не помогла, удалите и заново установите устройство печати. Возможно, вам также потребуется удалить оставшиеся в системе драйверы и записи реестра принтера.
- Откройте приложение «Параметры», перейдите в раздел «Устройства» → «Принтеры и сканеры», выберите справа проблемный принтер и нажмите кнопку «Удалить устройство».
- Нажмите клавиши Win + R, введите в окошко «Выполнить» команду
printui /s /t2и нажмите «ОК». - В открывшемся окне «Свойства: Сервер печати» выделите одноименный драйвер удаленного принтера и нажмите кнопку «Удалить».
- Подтвердите действие в диалоговом окошке, выбрав опцию «Удалить драйвер и пакет драйвера».
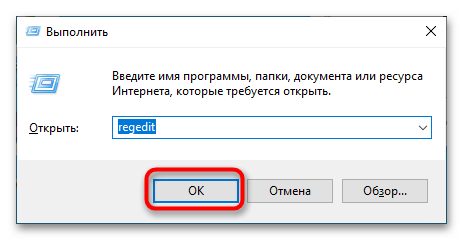
- Теперь откройте «Редактор реестра», для чего в окошке «Выполнить» введите команду
regeditи нажмите клавишу ввода. - В правой колонке окна редактора разверните ветку
HKLM\SYSTEM\CurrentControlSet\Control\Print\Printers, найдите в последнем подразделе (т. е. в «Printers») папку с названием вашего принтера и удалите ее. Если папка отсутствует, ничего предпринимать не нужно.


Выполнив эти действия, перезагрузите компьютер. Система автоматически обнаружит подключенный к компьютеру принтер и установит его.
Способ 4: Права на папку «TEMP»
Одной из распространенных причин ошибки «Не удалось создать задание печати» является отсутствие у пользователя полного доступа к системному временному каталогу «Temp». Соответственно, проблема решается получением на него прав полного доступа.
- Зайдите в папку
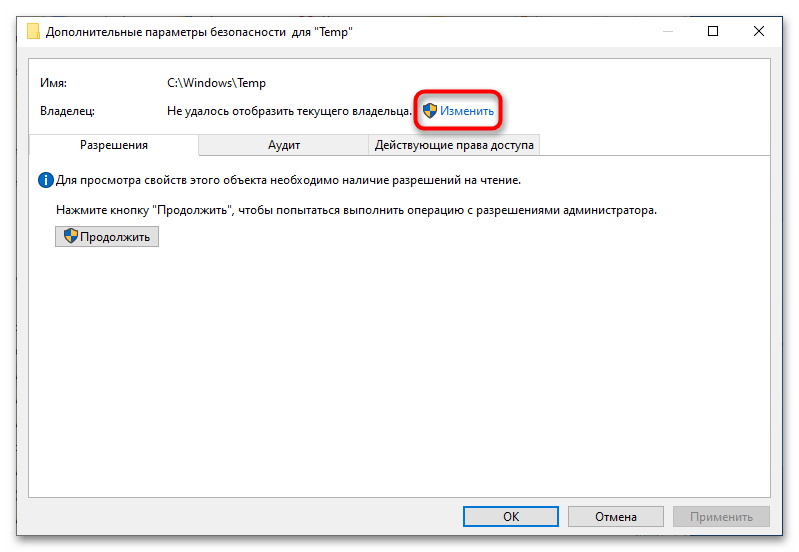
C:\Windows, найдите в ней каталог «Temp» и откройте его свойства из контекстного меню. - Переключитесь на вкладку «Безопасность» и нажмите кнопку «Дополнительно».
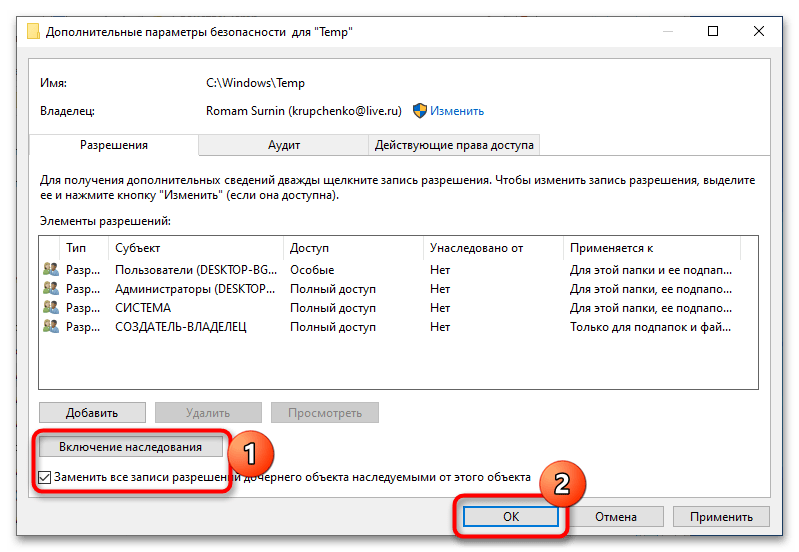
- В открывшемся окне дополнительных параметров безопасности кликните ссылку «Изменить» напротив имени текущего владельца (имя может не отображаться).
- Откроется диалоговое окошко выбора пользователя и групп, введите в нем ваше имя пользователя и нажмите «OK».
- В предыдущем окне установите флажок в чекбоксе «Заменить все записи разрешений дочернего объекта наследуемыми от этого объекта», нажмите «Включение наследования» и сохраните настройки.


Если у вас возникнут трудности с переопределением прав доступа, можете воспользоваться сторонними инструментами, например утилитой TakeOwnershipEx, скачав ее с сайта производителя.
Скачать TakeOwnershipEx с официального сайта
Пользоваться ей очень просто. Установив утилиту, запустите ее от имени администратора, нажмите в открывшемся окне «Получить права доступа» и укажите путь к папке «Temp».

В результате получите сообщение об успешном получении прав на каталог.
Наша группа в TelegramПолезные советы и помощь
Hi Sally,
Please try providing permissions to both the Temp folder and the Spool folder and check if that may help:
From the Control Panel (Category View) select User Account and then User Accounts again.
Thank a note of your exact user name as listed on the right pane.
- Right click the Start button and select Run.
- Type %temp% and press OK.
- Browse one level up.
- Right click the Temp folder and select Properties.
- Click the Security tab and then press on Advanced.
- Ensure your user name is the Owner, if any other user or group is shown take a note of its name, click on Change and type your user name, then on Check Names and OK.
- Check the box below the user name, then press Apply and OK.
- Click the Edit button and look if your user name is listed. if not click Add, type your user name, then on Check Names and OK.
- Check the box to Allow Full Control to the user, then press Apply, OK and confirm any prompt.
If the original Owner was System, please follow step 5 — 7 and set the owner back to original owner, then close any dialog.
Now try printing a test page and check.
If you see the same results, please browse to C:\Windows\System32\spool and repeat the same steps to the drivers folder.
Once again, be sure to set the owner back to System once you are done.
Hope that may help,
Shlomi
Click the Yes button to reply that the response was helpful or to say thanks.
If my post resolve your problem please mark it as an Accepted Solution
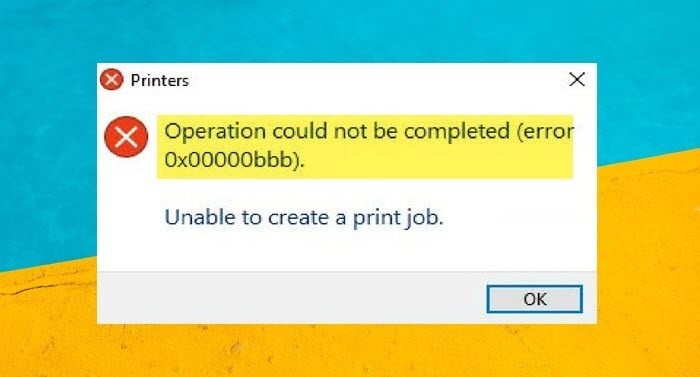
The 0x00000bbb printer error is a common issue experienced by users of Windows. When this error occurs, it usually prevents the user from creating a print job using an installed printer. This problem can be especially troublesome if you need to print something urgently.
Fortunately, there are some steps that you can take to fix the 0x00000bbb printer error and get your printing back up and running in no time. In this article, we will discuss how to fix 0x00000bbb printer errors in Windows. We will also cover several troubleshooting strategies that should help alleviate any issues you may have with your printer.
What Causes Printer Error 0x00000bbb
The 0x00000bbb printer error can be caused by a variety of issues. Some of the most common causes of this error include outdated printer drivers, incompatible printer settings, damaged system files, or a corrupted Windows registry.

Additionally, this issue may also be caused by incorrect printer configurations in the Print Settings menu. If any of these issues are present, then you may experience 0x00000bbb printer errors. Fortunately, most of these issues can be fixed with some simple troubleshooting steps.
1] Update Printer Drivers
The first step to resolving 0x00000bbb printer errors is to ensure that your computer has the latest version of your printer’s driver installed. This can usually be done by connecting your printer to the computer and then using Windows Update or Device Manager.
To do this, follow the below steps:
- Right-click on Start and select Device Manager.
- Locate your printer in the list of devices and right-click on it.

- Select Update driver and then follow the on-screen instructions.
2] Check For Windows Update
If updating the printer drivers doesn’t work, you should try to update Windows. Outdated or corrupt Windows components can cause 0x00000bbb printer errors, so updating your operating system should help address any issues related to this error message. Here’s how to do it:
- Open the Start menu and search for “Windows Update”

- Select Check for updates and then follow the on-screen instructions to install any available updates.
3] Run the Printer Troubleshooter
If updating your printer drivers or Windows doesn’t work, you should try running the Printer troubleshooter. This utility can help identify and resolve any 0x00000bbb printer errors that may be present on your system.
To do this, follow the below steps:
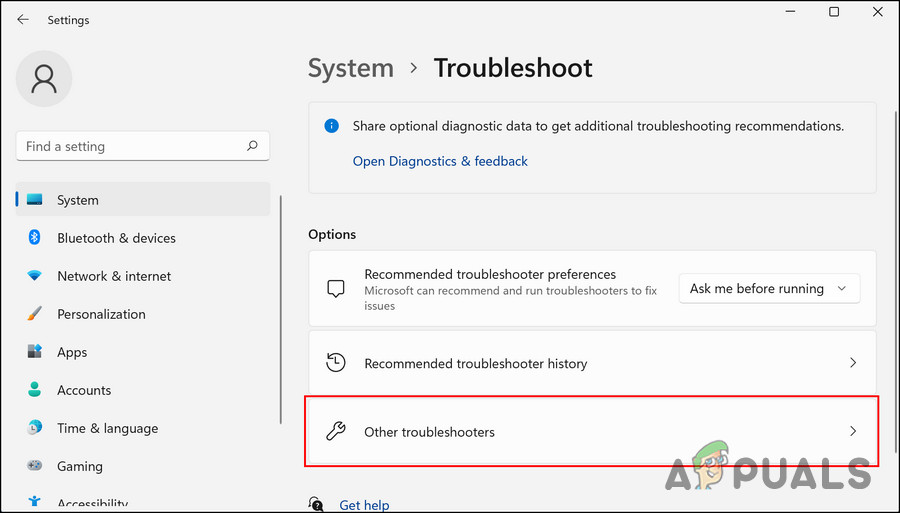
- Right-click on Start and select Settings.
- In the left-hand pane of the Settings menu, click System.
- Then select Troubleshoot > Other troubleshooters.

- Next, locate the Printer and click the Run button.
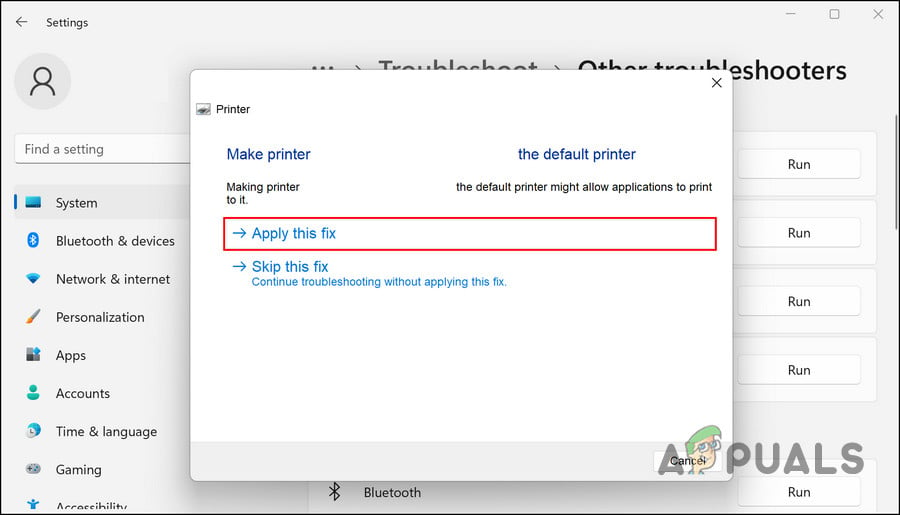
- Check the results after the troubleshooter finishes scanning.
Click on the Apply this fix button if the troubleshooter suggests solutions. If not, close the window and try the next solution.
4] Restart the Print Spooler Services
If the 0x00000bbb error still persists, then restarting the Print Spooler services might be of help. To do so, follow the below steps:
- Press the Windows + R keyboard shortcut to open the Run box.
- Type “services.msc” in the text box and press Enter.
- Scroll down and locate the Print Spooler service.

- Right-click the service and select Restart.
Once done, close the Services window and check if the 0x00000bbb error is resolved.
5] Reinstall Your Printer
If restarting the Print Spooler services did not help, then there may be a problem with the printer driver or its settings. To resolve the 0x00000bbb error, in this case, you can try reinstalling the printer. Here’s how to do this:
- Click on Start and search for “Control Panel”.
- Select the result from the top of the list.
- Once you open the Control Panel, set it to Category View.
- Now click Hardware and Sound > Devices and Printers.
- Then right-click on your printer icon and select Remove device.
- If a UAC dialog box appears, click Yes to grant access.
Having done this, you must now uninstall your device from Device Manager and remove it from Control Panel. Here’s how to do it.
- Right-click on Start and select Device Manager.
- Expand the Print queues section and right-click the faulty printer.
- Select Uninstall device from the context menu.
- After that, reopen Control Panel.
- Then navigate to Programs > Uninstall a program.
- Right-click the printer application and select Uninstall. In the same way, uninstall all printers.
- Once that’s done, disconnect the printer and restart your PC.
- Reconnect the printer after rebooting.
- Open the Control Panel again.
- Then go to Hardware and Sound > Devices and Printers.
- Finally, right-click on your printer and choose Set as default from the context menu.
Frequently Asked Questions
How can I add a printer to my Windows PC?
To add a printer to your Windows PC, open the Control Panel and click on the Devices and Printers icon. Click on Add a Printer, select either Local printer or Network printer, and follow the instructions that appear on your screen.
How can I set up a printer on my Windows PC?
To set up a printer on your Windows PC, connect the printer to your computer either directly or through a network connection. Install the driver software for your printer and configure the settings as desired. Once everything is set up, you will be able to print documents from your computer.
How do I change my printer settings in Windows?
To change the printer settings on your Windows PC, open the Control Panel and click on Devices and Printers. Right-click on the printer you want to modify and select Printer Properties. From here, you can adjust the paper size, resolution, color mode, and other settings.
What are the common printer problems in Windows?
Common printer problems in Windows include slow printing, error messages, paper jams, poor print quality, and more. These issues can usually be resolved by checking the connections and ensuring that you have the latest version of the driver installed on your computer. Additionally, you may need to clean the printer head or replace a cartridge.
How can I troubleshoot my printer problems in Windows?
To troubleshoot printer problems in Windows, start by checking the connections and making sure that your printer is properly set up. Next, ensure that you have the latest version of the driver installed. If these steps do not work, try cleaning the printer head or replacing any empty cartridges. Additionally, you may need to reset the printer or reinstall the driver software.
Read Next: How to Fix Printer Error 0x00000040 in Windows 11
The printer error 0x00000bbb occurs when the users try to create a print job in Windows using an installed printer. Apparently, this issue occurs with certain printers when Windows fails to recognize them.
The problem is typically caused by corrupt updates and corruption issues within the system. Below, we have discussed several ways of fixing this problem once and for all.
1. Run the Printer Troubleshooter
In case of facing any printer-related issues on your Windows computer, the first thing that you should do is run the printer troubleshooter. This utility can be found in the Settings app and works by scanning the system for printer-related issues.
Here is how you can run the printer troubleshooter:
- Press the Win + I keys together to open Windows Settings.
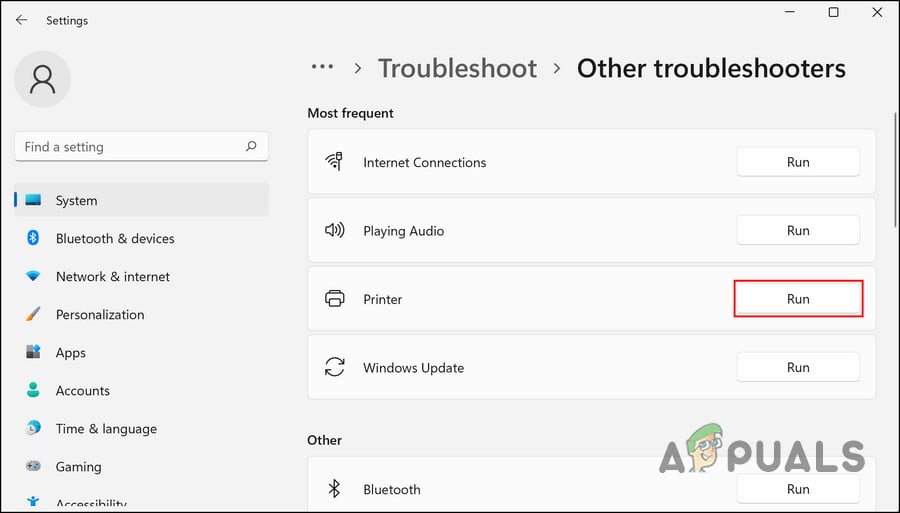
- Navigate to System > Troubleshoot > Other troubleshooters.

Click on the Other troubleshooters option - Now, locate the Printer troubleshooter and click on the Run button associated with it.
Run the printer troubleshooter - Wait for the troubleshooter to complete its scan and then check the results.
- If the troubleshooter suggests you solutions, click on Apply this fix. Otherwise, click on Close the troubleshooter and move to the next method below.

Apply the fixes by the troubleshooter
2. Add New Port on Problematic Printer
The problem can also occur with the port Windows is trying to use. If this scenario is applicable, then creating a new port and directing Windows to it will fix the problem.
Here is how you can do that:
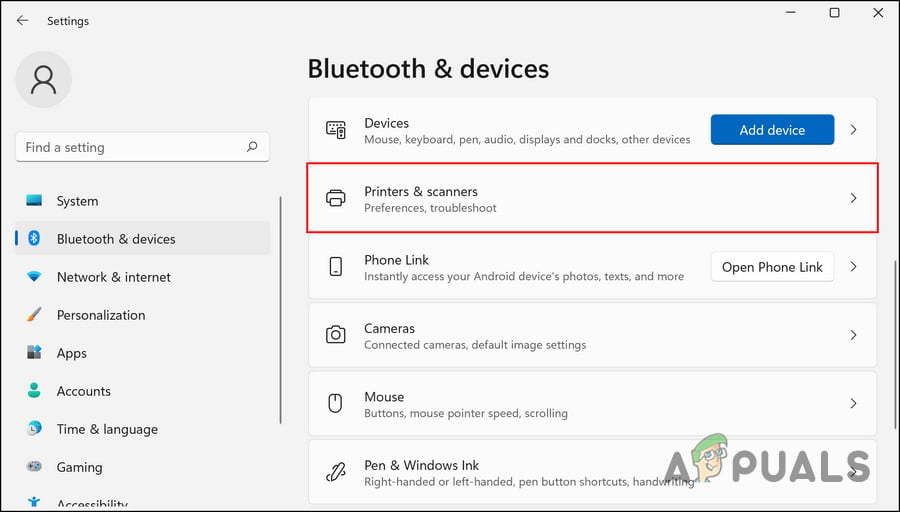
- Press the Win + I keys to open Windows Settings.
- Navigate to Bluetooth & devices > Printers & scanners

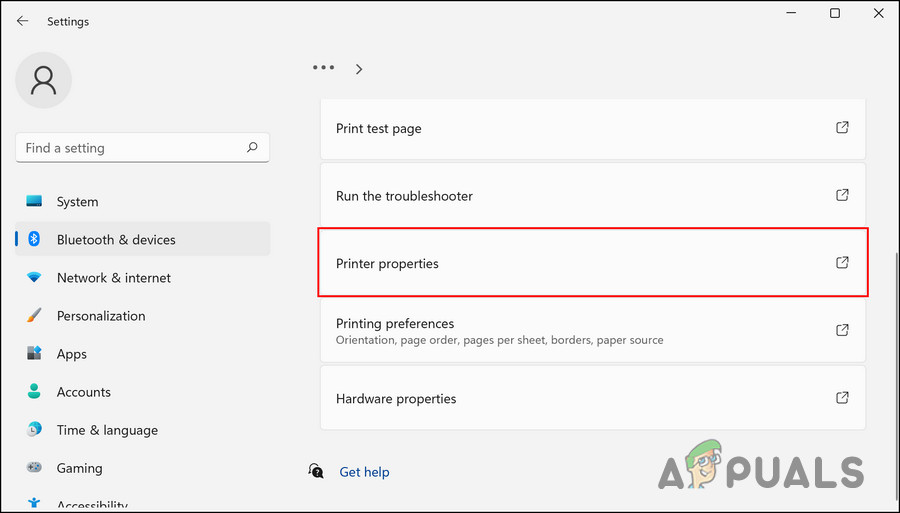
Access the Printers & scanners option - Now, select the problematic printer and click on Printer properties in the next window.
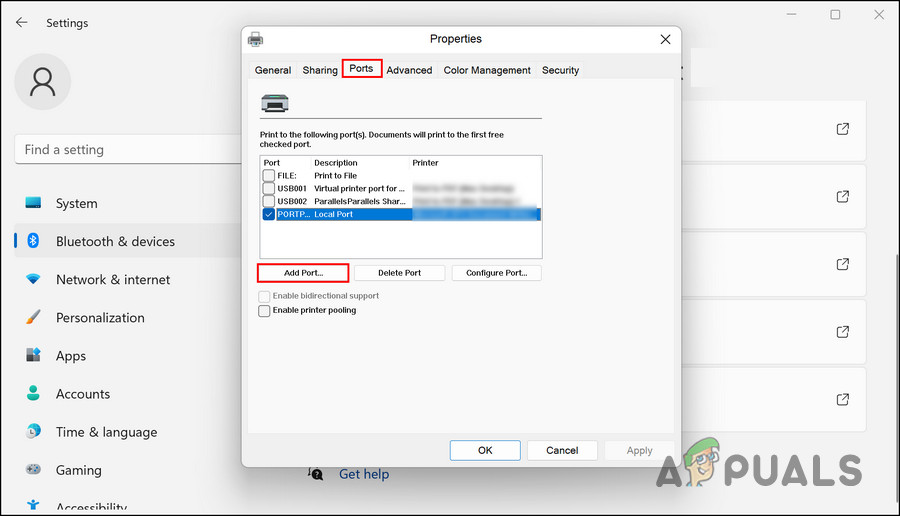
Click on the Printer properties - Head over to the Ports tab and click on Add Port.

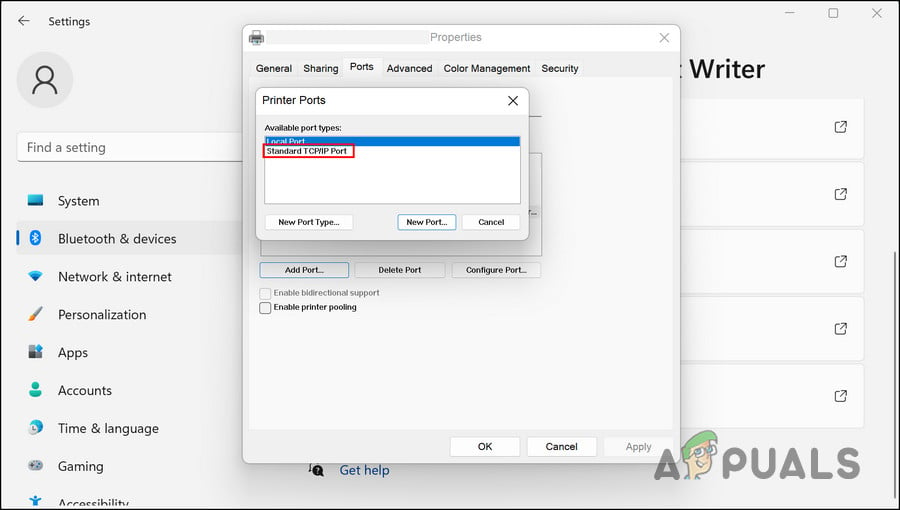
Click on the Add port button - Select the Standard TCP/IP port and add the IP address of your printer.

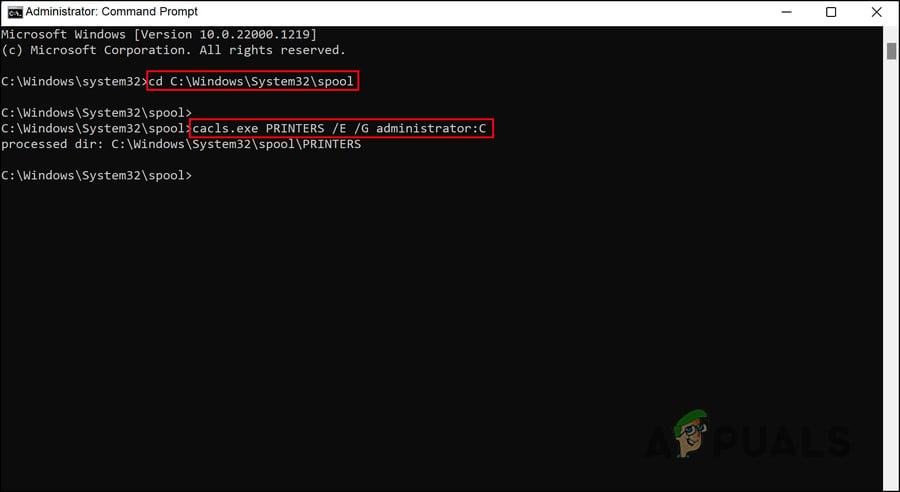
Choose the Standard printer port - Once done, press the Win + R keys together to open a Run dialog.
- Type cmd in the text field of Run and press the Ctrl + Shift + Enter keys together.
- Click Yes in the User Account Control prompt.
- Type the following commands in the Command Prompt one by one and hit Enter after each to execute them.
cd C:\Windows\System32\spool
cacls.exe PRINTERS /E /G administrator:C

Execute the entered commands - Once done, restart your computer and check if the issue is resolved.
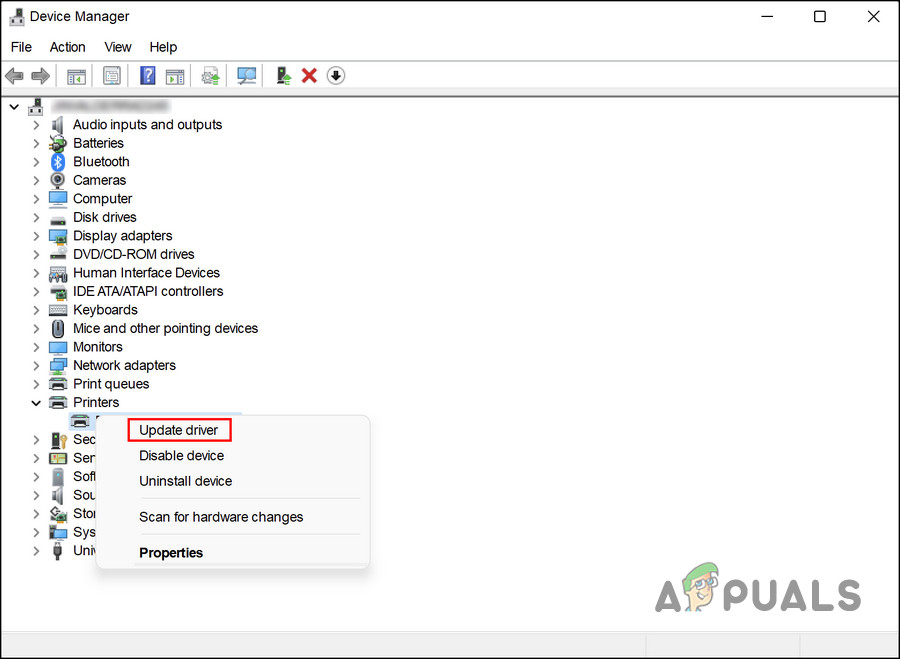
3. Update the Printer Driver
Your printer driver might be outdated or corrupt, causing your system to be incompatible with your printer. In this case, updating the printer driver can fix the problem.
Here is how you can update your printer driver on Windows:
- Press Win + R to open a Run dialog.
- Type devmgmt.msc in the text field and click Enter.
- In the Device Manager window, locate the Printers section and expand it.
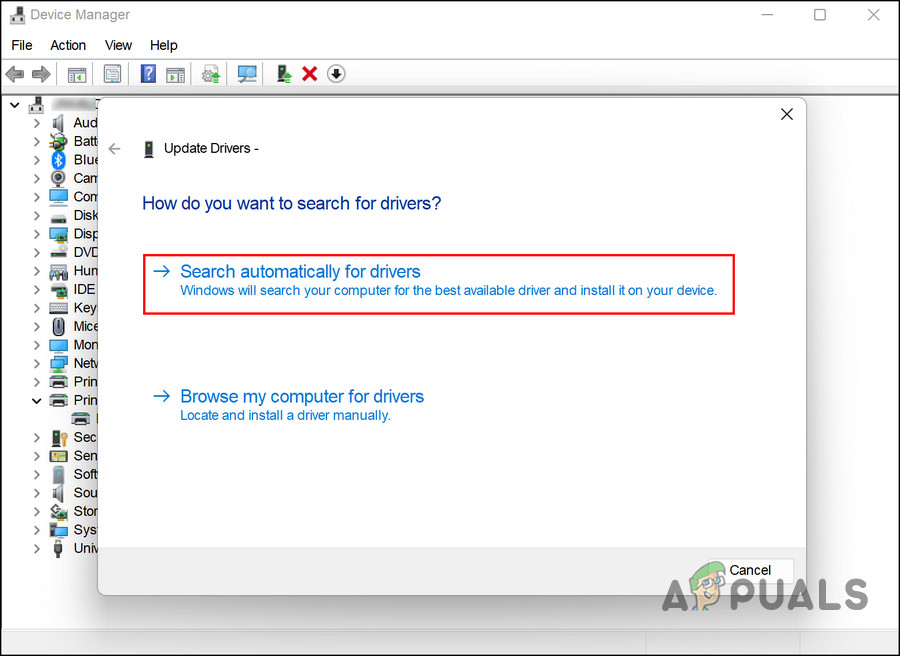
- Right-click the targeted driver and choose Update driver.

Click on the Update driver button - Then click on Search automatically for drivers and follow the instructions to install the updates.

Let the Device Manager search for updated drivers - Once done, restart your computer and check if the issue is resolved.
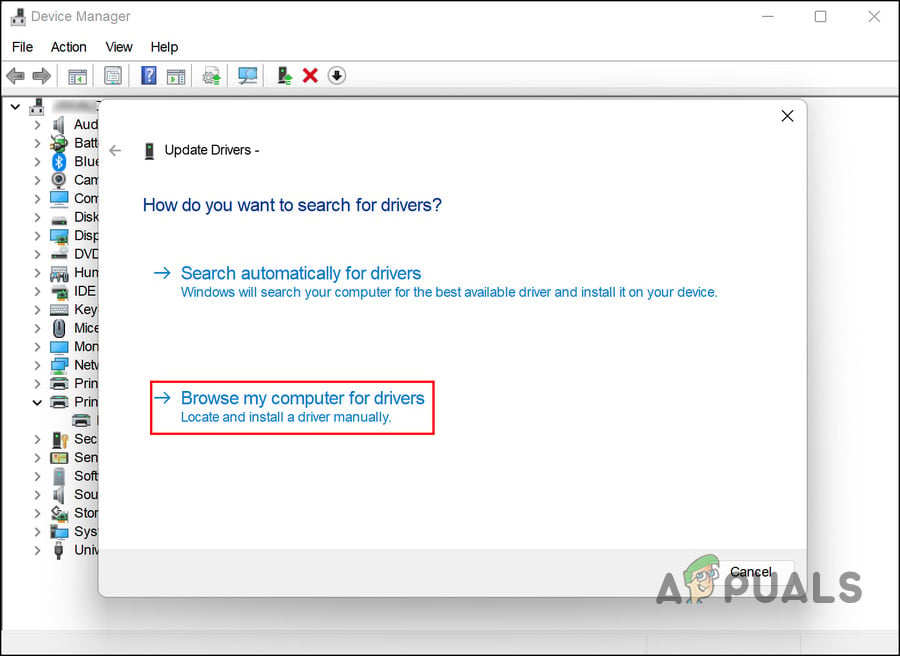
Manually updating the driver is also an option if the system cannot find any updates. In this case, follow these steps:
- Go to your printer manufacturer’s website in your default browser.
- There you will find the latest version of the printer driver. Download and install it.
- Once done, expand the Printers section in Device Manager.
- Right-click on the problematic printer and choose Update driver.
- Select Browse my computer for drivers in the next window.
Click on the Browse my computer for drivers - Go to the folder where you installed the latest driver software and select it.
- Once the update process has completed, check if the error has been resolved.
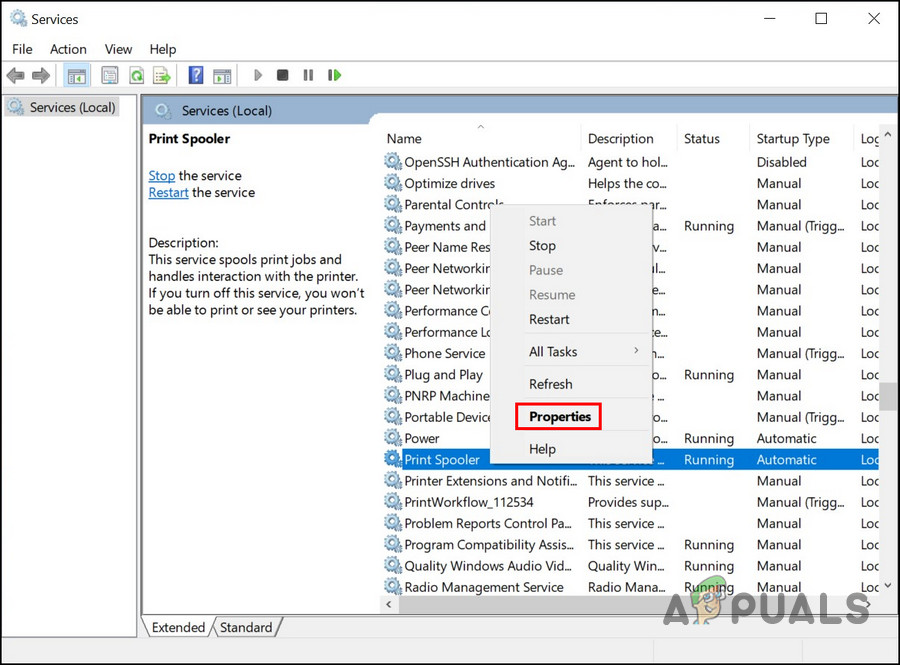
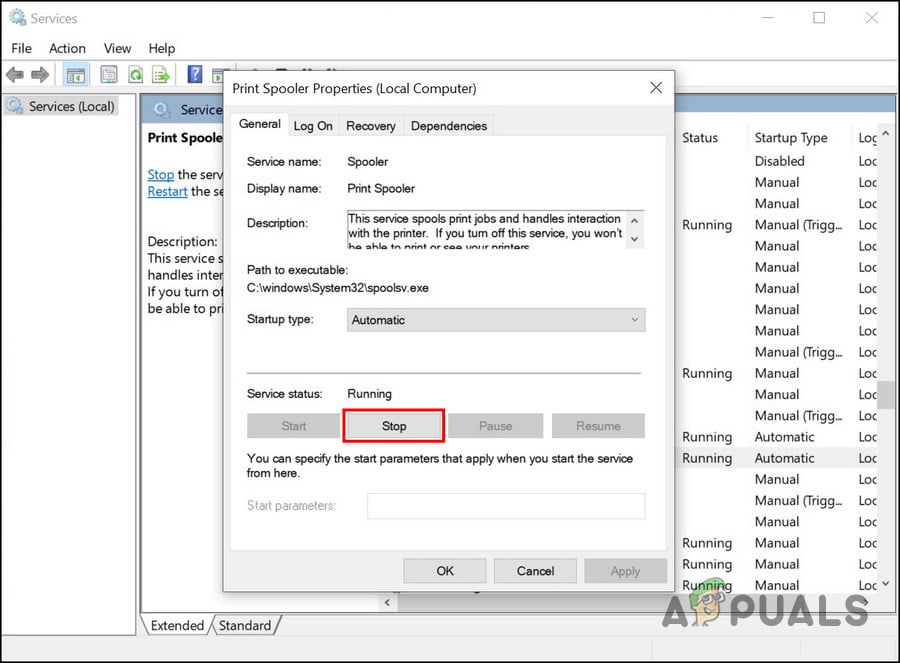
4. Restart the Print Spooler Services
In order for the printer to work properly, the print spooler service must be running properly, and if it is not, problems like this will be encountered. It is usually possible to fix the problem by restarting the service.
Here is how you can restart the print spooler service:
- Press Win + R together to open Run.
- Type services.msc in Run and hit Enter.
- Right-click the Print Spooler service in the Services window.
- Choose Properties from the context menu.

Click on the Properties option - If the service is disabled, click the Start button.
- In case the service is already running, click on the Stop button, wait for a few seconds, and then click Start again.

Click on the Stop button - Select Automatic from the Startup type dropdown.
- Click on Apply > OK to save the changes.
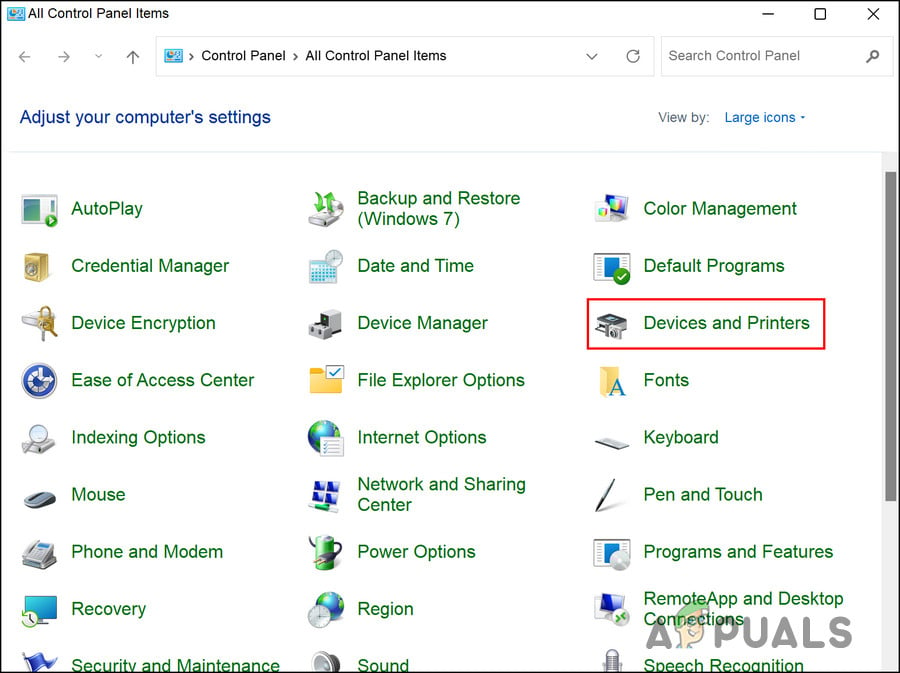
5. Reinstall Your Printer
If all else fails, uninstall the printer driver and then reconnect the printer after removing it from the system and the device. Windows will automatically install the default printer driver when you connect your printer to the PC, hopefully resolving the error.
Follow these steps to proceed:
- Press the Win + R keys to open Run.
- Type control in the text field of Run and click Enter.
- Expand the View by dropdown in the Control Panel window and choose Large icons.

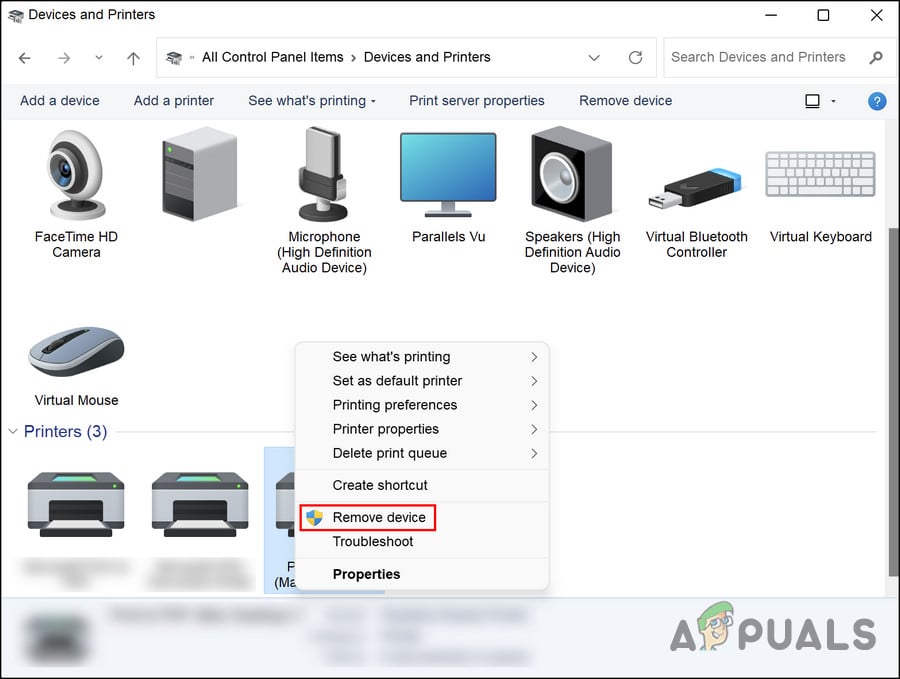
Click on the Large icons option - Select Devices and Printers from the menu. Here you will find a list of all the printers installed on your computer.

Click on the Devices and Printers option - Simply right-click the faulty printer and select Remove device.

Click on the Remove device button - If a UAC prompt pops up, click on Yes.
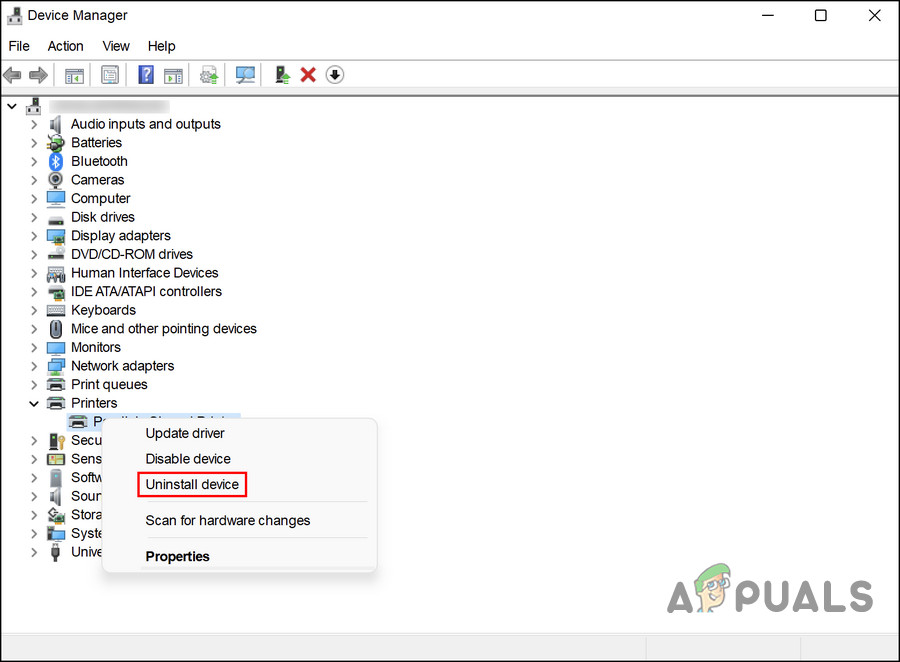
- Once done, type Device Manager in Windows search and click Open.
- Look for the Print queues section, expand it, and right-click on the faulty printer.
- In the context menu, select Uninstall device.

Choose the Uninstall device option - Now, launch Control Panel again.
- Head over to Uninstall a program under Programs.
- Right-click on all printer applications and select Uninstall.
Uninstall the printer - Then, disconnect the printer from the device and restart your computer.
- Upon reboot, connect the printer again.
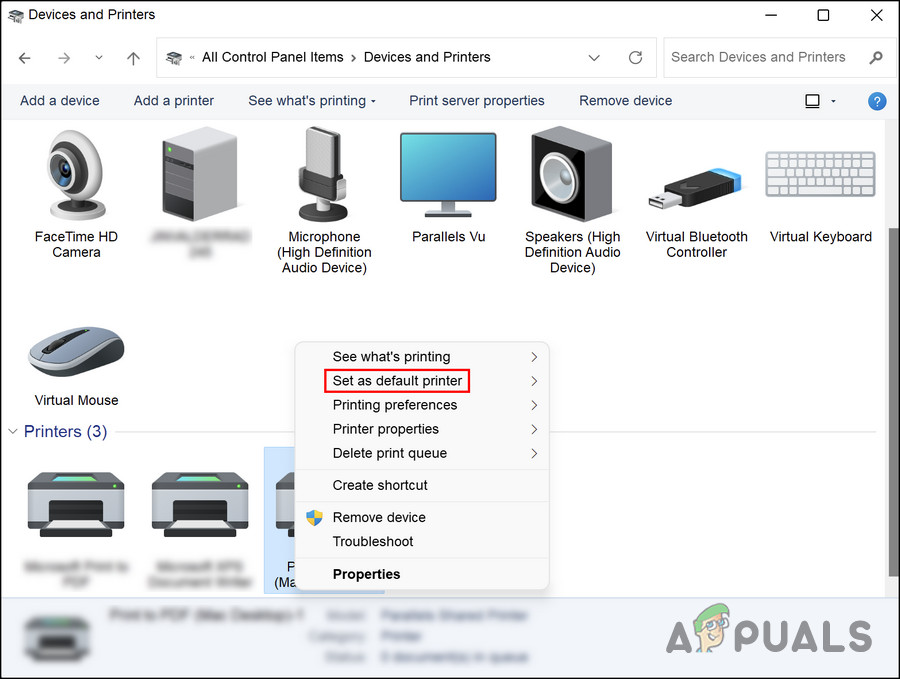
- Finally, head over to the Devices and Printers section again in the Control Panel.
- Locate your printer, right-click on it and select Set as default printer from the context menu.
Click on the Set as default printer button

Hopefully, this should fix the problem once and for all.
Zainab Falak
Zainab Falak is a highly educated professional with a background in actuarial science and a strong passion for technology. Her expertise lies in the field of data analytics and she is a proficient programmer in languages such as Python and R. At Appuals, Zainab shares her extensive knowledge of Windows 8, 10, and 11, covering a broad range of topics related to these operating systems. Zainab’s ability to effectively communicate technical concepts in a clear and concise manner has earned her recognition and respect in the tech community. She is committed to staying up-to-date with the latest developments in the field and providing readers with insightful and informative content.